In this Information Technology era it is very difficult even for shoe workshops to compete for clients without presence on the Internet. Nonetheless not every business decides to build the web site on its own. Web studios are expensive but there is a solution.
Why WordPress?
According to Web Technology Surveys WordPress is the most popular content management system (CMS). 31.7% of the total number of existing sites, as well as 60.1% of sites which use CMS as of 1st of July 2018 work on this engine. Key reasons for this status of the WordPress:
- Free engine. CMS WordPress extends according to the open license agreement. You can freely use this product in any purposes including commercial.
- Almost unlimited opportunities. By means of WordPress you are able to build an e-commerce shop, the personal blog, the corporate website, an information portal, an industry resource, a multimedia gallery.
You say WordPress is suitable only for the personal blogs? You are much mistaken. WordPress is used by The New Yorker, Reuters, TechCrunch, US Republican Party, Fortune and many other large media, corporations and the organizations. Hell, it’s even appreciated by Rolling Stones and Snoop Dogg.
- Flexible appearance customization and functionality. Paid and free themes are available to the WordPress sites’ owners making it possible to customize an external resource. And with the help of 56K+ plugins you might resolve technical issues and deliver essential functionality of the site.
- Easy admin. You don’t need specific knowledge in order to work via WordPress. Principles of working with the platform are understandable on an intuitive level – user-friendly.
- An opportunity to build a website and publish the first content within 5 minutes. Of course, you will have to spend much more time to turn a sample product into something new and interesting. But on the first publication you will spend no more than 5 minutes.
Well, have you decided to make a WordPress website? Then proceed to our step-by-step guide.
Step # 1: How to Choose a Hosting and Register a Domain
If you have a noncommercial project better choose a free hosting. For example, to share photos of cats with the world or keep the diary of the young bodybuilder is possible on the WordPress platform. The address of your website will look something like: example.wordpress.com. If you are bringing the commercial project into life, for example, create the thematic blog, the corporate website or you plan to earn by means of a resource by any method, select a paid hosting.
Don’t stuff your head with a research and the comparing of a technical characteristics of the hosting – the size of a disk space, loading speed, etc. Trust us, in the first months, and even years of existence of the website for standard operation there are enough opportunities which are provided by an average hosting. Therefore, address the sales department of the reliable company which provides hosting service, describe your needs and choose a suitable tariff plan by means of the consultant. To select reliable hosting provider, study ratings and reviews. You are always more than welcome to read our especially hand-picked thorough review on choosing the right WordPress website hosting. We’ll be very glad to help and you’ll appreciate it as well.
The hosting will also help you to register the domain. It is enough to think of a domain name, make sure that it’s free and to pay for the registration.
The following recommendations will help you to select successful domain name:
- Select domain name, partially or completely matching the name of the website. In our case let’s make it example.com.
- Use the shortest domain name possible. It’s difficult to owners of smartphones to enter the long address into a line of the browser. Therefore it’s better to use the ex.com name.
- Make sure that the chosen website address easily remembered and it makes sense.
The choice of a domain zone doesn’t influence technical characteristics of a resource or search results output. However theoretically this parameter can influence trust of audience. And also users trust the websites with the address such asexample.com or example.net more willingly, than to example.wordpress.com or example.blogspot.com. Accordingly, for commercial projects try to choose domains of the top level, for example, of .com, .info, .org, .net, .ua, .by, etc. Pay attention to the domains of the first level which appeared recently, for example, .club, .guru, .ninja, .expert and others.
Step # 2: How to Install WordPress
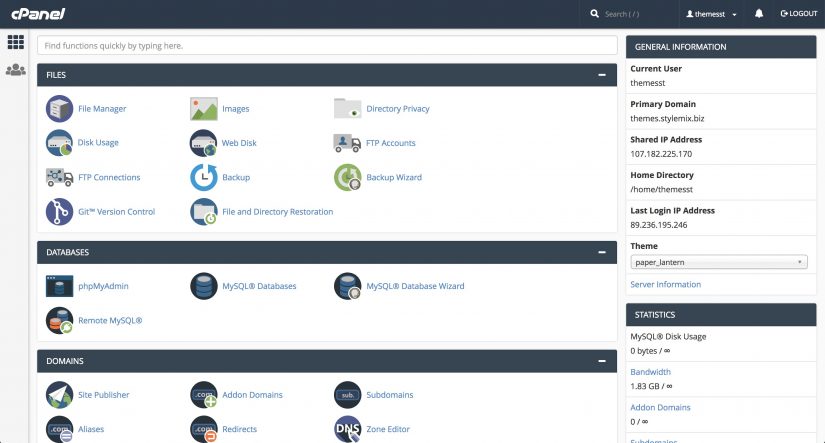
After the purchase of a hosting and registration of a domain name the cPanel would be provided:
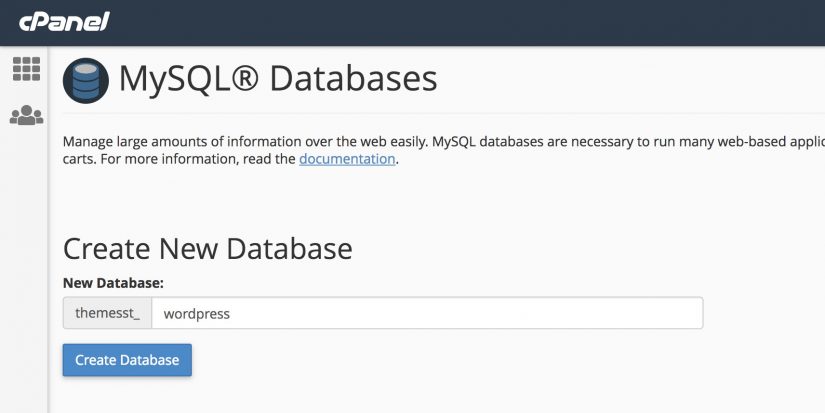
Proceed to the MySQL Database, please, and create new database:
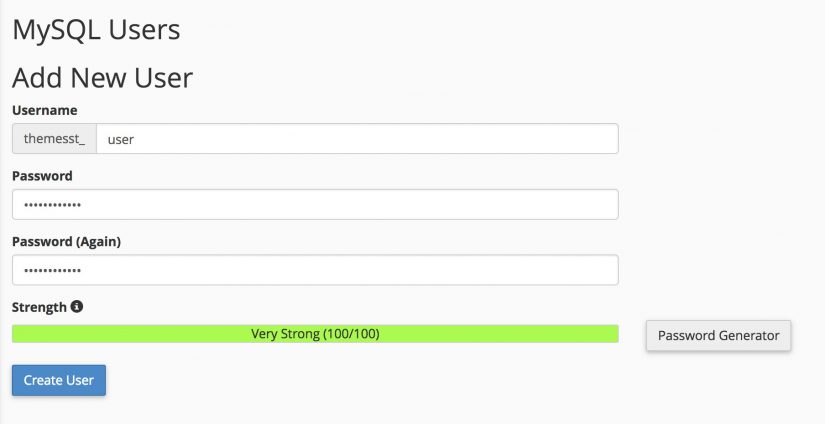
Add New User by typing in the Username and generate a strong password:
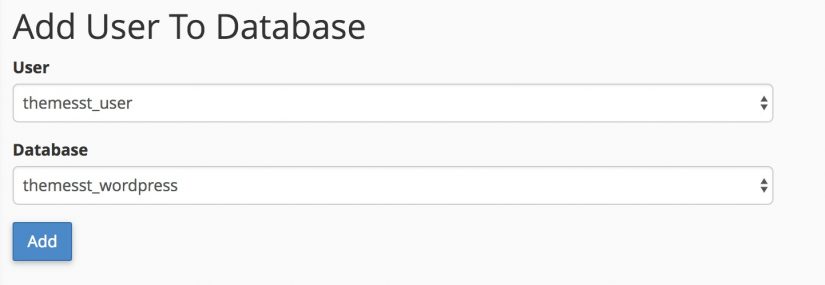
Add User to Database:
To Manage User Privileges, select ALL PRIVILEGES:
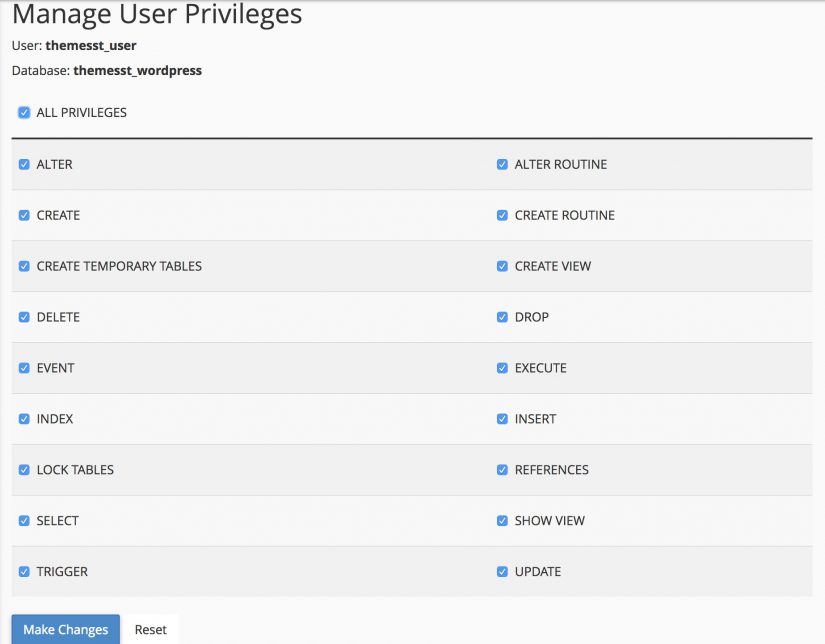
And then go no and proceed to the File Manager in the cPanel’s menu:
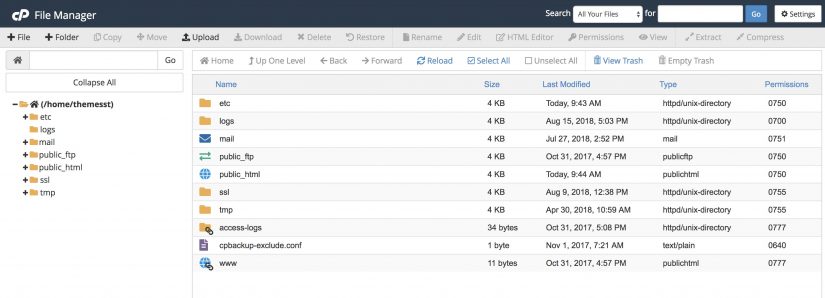
Follow the public_html folder:

Go to the WordPress site and download the distribution:
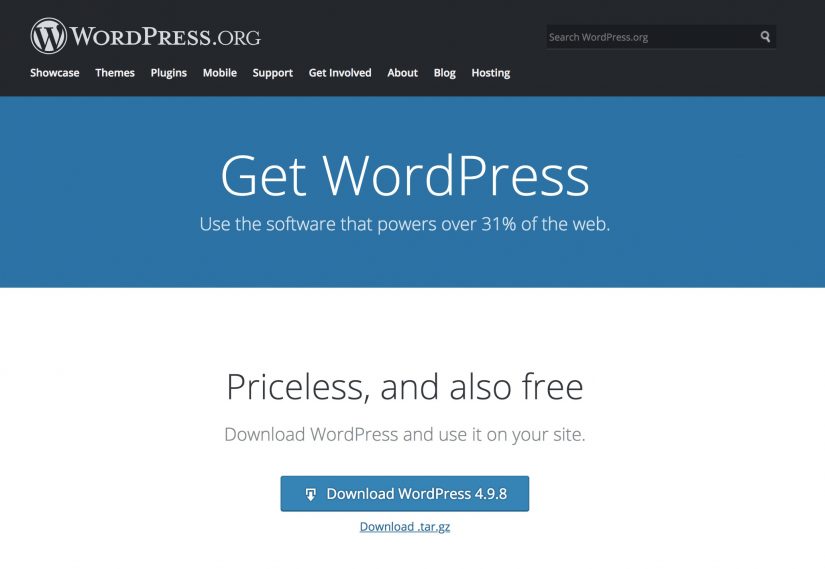
Then Upload:

Select WordPress ZIP file you need to upload:
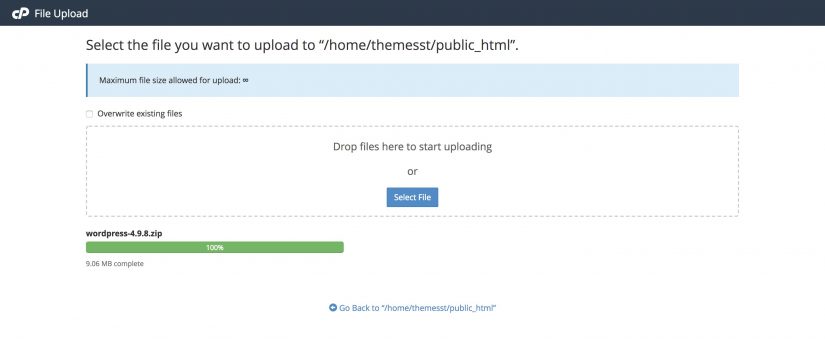
And Extract it:
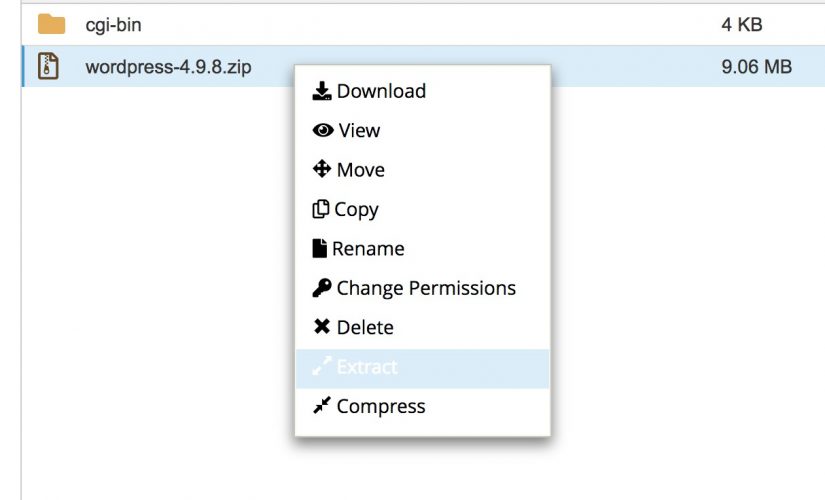
After Extract:

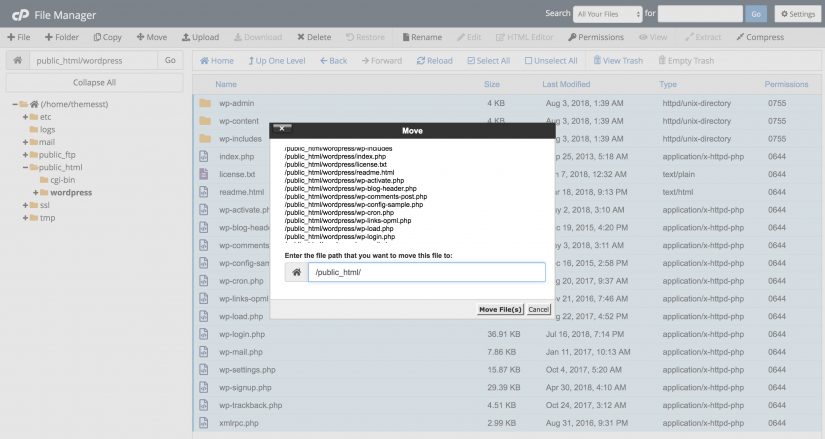
Move that file to the desired path:
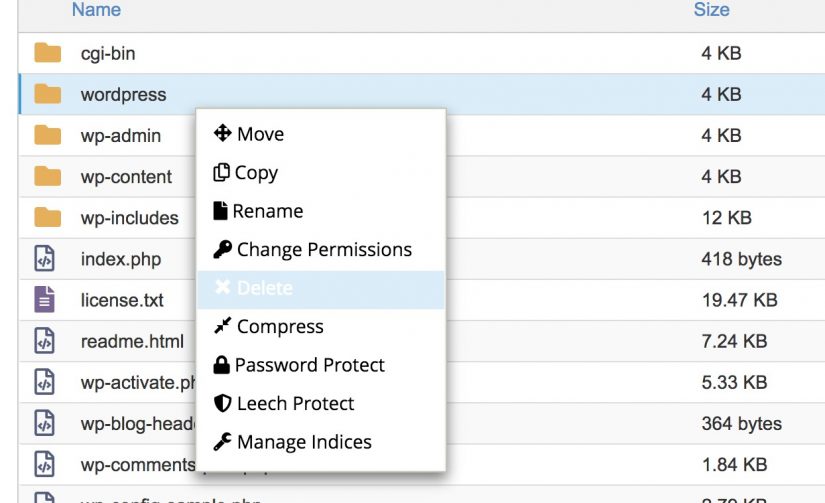
Delete the WordPress folder:
Rename wp-config-sample:

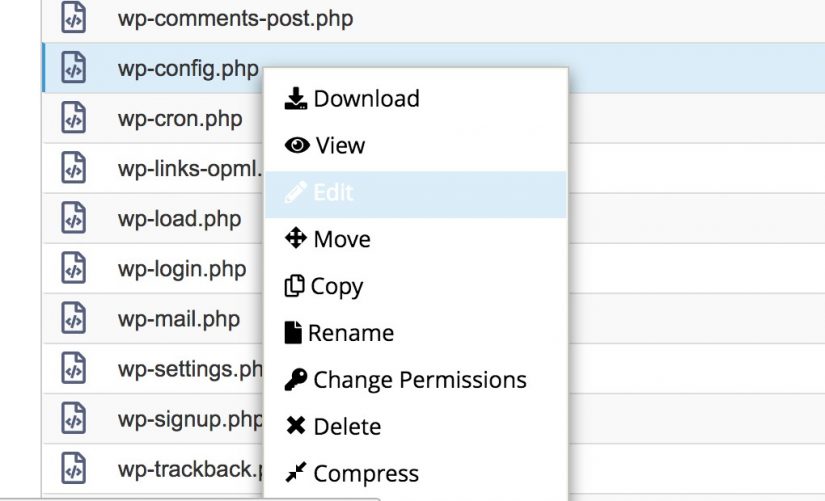
Edit wp-config.php file:
Fill up the DataBase credentials:

Open the WordPress website choosing the language:
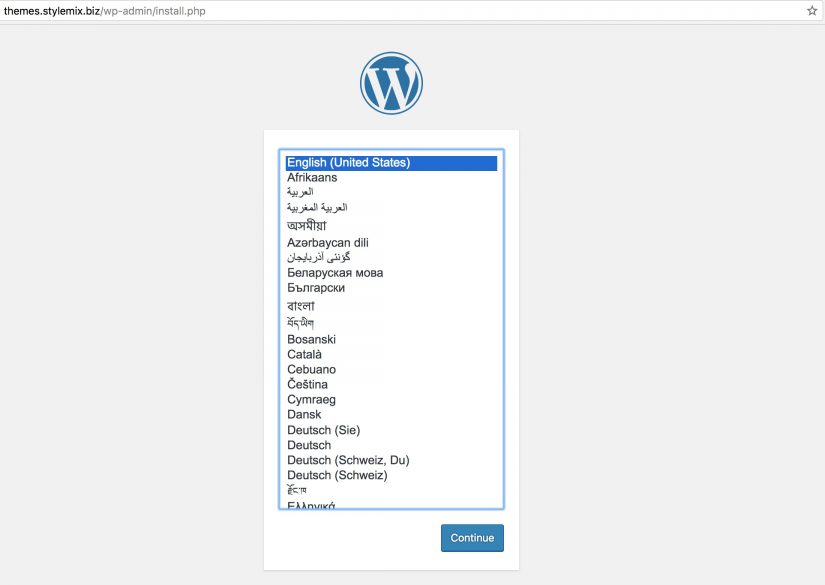
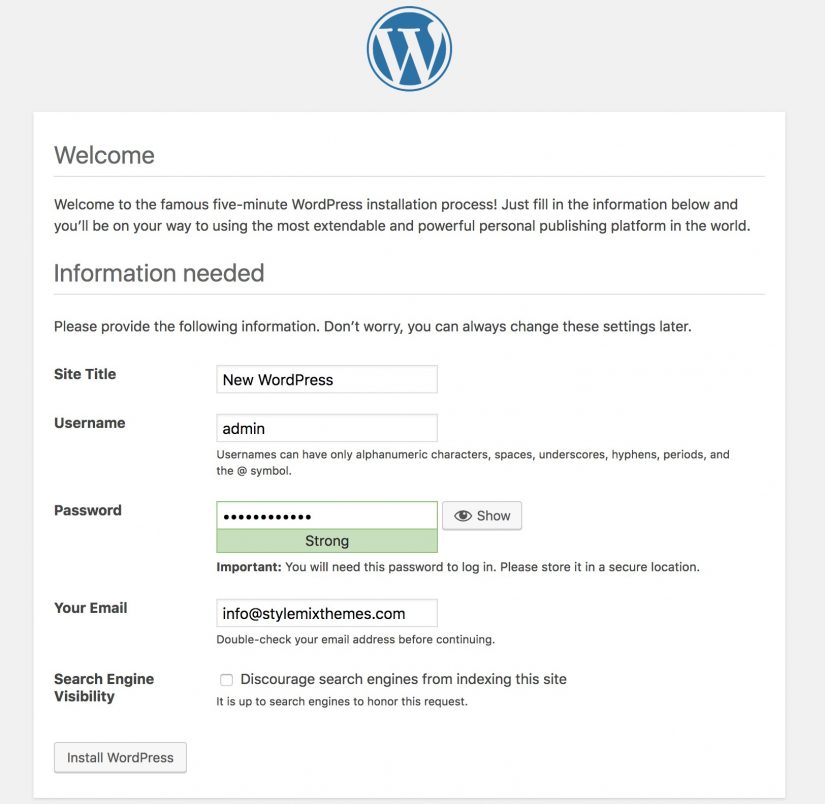
Install WordPress.
Fill out the necessary information: specify the Site Title, Username, Password, Your E-mail. Specify whether search engines can index this site.
If you did everything right, you will see the following message:
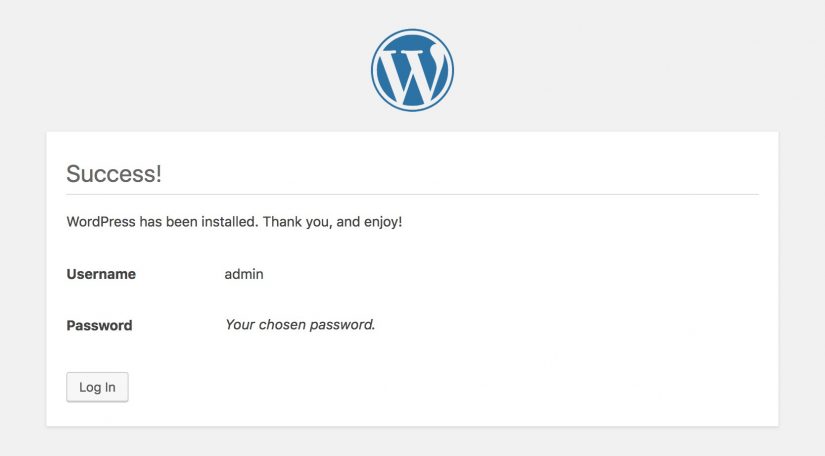
Bingo!
Now you can Login the dashboard and start setting up the WordPress website.
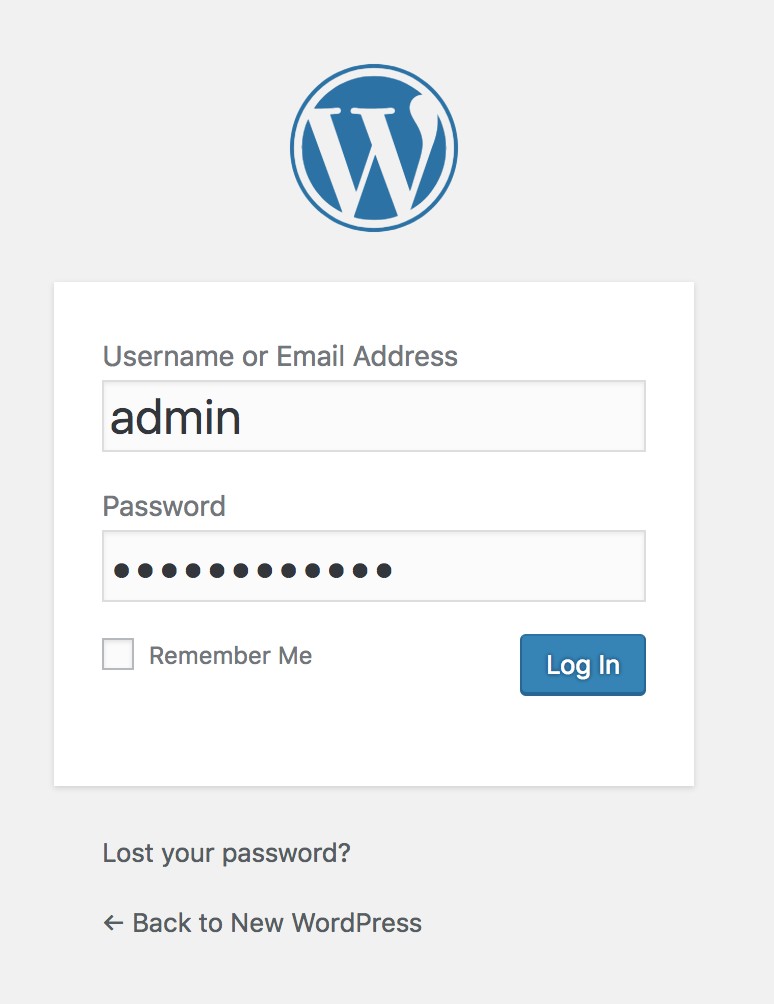
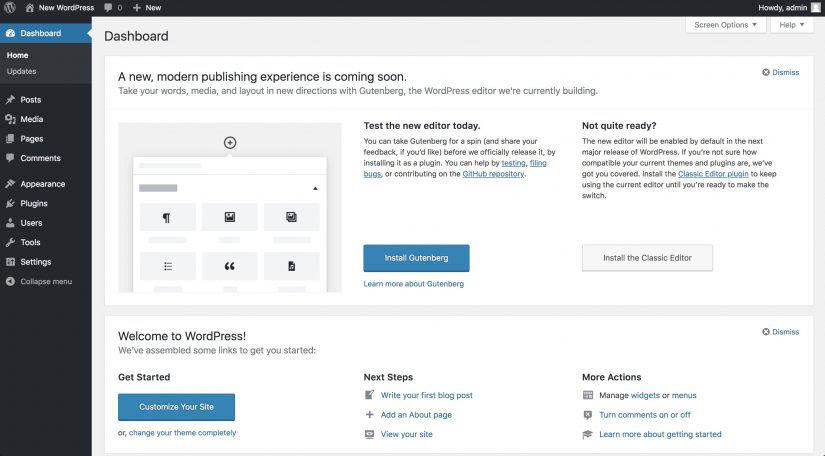
Step # 3: Choose a Suitable WordPress Theme
WordPress Theme is responsible for the appearance and functionality of your site. In other words, with the help of a theme you can customize the site on a WordPress platform. The following questions and answers will help you choose the right one:
- Which theme to choose? For sure in the 21st century it should and must be responsive! If you do not plan to create a mobile version of the site separately, be sure to choose a template with a responsive layout. With the help of our guide on accelerated mobile pages, your site will become mobile-friendly and will not suffer as a result of any mobile Armageddon.
- Is it better to choose a free or paid theme? If you are just starting to work with WordPress, it’s best to select a paid one. 15 tips for a begginer which we are providing you with will be very useful. Developers of paid themes always update them regularly and provide support almost 24/7. In addition, paid templates are used less often. Purchasing a premium theme, you reduce the likelihood of making a template site. But we nevertheless have a handy collection of most creative free WordPress themes for your kind review.
Searching for a Theme
There are thousands of awesome, professionally designed themes you can choose from and customize for a site that’s all your own. And many marketplaces where you can find large collections of WordPress themes. We recommend ThemeForest as one of the best. It is very easy and convenient to search for WordPress themes by category.
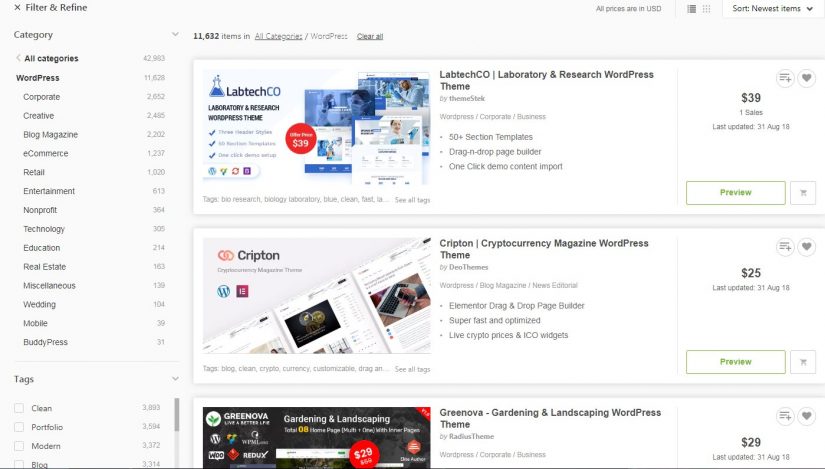
And here you can filter and refine by category, tags, price, sales, rating, date added, software version and compatibility.
But we already took care and created collections for your convenience depending on your focus. If you look through our portfolio WordPress themes you’ll find an incredible collection of the best ones for photographers, travelers, creative professionals, digital designers, illustrators, and anyone who wants to show their high-quality work in the most original way. When raising up an impressive and innovative business you just might want to take a glance at creative business WordPress themes. Also corporate and business WordPress themes specially designed to target a commercial project. But when you are dealing with ICO and Cryptocurrency that’s the whole other story.
In order to check out the theme which you’ve liked in action it has to be installed. You can do it this simple way:
Download it from the developer’s site.
At the sidepanel select the menu “Appearance – Themes”.
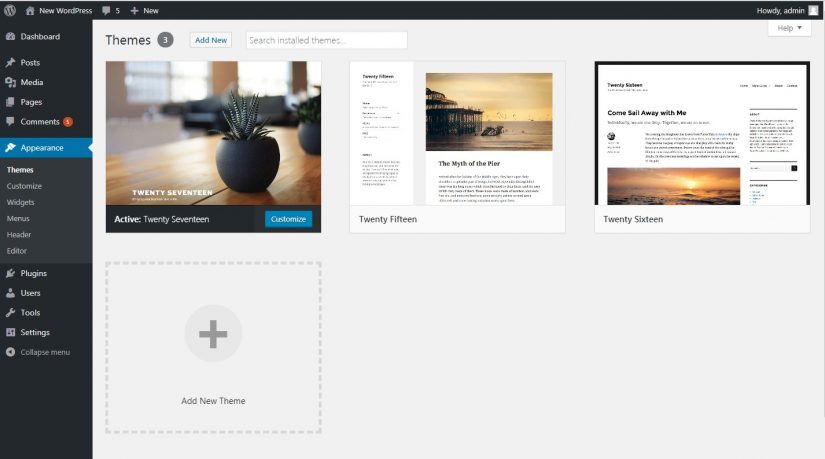
And click Add New button in blue print.
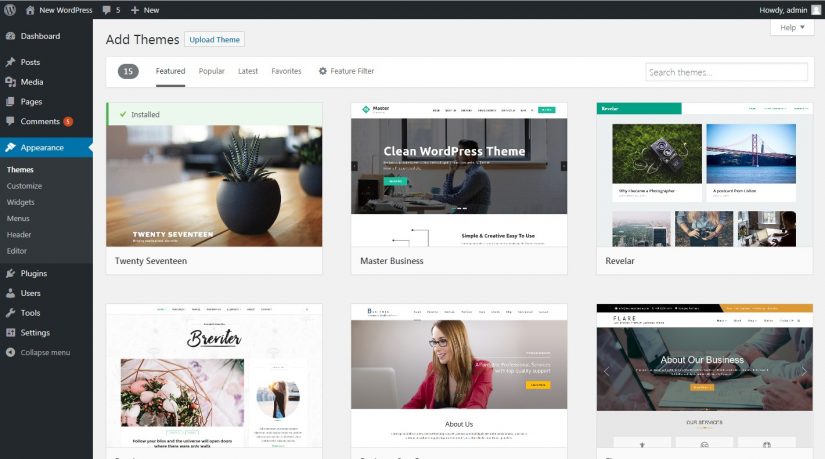
Upload a theme which you’ve chosen on the market – we’ve made it Pearl – a unique one as an example.
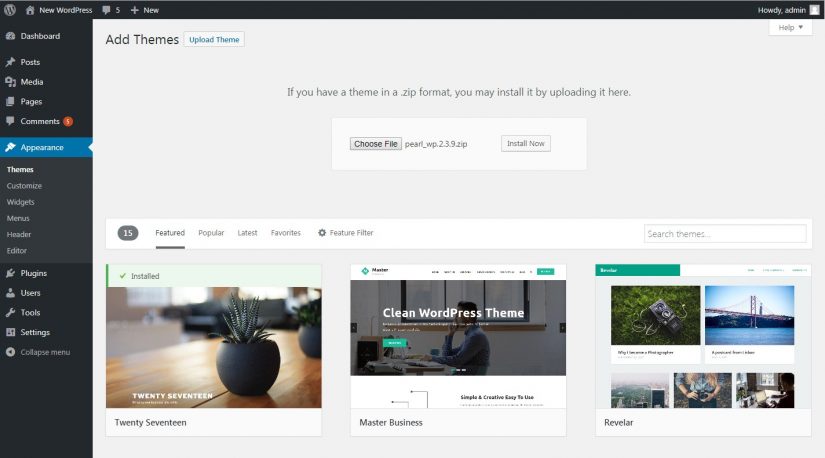
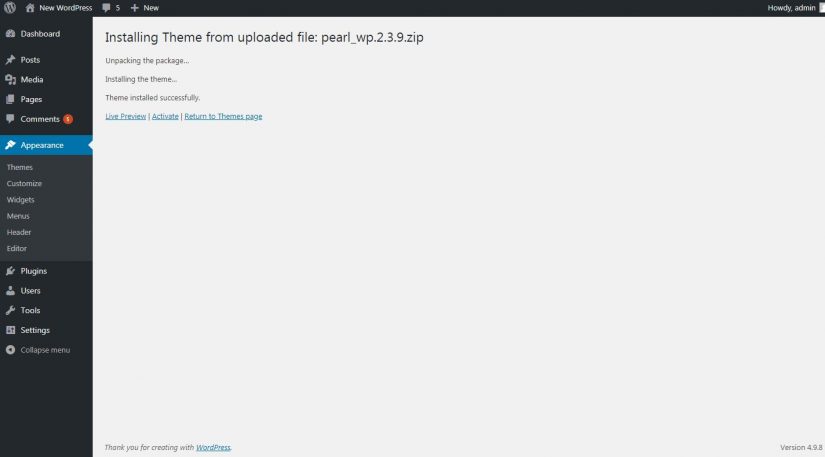
Install it and activate
Step # 4: How to Set Up a WordPress Website CMS and a Theme
At this point, you need to pay attention to the basic settings of the content management system which are open without installing extra plugins. Likewise, you must set up a theme. Please note that the theme settings are different.
WordPress CMS Setup
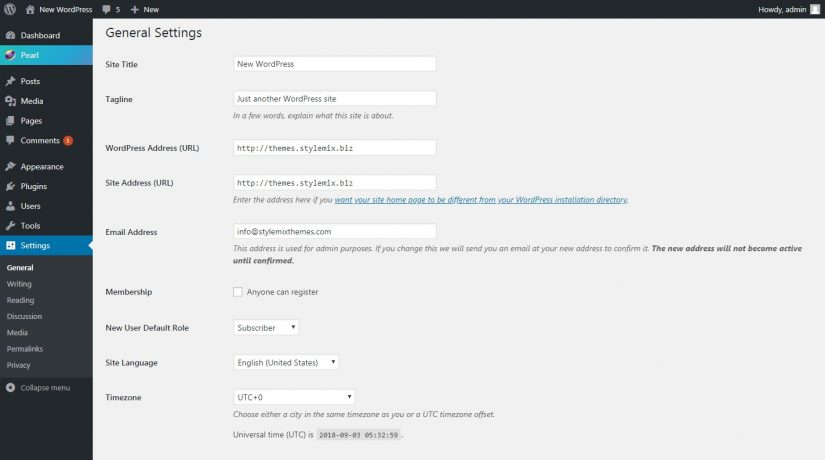
At the WordPress sidepanel select the “Settings” menu. Specify the necessary data in each section of the settings:
General Settings
In the “General” section, specify the Site title and a Tagline – explain what this site is about in a few words. This information will be displayed to users. In the “WordPress Address (URL)” and “Site Address (URL)” fields, specify the URL of your resource. Select the time zone, time format, date format, language of the site. Leave the “Membership” field empty since at the first stage of the development of the resource only bots and intruders will want to register on it. Then Save Changes of course at the bottom!
Writing Settings
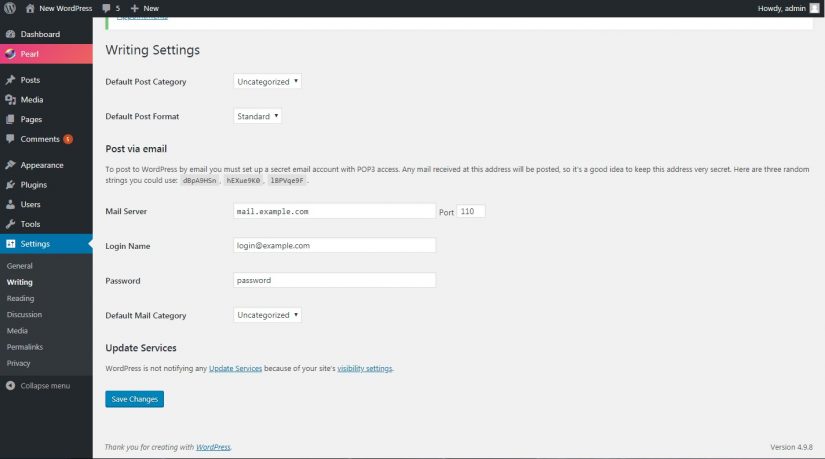
In the “Writing” section, select the required options. At the beginning of your project, you can use the default settings for formatting, the main heading and the format of the posts. If you want to post via e-mail, enter the required information: Mail Server, port, Login Name and a Password. However, it is better for beginners to publish posts in the WordPress admin. Save Changes.
Reading Settings
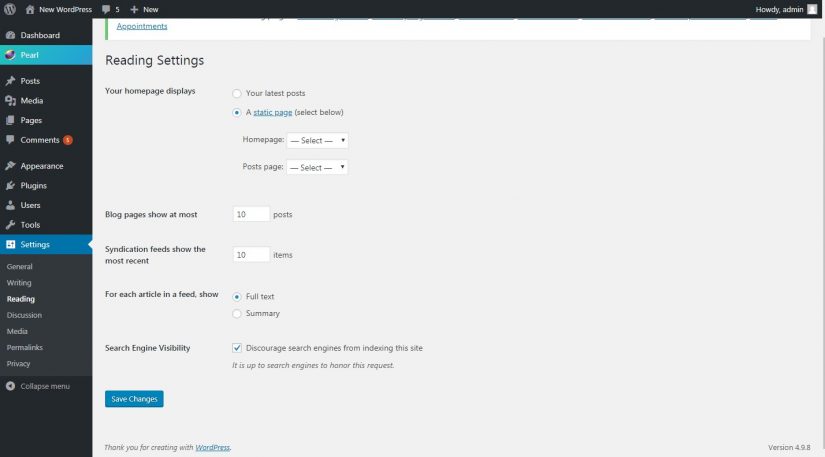
In the “Reading” section, specify what should be displayed on the main page of the site. If you are creating a blog, the main entries should be on the main. As an example, pay attention to the blog of the famous marketer Heidi Cohen. If you are creating a site with static pages, then the main page should display one of them. In this case, create a static “Blog” page where posts will be displayed. Specify how many posts to display on one page and in Syndication feeds. If for some reason you do not currently want the search engines to index your site, check the corresponding box.
Discussion Settings
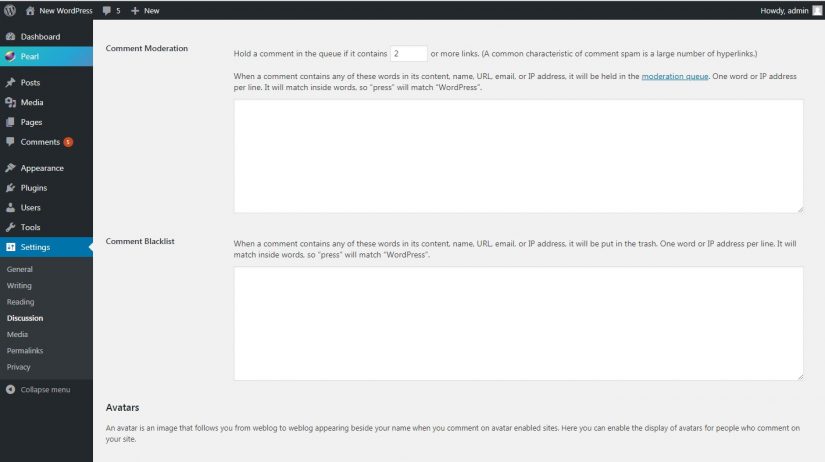
In the Discussion sector, select the suitable options. Mainly, you will need default settings. Pay attention to the fields “Comment Moderation” and “Comment Blacklist”. You are able to state the characteristics by which comments will be queued for moderation before publication or appear in the “Spam” list.
In the “Media” sector, leave the default settings.
Permalink Settings
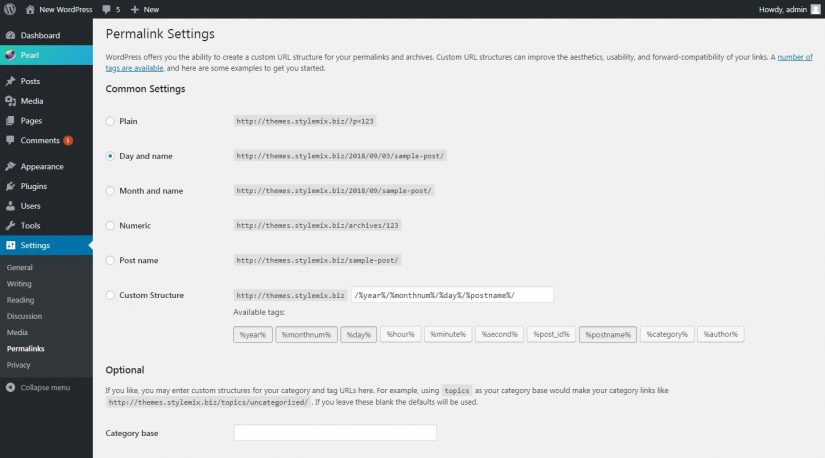
In the “Permalinks” segment, choose the structure of your materials’ links. E.g., a link could contain the name of the post and the date of publication or only the name of the post. Also you can add prefixes for categories’ links.
Customize the Theme on WordPress Website
You remember that each theme has its own settings. Description of the Pearl theme settings will assist you in understanding the patterns of customization.
Click the Appearance – Customize at the WordPress sidepanel and go on board:
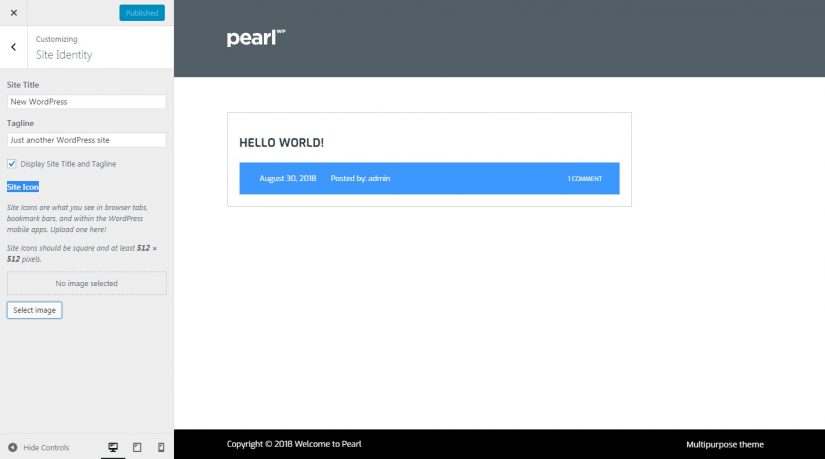
At the Site Identity sector input the Title, Tagline & download the Site Icon.
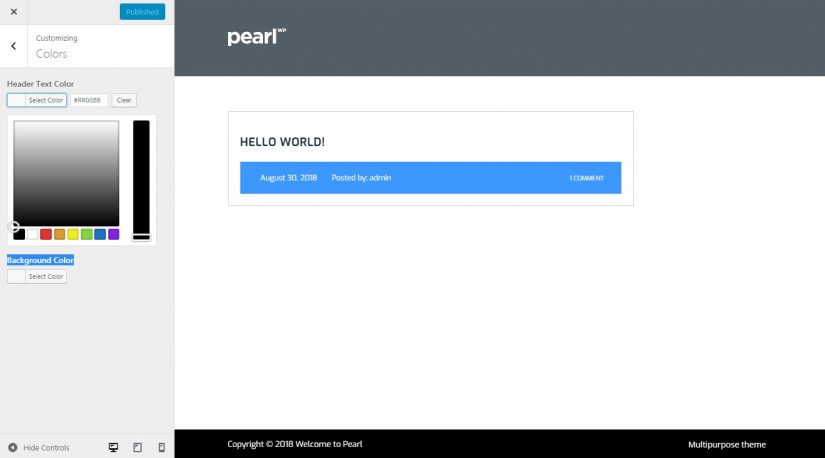
In the “Colors” section you are able to set the Header Text Color and a Background Color.
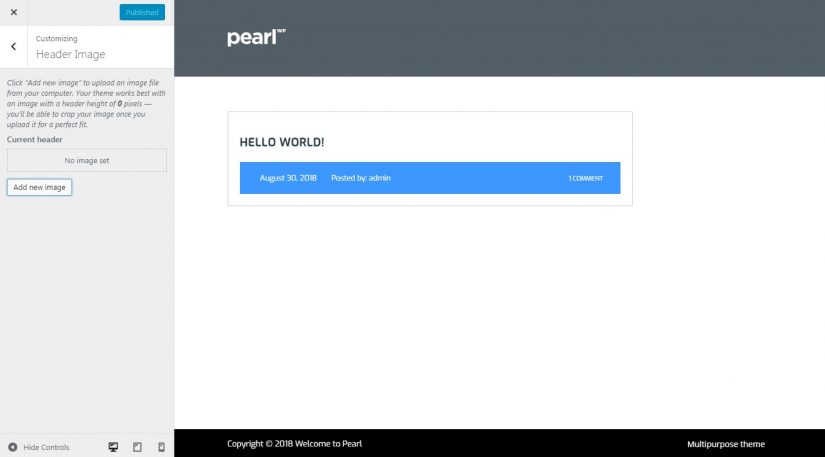
At the Header Image sector, you can upload an image file from your computer. Your theme works best with an image with a header height of 0 pixels — you’ll be able to crop your image once you upload it for a perfect fit.
And do the same with the Background Image.
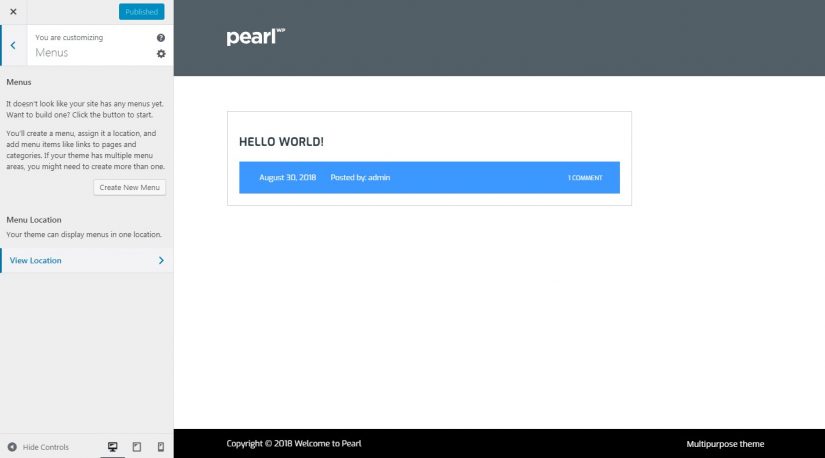
At the Menus section it possible to create a menu, assign it a location, and add menu items like links to pages and categories. If your theme has multiple menu areas, you might need to create more than one and assign a location.
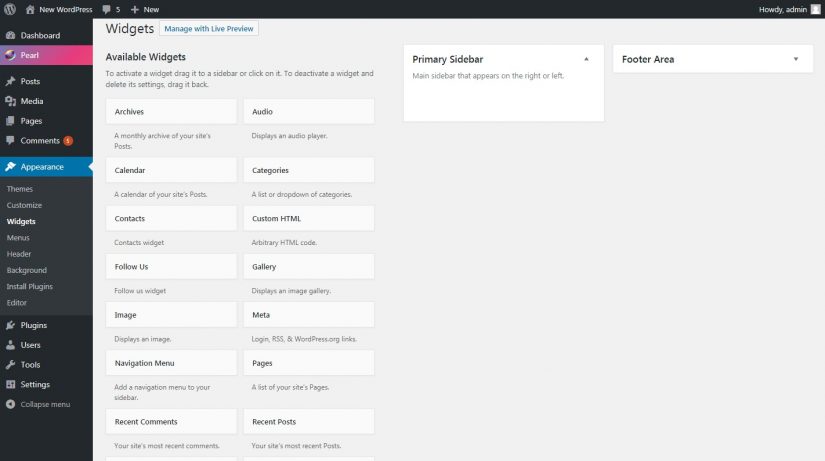
You could add widgets to the Primary Sidebar and the Footer Area at the Widgets section but they are better to configure not in the theme menu but in the WordPress menu. To do this, select the “Appearance – Widgets” section. In the left part of the screen you can see the available widgets. To activate a widget drag it to the sidebar or click on it. To deactivate a widget and delete its setting, drag it back. Don’t forget to save changes.
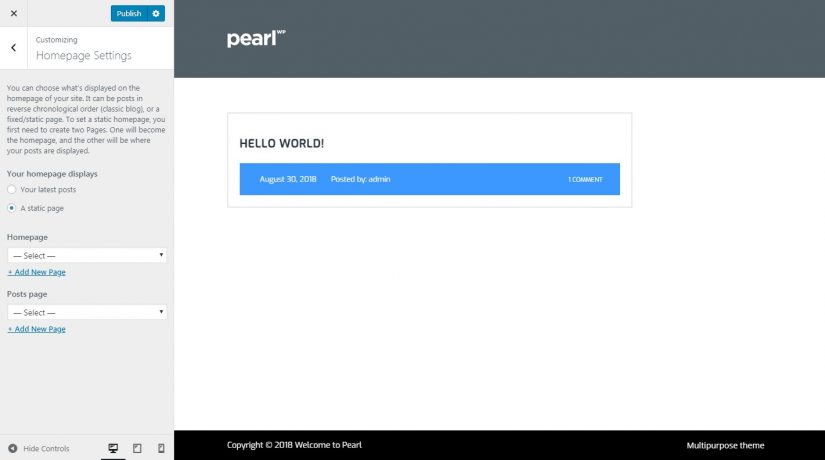
At the Homepage Settings section, you can choose what’s displayed on the homepage of your site. It can be posts in reverse chronological order (classic blog), or a fixed/static page. To set a static homepage, you first need to create two Pages. One will become the homepage and the other will be where your posts are displayed but we have already done it actually.
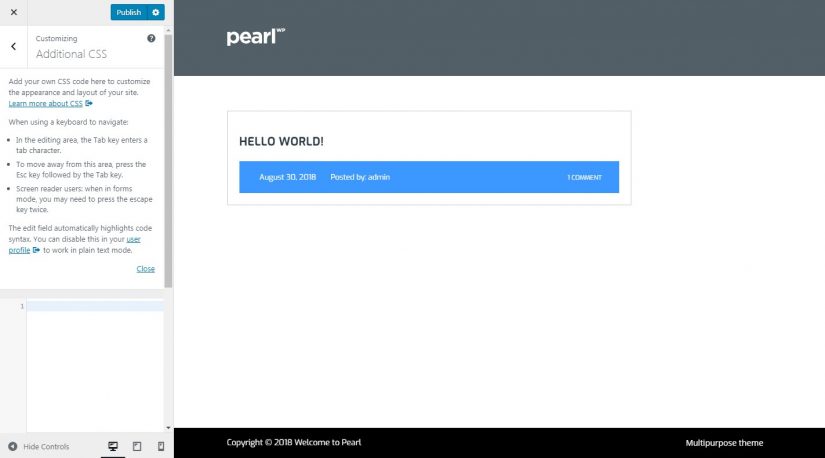
Add your own CSS code here to customize the appearance and layout of your site at the Additional CSS sector.
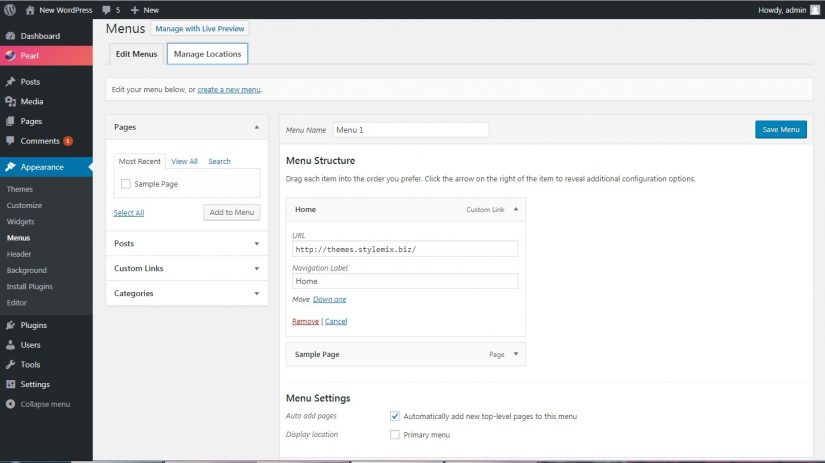
Configure the site menu at the “Appearance – Menu” sector.
Follow these actions:
- Name the menu and click the “Create Menu” button.
- Add the top-level pages to this menu.
- At the page settings, select the URL which will be displayed on the menu.
- In the settings, specify that the CMS should automatically add new top-level pages to this menu.
- Choose the theme locations where the menu will be displayed.
Step # 5: Solve Practical Tasks Via WordPress Plugins
Plugins are nearly the most dangerous syndrome of the beginning WordPress websites holders. Hardly registered a resource many developers look for publications like “100500 Best WordPress Plugins”. They install dozens of the add-ons. Why it has undesirable effect on the development of a resource sometimes? It’s not that they enormously slow down your site to a degree though the excess number of plugins can cause getting to such an issue.
The problem consists in concentration of attention and efforts of the site’s owner. The developer looks for plugins hourly instead of creation and the publication of qualitative and unique content. Such webmaster is not able to grab the whole picture and forgets that plugins are necessary for the solution of the specific practical objectives.
Use plugins with caution in order to successfully develop the website. Install the add-ons only when you want to solve a specific task. By means of plugins you are able to address the following issues:
- Security.
- Spam protection.
- Technical optimization of the resource in accordance with the requirements of search engines.
- Functionality and usability boost.
How to Use the WordPress Plugins to Secure the Site
Your website is exposed to two global threats. The first one is yourself. The commitment to excellence and to innovations can force you to go to risky experiments with a code and programs which can lead to loss of information. It is possible to be protected from it by means of the plugins creating backup copies of the website.
The second threat is an unauthorized access to a resource. Malefactors can try to get access to your website to set on it the malicious code or just to steal it.
Use one of the listed plugins to regularly create backup copies of the site:
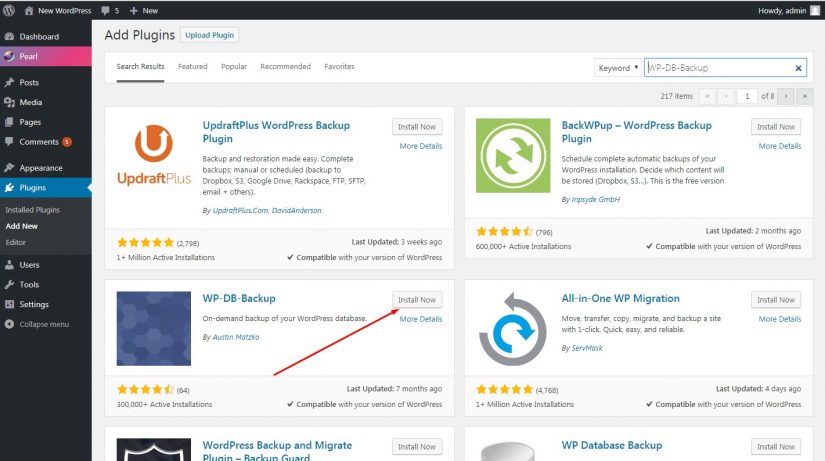
To install the selected plugin, go into the Plugins — Add New at the dashboard sidepanel. Enter the name of add-on into a search box in the upper right corner. Also you can download a plugin from the website of the developer and install it by means of function “Upload Plugin” in the upper part of the screen of the admin panel.
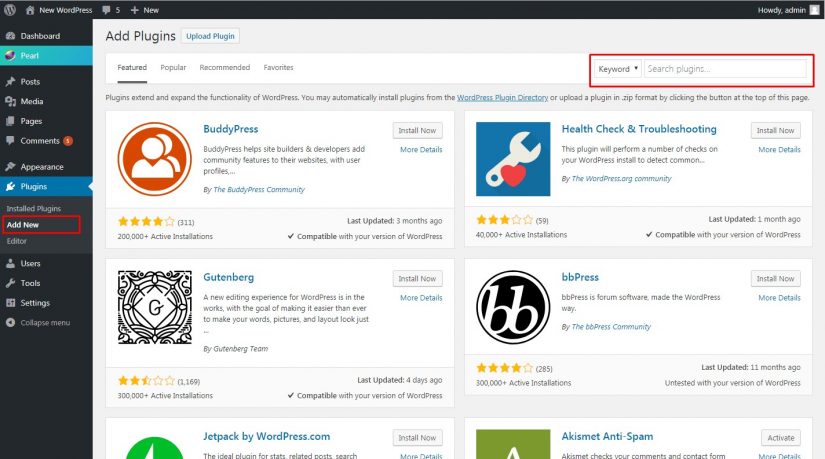
Press the “Install Now”
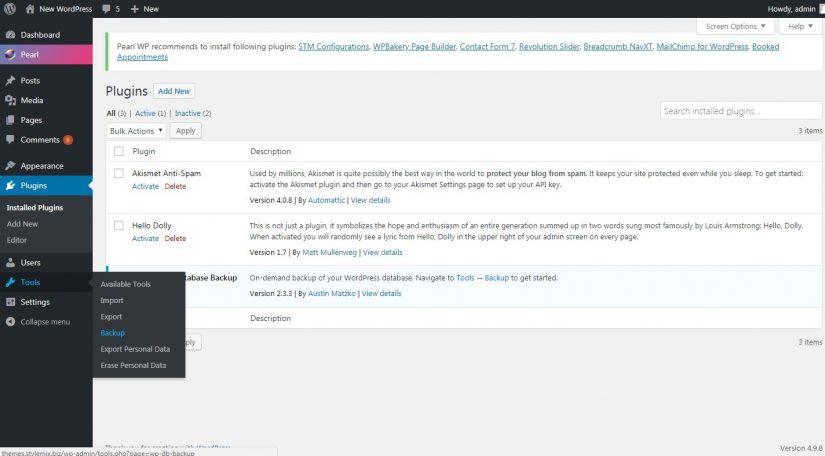
After installation, please, activate the plugin. Now you can configure the backup options. Select the “Tools – Backup” menu. Also, you can enter the setup menu through the control sections “Plugins – Installed – Tools – Backup”.
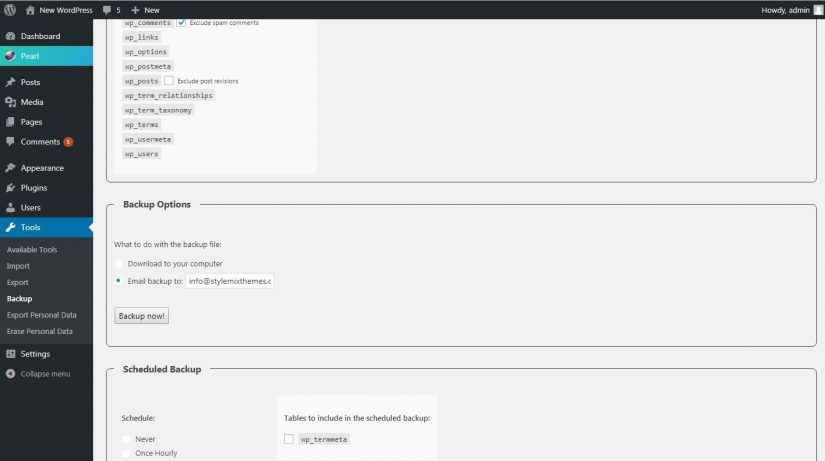
In the section “Tables” of settings tick opposite to the option “Exclude spam comments”. Select a method of saving archive from the section “Backup Options”. For example, you can receive it on the e-mail address. Select periodicity of creation of archive from the section “Scheduled Backup”. At the first stage of the development of your resource make a backup copy once weekly.
To defend your site from an illegal access, practice one of these plugins:
- Whitelist IP For Limit Login Attempts
- Jeba Limit Login Attempts
- Limit Login Attempts
- iThemes Security
- Simple Security Firewall
For instance, install and activate Jeba Limit Login Attempts. This plugin will disable IP of the attacker for 30 minutes after three unsuccessful attempts of authorization in the admin panel. That way you will be protected from a brute-force: cracking of the website by password guessing.
How to Fight Spam via WordPress Plugins
Do not be surprised if right after registration of the website comments with ads of viagra and machines for metal cutting will appear. Neuro networks never sleep. Basic protection against them is provided by correct setup of the platform itself. And you can create additional solidifying by means of the plugins:
- Akismet
- SABRE
- Antispam Bee
- Antispam by Clean Talk (premium)
Install and activate the Akismet plugin. Go to the link in the picture to get the API key.
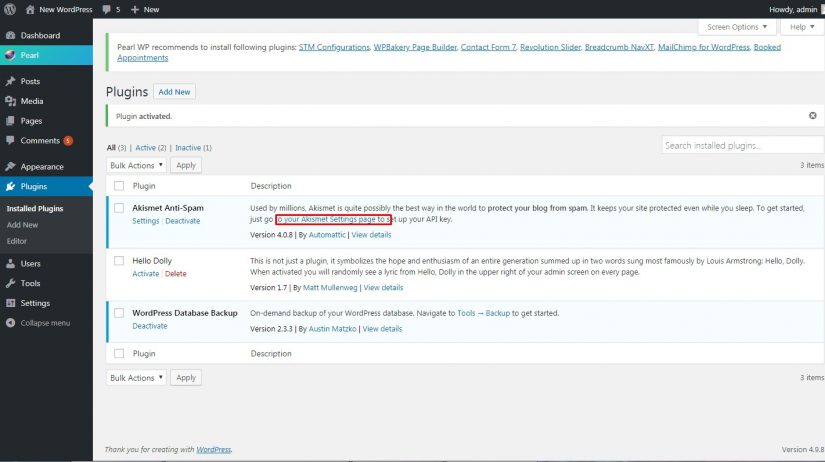
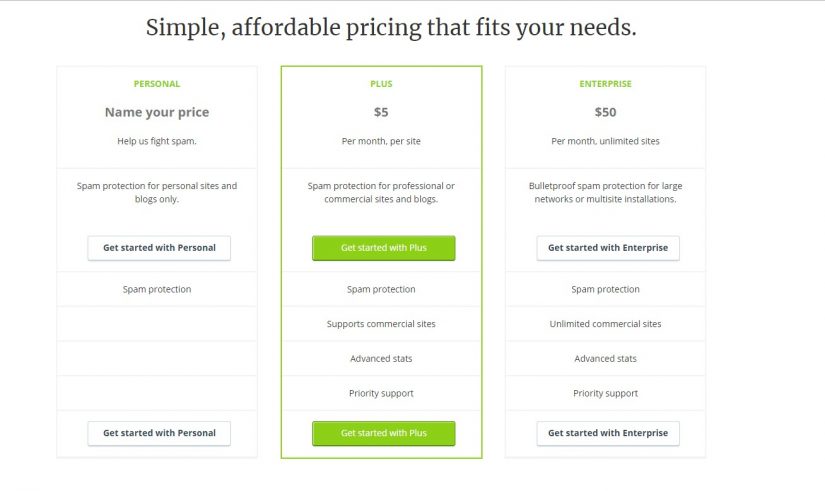
On the opened page select a suitable rate. The plan with zero cost is available to noncommercial projects and personal blogs.
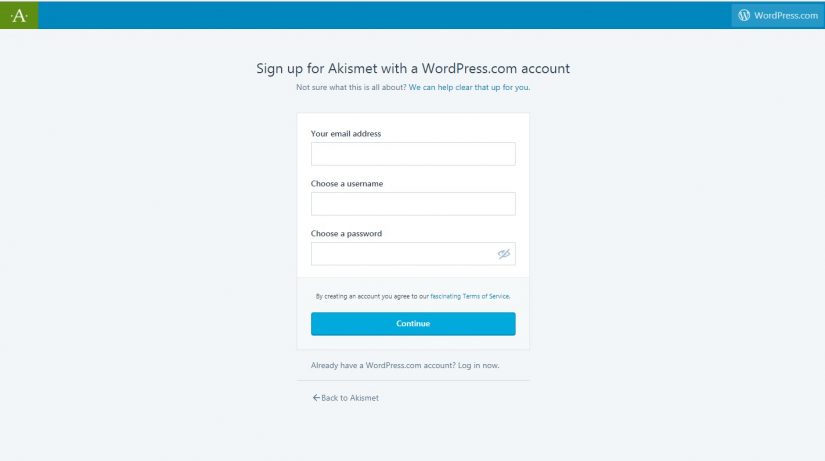
Then enter the registration data.
Enter personal data and using the slider set the zero cost of use of a plugin. Pay attention once again, free of charge only noncommercial projects.
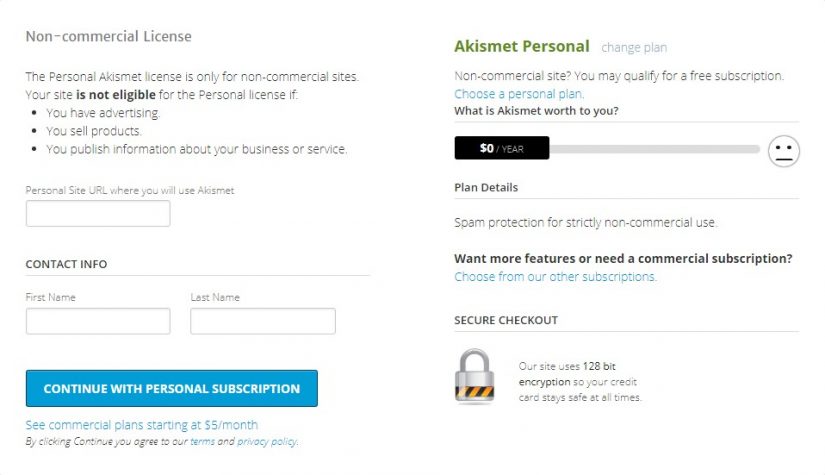
Press the CONTINUE WITH PERSONAL SUBSCRIPTION BUTTON, copy the received API Key and insert it into the appropriate field on the plugin settings page.
How to Make Your WordPress Website SEO-friendly by Plugins
With the help of SEO-plugins you can ensure that your WordPress site meets the technical requirements of search engines. Particularly, add-ons resolve next issues:
- Site map creation & updating
- Canonical URL
- Title pages’ optimization
- Meta-data pages’ automatic generation
- Blocking the indexing of duplicate content
- Page micromarkups creation
In order to address these issues, you need to install one SEO plugin from each of the three groups: programs for creating a site map, programs for technical optimization of the resource and a program for creating micro-markup.
To create a site map, use one of the following plugins:
Let’s install Google XML Sitemap plugin and activate it. To configure the plugin, go to the Settings – XML-Sitemap menu.
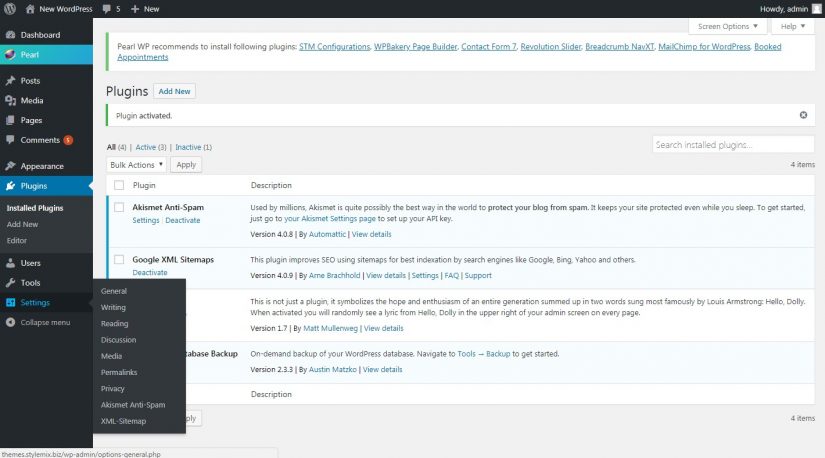
For beginners it is better to leave the default settings. After activation, the plugin created a site map, added its address to the robots.txt file and prepared to notify search engines about resource updates.
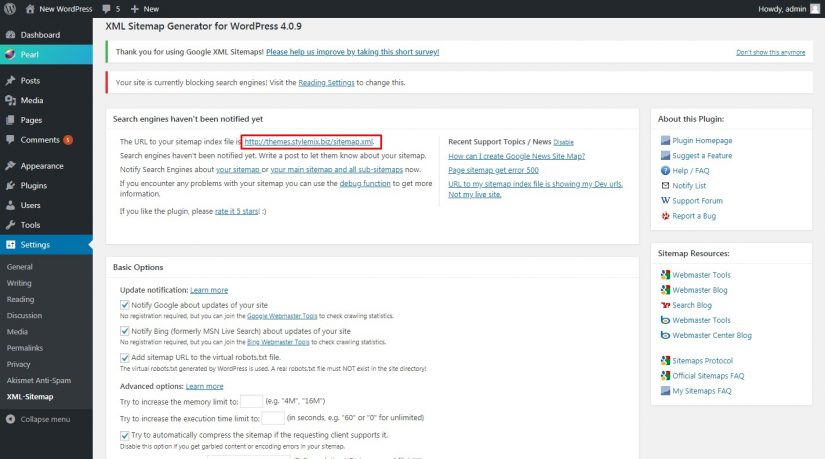
But when you think of yourself as an experienced developer, you can change the settings of the plugin. In the “Additional Pages” section, you can manually include URLs that have not been included in the site map automatically. At the “Post Priority” section, determine how to calculate the priority of content indexing. And you could also recommend to search engines the most priority types of content at the sections “Change Frequencies” and “Priorities”.

Use one of the following plugins for SEO-friendliness:
Install and activate the designated plugin, for example, All in One SEO Pack and its icon will appear on a sidepanel as on the screenshot. Always practice the default settings if you are just getting started with WordPress. If you consider yourself a progressive developer, you can change some SEO settings. To do this, select the appeared “All in One SEO” at the WordPress dashboard.
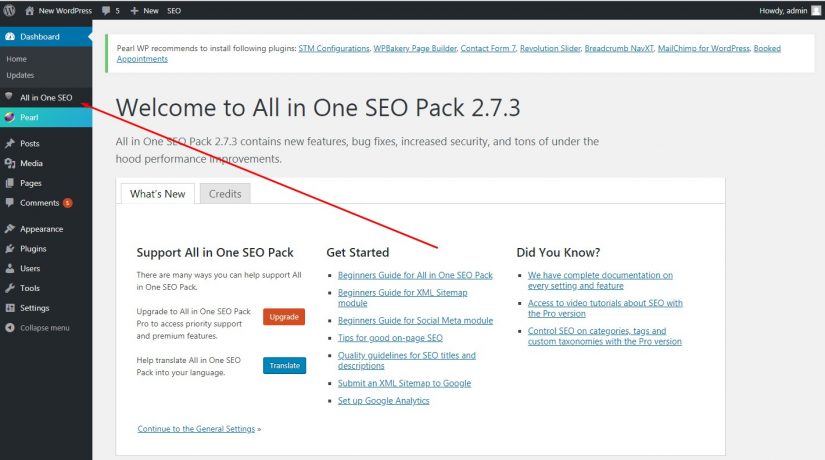
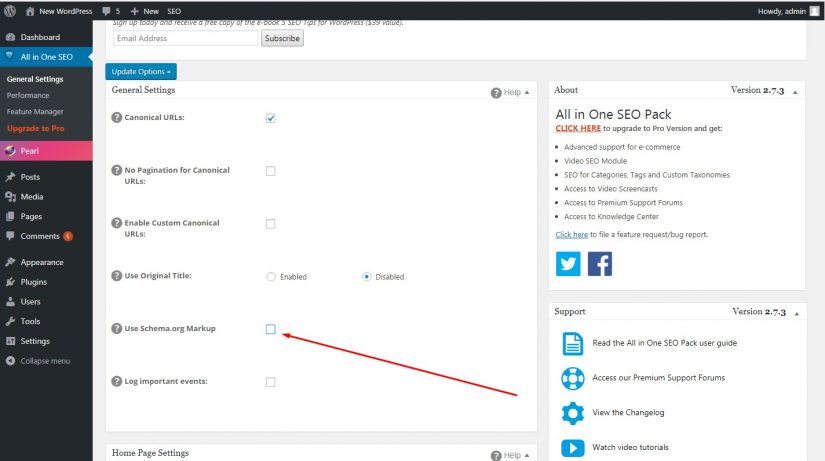
Pay attention to the following settings:
First, uncheck the Use Schema.org Markup check box at the “General Settings” section. You plan to mark the page by the means of an isolated plugin.
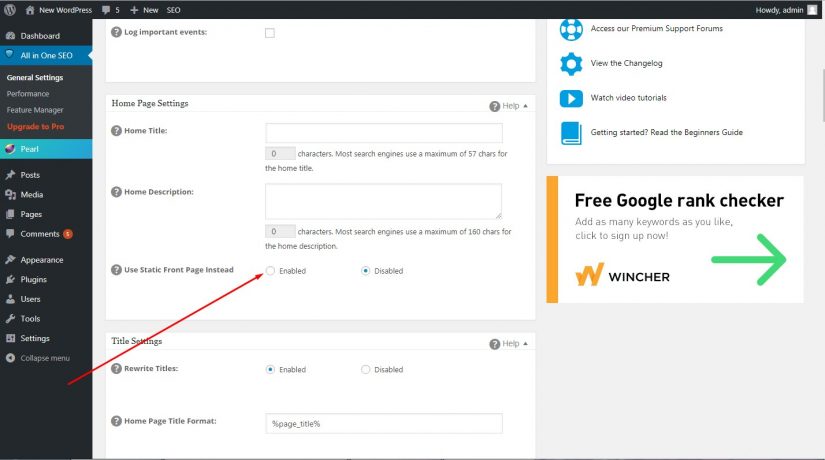
When the home page is your post page, in the “Home Page Settings” section, specify the title, description and keywords. If the static page is used as the home page, check the “Enable” box, as shown at the screenshot.
In the “Webmaster Verification” section, specify the verification code of the resource in the cabinet for Google webmasters. To do this, add a new resource to the “Google Webmaster Tools”, select alternative methods of verification. Copy the HTML code shown in the image.
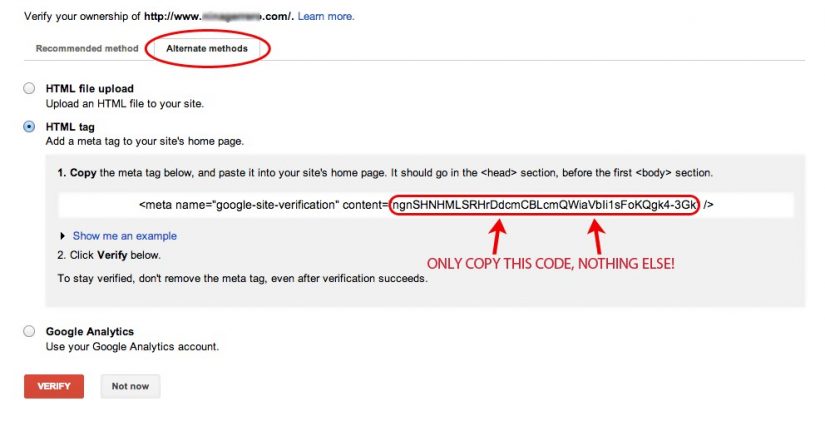
Insert it into the “Google Webmaster Tools” field on the plugin settings page.
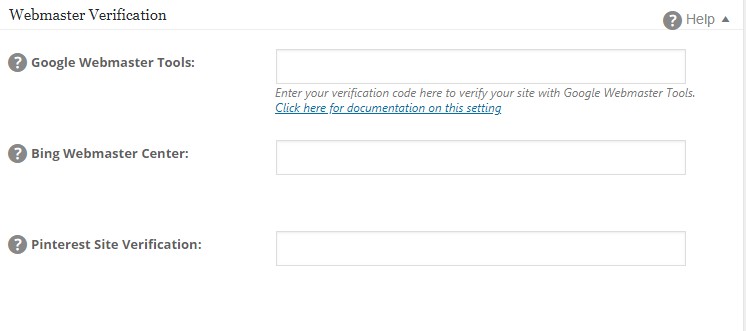
Paste the code on the plugin settings page.
Save the plugin settings. In the “Google Webmaster Tools” cabinet, click the “Verify” button.
For page markup use one of the following plugins:
- A binding of WPSSO and WPSSO JSON. First one is a basic plugin and the second one is an add-on. With the help of the base solution on the site, you can add the Open Graph markup. With the second Schema.org markup is implemented using JSON-LD.
- WP SEO Structured Data Schema. Using this plugin, you are able to add several types of Schema.org markup to the site, including Article, BlogPosting and Review. The markup is implemented via JSON-LD as well.
- Plugin Schema App. Involving this one, you can add different types of Schema.org markup to the site. It is also implemented through JSON-LD. The free version supports basic markup types. Likewise, markup can be implemented using the online generator org JSON-LD Generator.
Install and activate the WPSSO and WPSSO JSON plugins.
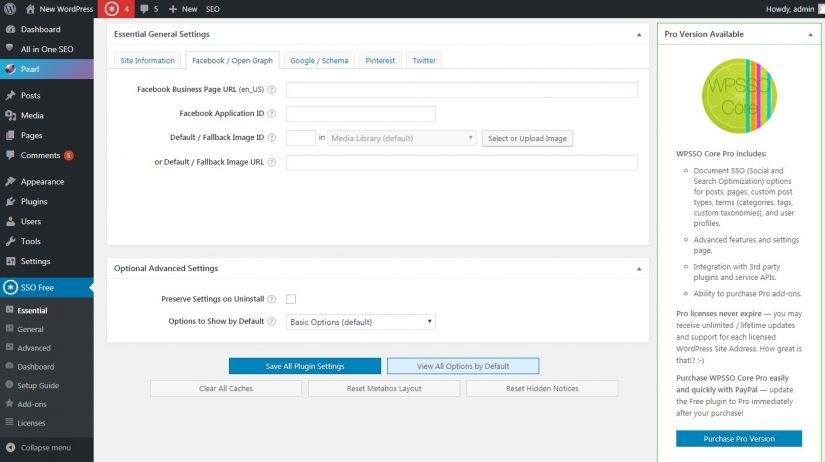
Provide the information about the site as well as the information for Open Graph markup at the sidepanel on the plugin settings page under Essential Settings. Don’t change any other settings.
Proceed to the Schema Markup section. In the Google+ Business Page URL field enter the name of the site. In the fields Organization Logo URL and Organization Banner URL specify the URL of the logo and banner of the site. These images might be used on the SERP page.
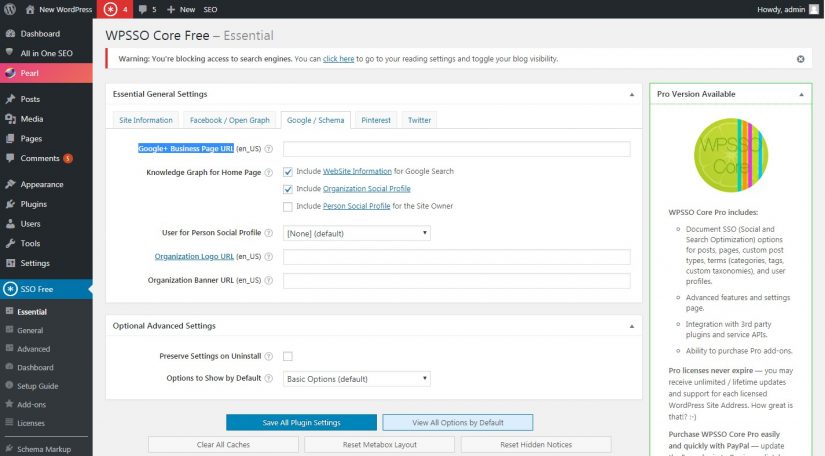
Use the drop-down menu to select the basic type of markup for the blog posts page, static home page, categories page, authors and search results. You need the following types: Blog, Website, CollectionPage, ProfilePage and SearchResultsPage correspondingly.
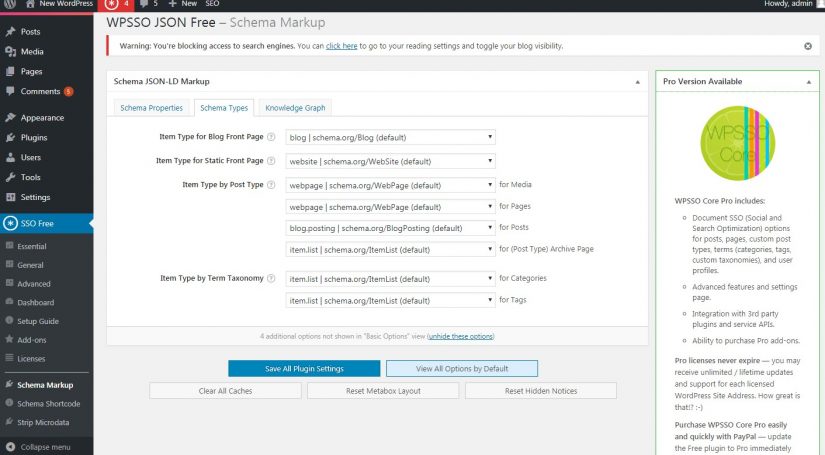
Choose the type of markup for the posts, static and media pages. The Article and BlogPosting markup types are appropriate for posts pages. Which one to choose? It depends on the format of the publications in your blog.
The BlogPosting markup type is a derivative of Article. In addition to BlogPosting, the article refers to the News Article markup or “News”. That is, BlogPosting contains all semantic article markup data.
Use the type BlogPosting, if you publish small notes, personal observations and impressions. Use the Article type if you publish reviews, analytical articles, guides. Here’s an example: for publication in the blog the type of markup Article suits the most but for the diary the BlogPosting.
For static pages and media pages, specify the WebPage markup type.
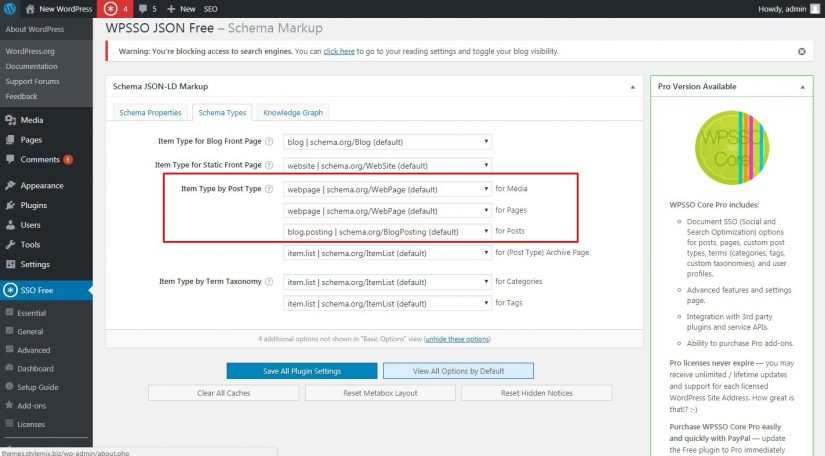
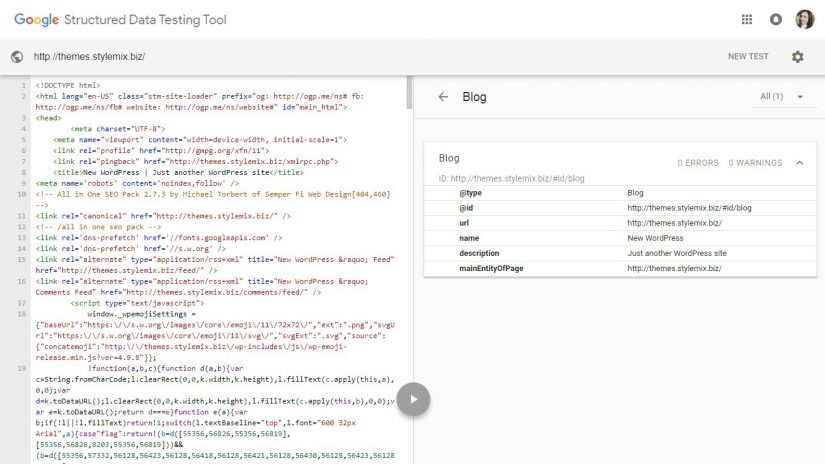
This plugin will automatically add the selected markup type to the site pages right after saving the settings. The semantic data will also appear on existing pages. You can verify this with the Google Structured Data Testing Tool.
What should you do if you publish different types of materials such as longreads, small notes and news? In this case, for each publication, it is better to choose the appropriate markup. Instead of the WPSSO JSON add-on, use the WP SEO Structured Data Schema plugin.
After installing and activating the plugin, an additional section will appear on the post editing page. Using it, you can select the type of markup and specify structured data.
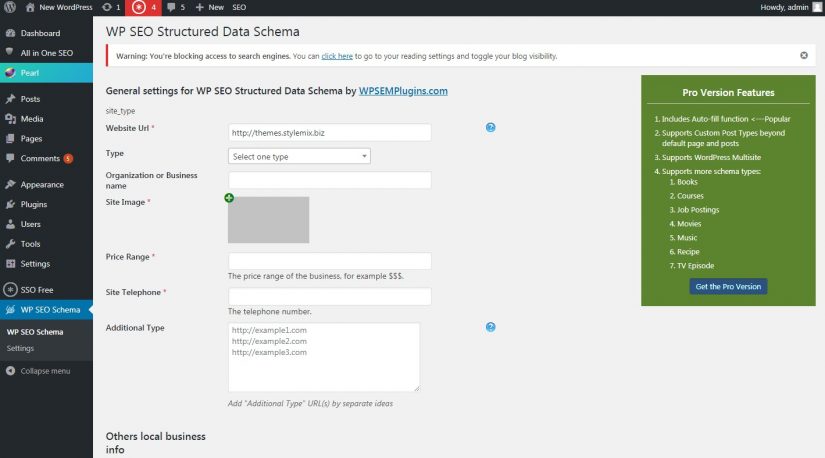
The disadvantage of the plugin is the need to specify the data for markup to each publication manually. And the benefits include support for additional types of markup, for example, Review, Product and Aggregate Ratings. The free version of WPSSO JSON does not support these types.
How to Improve the Functionality and Usability of the WordPress Website by Plugins
It is necessary and possible to increase the functionality as well as the usability constantly. As it was mentioned above, some WordPress websites owners are so fond of this process that set tens and even hundreds of plugins. To avoid this error, begin increase in functionality and improving of a usability not with plugins and with the problem and tasks definition which you want to resolve.
For example, if you want to create a WordPress online store, find plugins for electronic commerce. If you think that the standard system of navigation is not user-friendly enough, find plugins by means of which it is possible to add breadcrumbs on the pages and also links to relevant materials. Also through plugins it is possible to add the form of fast and abundant feedback, to display the list of the active commentators at the sidebar, to show to visitors the form of a subscription and to tackle many other tasks and challenges.
Step # 6: How to Set the Analytics and Google Structured Data Testing Tool on WordPress Website
This issue could be addressed by different methods. Such as, when you’ve installed All in One SEO Pack plugin you already connected a Google Structured Data Testing Tool. Also you for certain want to keep track of efficiency of a resource by means of Google Analytics.
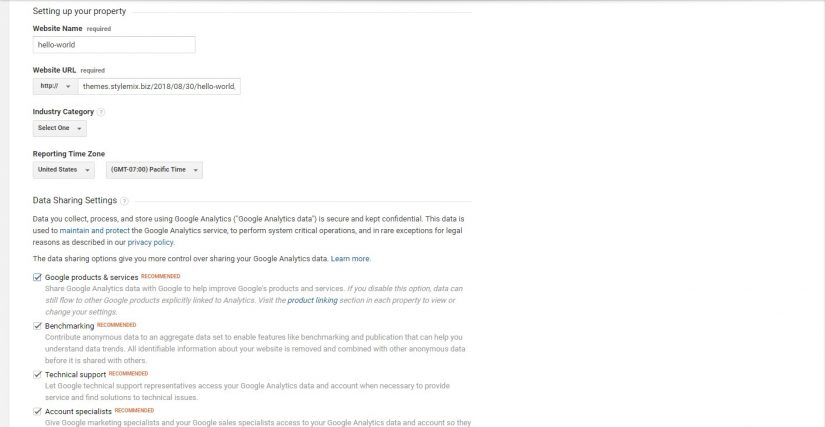
To register a site in Google Analytics, follow these steps:
- Log in to your account, select the menu “Administrator – Resource – Create resource”.
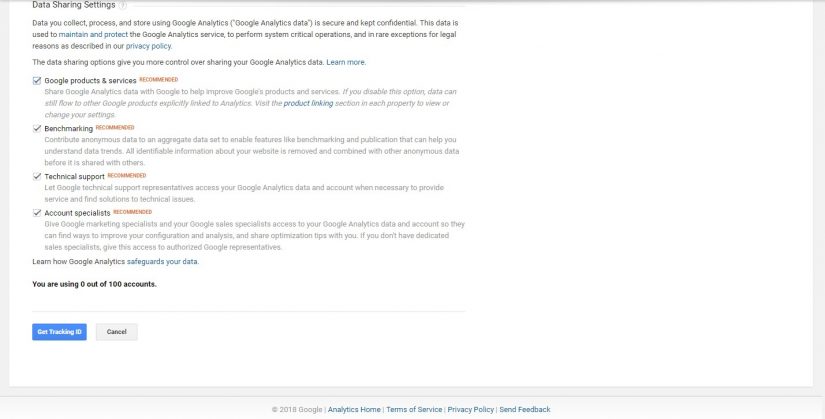
- Specify site registration information: Website Name, Website URL, Industry Category, Reporting Time Zone. Click the Get Tracking ID button.
- Install and activate Google Analytics by Yoast or a similar plugin.
In 2016, the Yoast team sold the plugin for the Google Analytics integration. Now this add-on is called Google Analytics by MonsterInsights. The functionality of the add-on and the interface of the settings page are preserved.
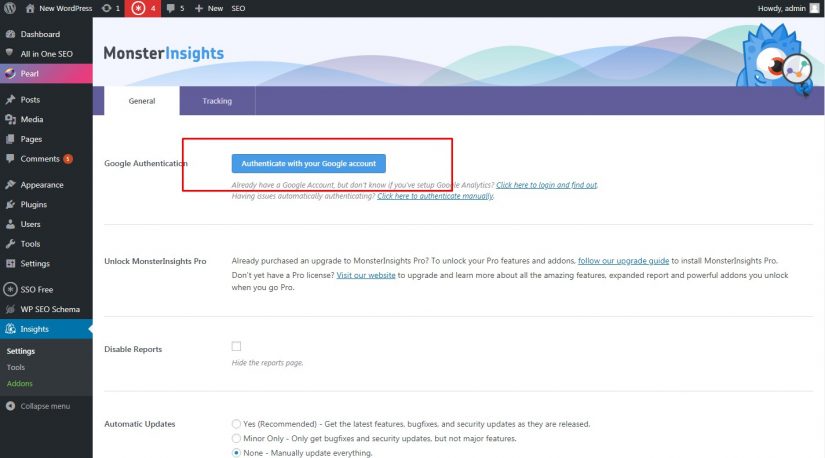
- On the plugin settings page use the button “Authenticate with your Google account”. Copy the proposed code and paste it into the appropriate field.
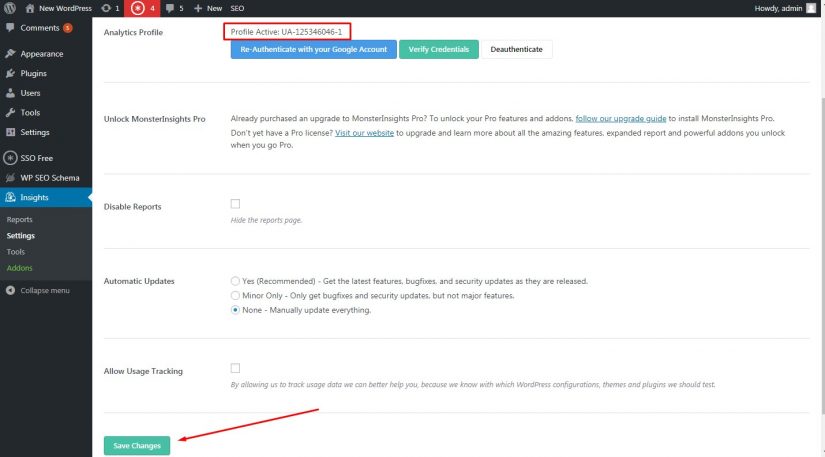
- Select the desired analytics profile and save the changes.
- Check if the analytics code is installed on the site pages. This can be done manually in the code view mode. You can also check the status of the tracking in the Google Analytics menu “Administrator – Tracking Info – Tracking Code”. Please note, Google Analytics takes several hours to update the tracking status.

Now you can track the performance of the site in the interface of your Google Analytics account.
Step # 7: How to Create Pages and Posts on WordPress Website
Great job! You’ve set up a WordPress site and prepared it for publishing content. Now you can create static pages and publish content in a blog.
How to Create a Static Page
Follow these steps:
- Go to “Pages – Add New” at the sidepanel.
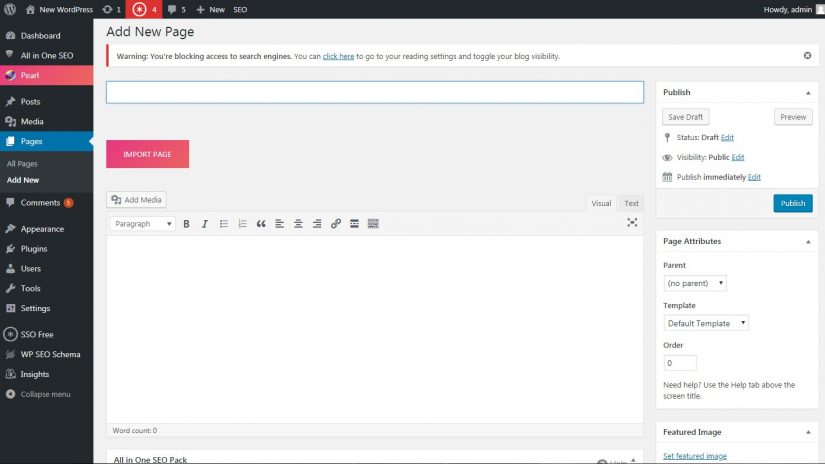
- Choose the visual or text editing mode.
- Add the page title and the content.
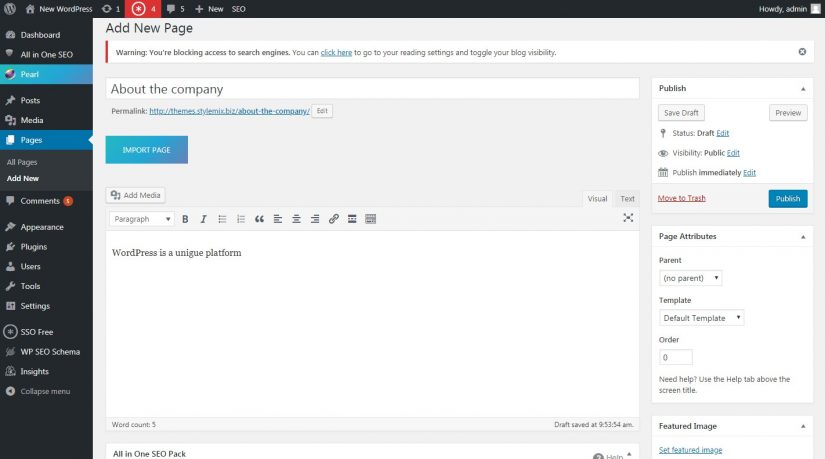
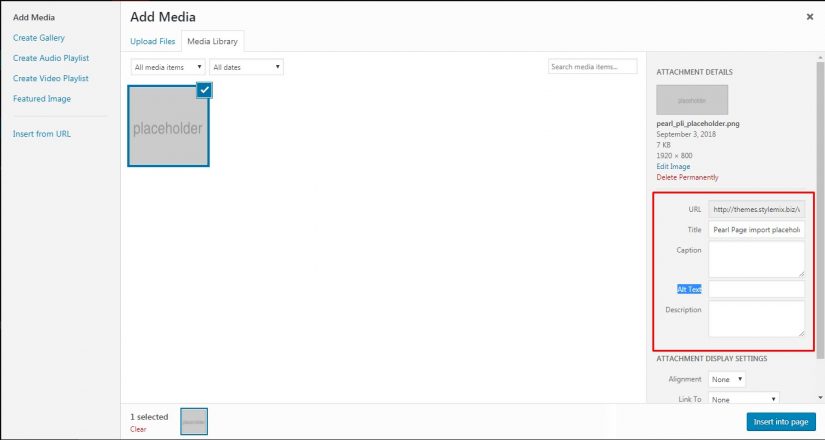
- Upload an image. This can be done through “Add Media”. Specify the title, caption and fill in the “Alt Text”.
- Indicate the title and description.
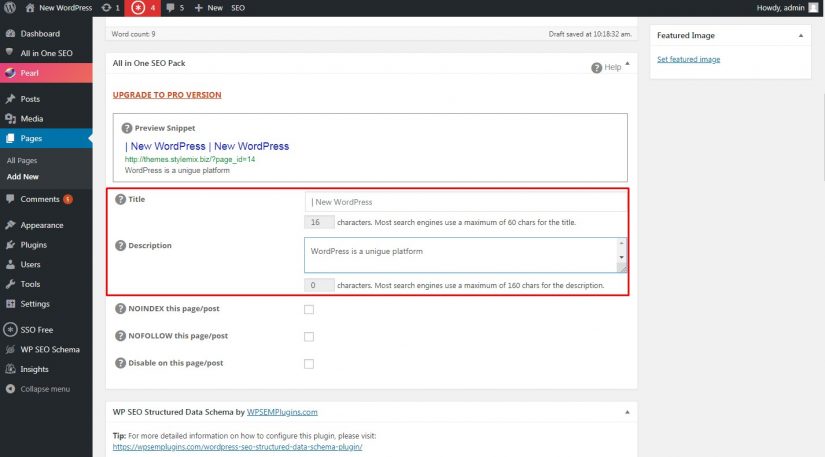
- Please, use the Add Schema in order to add micro-markup if necessary.
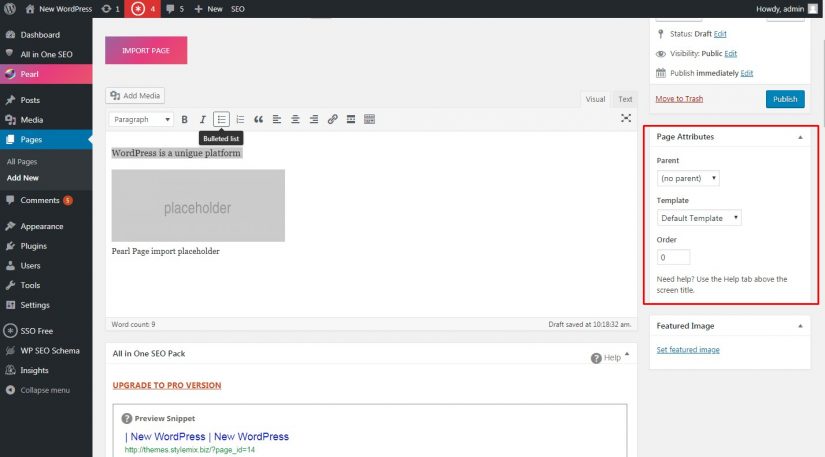
- Indicate the page attributes. You can select the parent page and the order number for the created page.
- If you want, set the thumbnail of the entry.
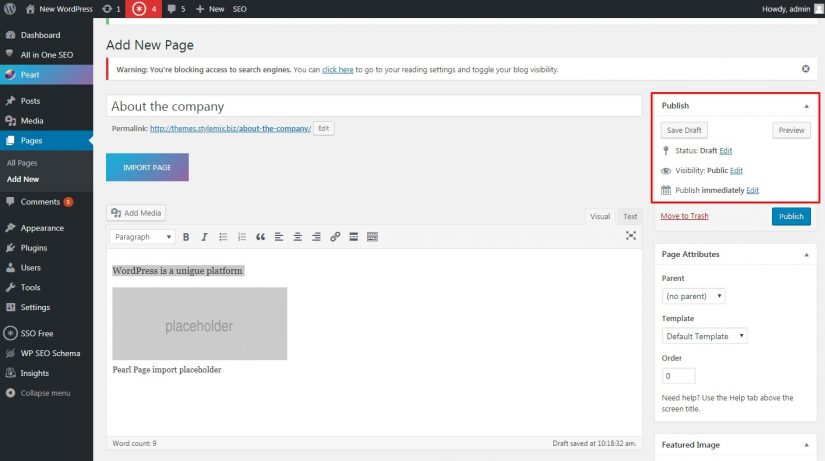
- You can also now preview the page or publish it right away.
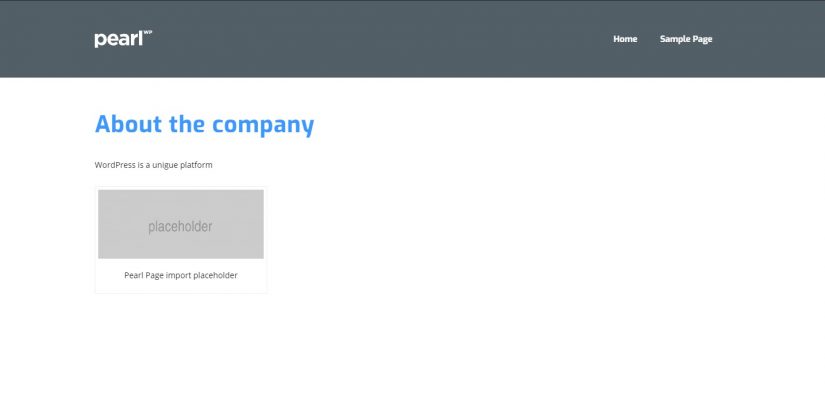
Please, make sure that the content is displayed correctly right after the publication. Edit the page if needed.
How to Create a Publication
Proceed to “Posts – Add New” in order to add a post. The publication of the post is basically the identical to the design of the page. Consider the next hints:
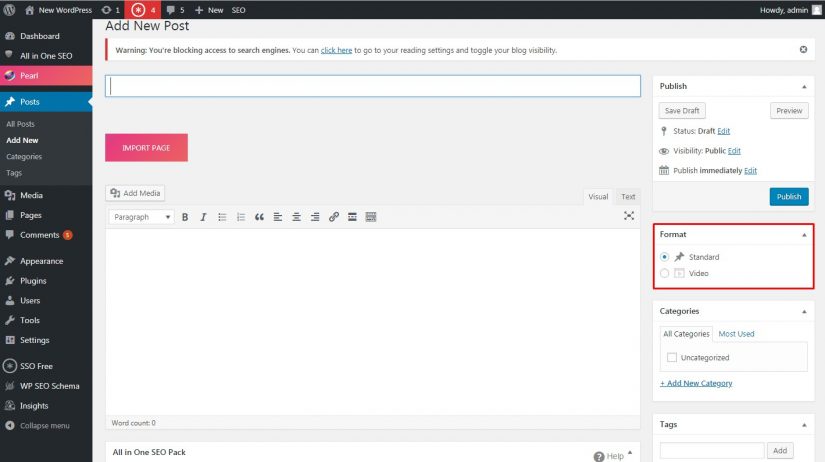
- Most admins support multiple posts formats.
- Choose a suitable category for the publication. Use the following sector to create one.
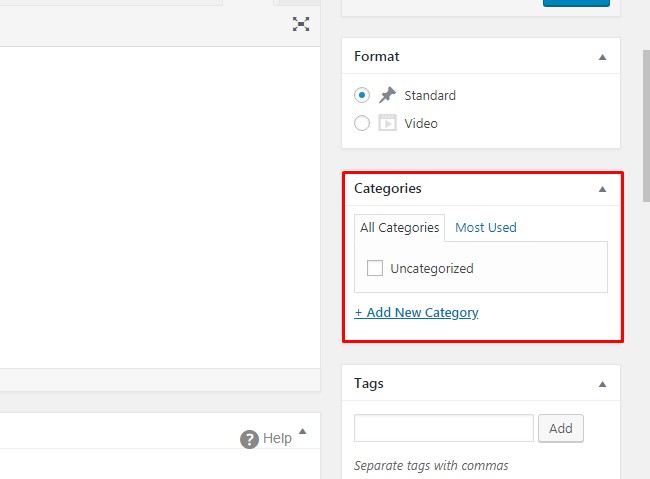
Also, you are able to add tags to the posts. You don’t have to specify tags when using the All in One SEO Pack plugin with the keywords to your posts.

Go On to the Utmost Exciting as Well as Crucial
You have built, set up and customized the WordPress website and got the hang of publishing the content. From now on you are waited by the hardest and responsible work. In order for the site to be effective, you shall regularly create content which is qualitative and useful to the audience. The possibilities of the WordPress platform are endless – from the implementation of an information resource to an e-commerce shop.
Be most welcome to contact us and write any comments, questions and suggestions related to the creation and customization of the WordPress website. Also you can share experience with CMS WordPress, tell us about your favorite plugins, post pros and cons of the most worldwide platform.




I got this site from my friend who told me about this web site and at the moment
this time I am visiting this web page and reading very informative articles at this place.
This site was… how do I say it? Relevant!! Finally I’ve found something which helped me. Cheers!