An SSL certificate is a security measure that encrypts the connection between your website and the end user, helping protect both parties. When installed on a domain, the prefix “https” appears in the web address.
While it’s not mandatory, it’s best practise for every WordPress website on a live server to be fitted with an SSL certificate. This helps increase security, and protect your website and visitors from hackers stealing personal information, breaking your site as well as prevents the spread of spam and malware as previously described in the statistic above.
In this post, I’ll share more details on HTTPS and SSL for WordPress, why it’s crucial to have them as well as a list of actionable steps to install an SSL certificate on your website.
What is SSL and HTTPS?
HTTPS is the secure extension of the Hypertext Transfer Protocol (HTTP), which is the set of rules for transferring data between your browser. HTTPS means that all communications are encrypted to prevent unauthorized access.
HTTPS is often used to encode websites that process personal details such as login, sales and product pages as well as forms.
Secure Socket Layer (SSL) is a type of protocol that HTTPS uses. It can be purchased as an SSL certificate for a domain. It provides confirmation that the domain is in possession of the site owner and the connection between the visitor and website is encrypted.
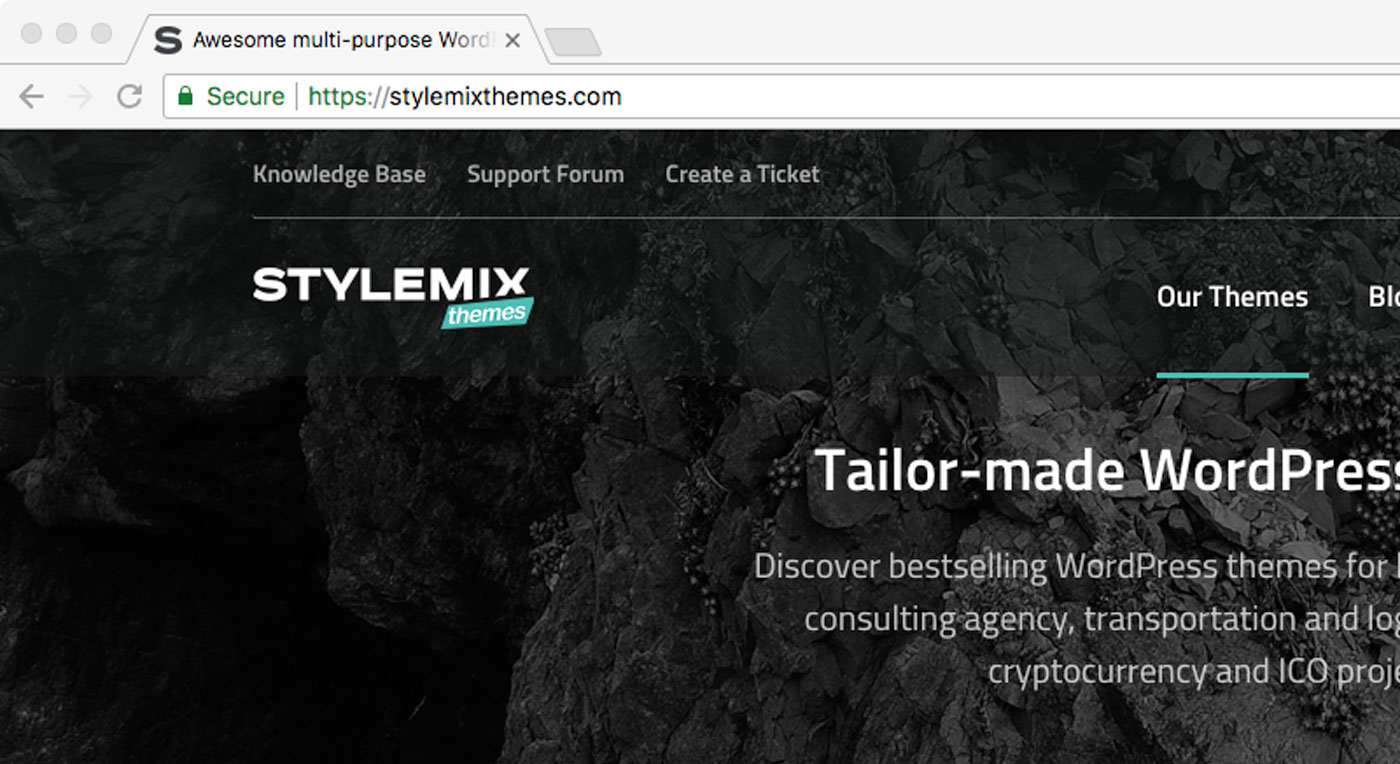
When a website is using SSL, the prefix “https” appears in the URL instead of “http.” A green padlock symbol also appears in the address field. Certain types of certificates with a higher level of security include the company name beside the padlock.

SSL is enabled on the Stylemix Themes website.While an SSL certificate bumps up the security of a website, it doesn’t guarantee that a website is legitimate since anyone can install a basic certificate so it’s still important to do your due diligence to ensure you’re visiting a safe website.
Although, if a website address includes the “https” prefix but doesn’t have an SSL certificate installed, the most popular browsers notifies users with a warning before connecting.
It may also be important to note that Transport Layer Security (TLS) is actually the precursor to SSL and they’re often used interchangeably.
For details, check out a Detail guide for HTTP to HTTPS Migration on WordPress.
Why You Need SSL for WordPress
If access to cookies or any type of form that processes login or personal information including credit card numbers is required, SSL for WordPress is absolutely essential to prevent the information from being compromised.
Keep in mind that every WordPress site also requires access to cookies by default.
Without an SSL certificate, a website is vulnerable to attacks such as SQL injections (SQLI), Cross-site Scripting (XSS), Cross-Site Request Forgery (CSRF), Authentication Bypass, file upload and many other types of attacks. Hackers could steal personal information, hijack your browser connection, inject malware or spam into your site, or otherwise gain access to do whatever they want.
Not only will having an SSL certificate protect both you and your users, but it can also help establish trust between your site and its users.
That’s why in 2014, Google announced that website with SSL certificates would be given boosts in search engine rankings.
The European Union also instituted the General Data Protection Regulation in May of 2018 and while the new law doesn’t specifically mention the use of SSL certificates, it does require that websites sufficiently ensure security and privacy of any visitors from the European Union.
While an SSL certificate alone isn’t enough to ensure the security of your WordPress site, it’s a critical first step.
How Do SSL Certificates Work?
When a website has an SSL certificate, all information passed from browser to server is encoded in a random series of letters and numbers instead of in plain text, which is words that are human readable.
Website owners can purchase SSL certificates from an issuing company known as a Certificate Authority (CA).
Here are the steps to get your own SSL certificate:
- Purchase a certificate from a CA.
- Provide your personal details including your name, email and other details.
- You are given a public and private key, which are cryptic strings of letters and numbers that fit together mathematically. They’re used to authenticate and encrypt your domain during the installation process. Your private key should remain a secret.
- Submit your public key with your previously provided details in a Certificate Signing Request (CSR).
- If the information matches up and is correct, the certificate is signed with a Secure Hash Algorithm (SHA).
- The SSL certificate is issued and you can install it on your server.
When a user enters a URL into a browser an SSL handshake occurs automatically:
- The browser connects with a server(a web server, or a website) and requests an identity confirmation.
- The server sends a copy of its SSL certificate, which contains a public key.
- The browser checks the certificate that the Certificate Authority has, making sure it’s reputable, then sends back a key for the session.
- The server decrypts the session key with a private key and returns an encrypted session key.
- The link between browser and server is now secure and all data that passes through between them is encrypted.
Purchasing an SSL Certificate
As previously mentioned, SSL certificates can be purchased through a CA and most website hosting companies also have certificates available for purchase with a hosting plan.
There are also different types of SSL certificates that exist for different website requirements and the level of security that is needed as outlined below.
Validation Level
- Domain Validation – The CA confirms that the organization holds the the domain of the website. This is a basic certificate.
- Organization Validation – The organization holding the certificate is investigated and authenticated.
- Extended Validation – The CA confirms the identity, legal existence, location, and more of the organization. This is the highest level of validation for a certificate.
Number of Secured Domains
- Single-name SSL – Protects a single subdomain or host name
- Wildcard SSL – For an unlimited number of subdomains for a single domain
- Unified / Multi-site / SAN SSL – Protects up to 100 domains with different names
You can also issue and sign your own SSL certificate, known as a self-signed certificate, but most browsers do not recognize these as being valid.
A certificate to enable SSL for WordPress can range in cost from free to $800 or more per year, depending on the type of certificate and CA.
A free option not affiliated with hosting is Let’s Encrypt, which is an automated CA run by a non-profit organization dedicated to making the internet a more secure place. Let’s Encrypt has partnered with many different web hosts to create a quick and seamless installation.
For details, check out Server Guy’s An Ultimate Guide to Types of SSL Certificates and The Top 5 Most Popular SSL Certificate Authorities Reviewed.
Setting up SSL for WordPress
Even though you’ve been issued an SSL certificate, this doesn’t mean your site will automatically be secure. There are a few steps you need to take first for single and Multisite installations and they’re outlined in detail below.
1. Change the URL
Before you install your certificate, you need to update your site’s URL.
In your admin dashboard, go to Settings > General and change both your WordPress Address and Site Address to include “https” instead of “http” for single installs of WordPress using Apache servers.
For Multisite installations, you can make this change in your wp-config.php file above the line below:
/* That's all, stop editing! Happy blogging. */
Add the following code, but be sure to replace mysite.com with your real domain:
define('WP_HOME','https://mysite.com');
define('WP_SITEURL','https://mysite.com');
2. Force the Use of SSL
Next, configure your site so that it forces the use of SSL for the WordPress login page and admin dashboard.
Add the code below into your wp-config.php file, just above the “happy blogging” line:
define('FORCE_SSL_ADMIN', true);
3. Redirect to HTTPS
Finally, set up a 301 redirect so visitors are automatically be redirected to the SSL-enabled version of your site
Insert this code into your <em>.htaccess</em> file above any code that already exists:


<IfModule mod_rewrite.c>
RewriteEngine On
RewriteCond %{SERVER_PORT} 80
RewriteRule ^(.*)$ https://www.mysite.com/$1 [R=301,L]
</IfModule>
Make sure you replace www.mysite.com with your real site URL and enter the correct server port if yours isn’t 80.
Save all your files and revisit your site to test it out. if you see a https and a green padlock, you have successfully installed an SSL certificate on your WordPress site.
Keep in mind that if these steps didn’t work, you may need to clear your browser, website and server’s cache.
You can also choose to automate this process with a plugin such as Really Simple SSL.
Wrapping Up
SSL for WordPress sites is a major win for your visitors since it’s the first and crucial step toward securing your site.
Were you able to install an SSL certificate? Were there any SSL for WordPress details that were missed? Share your thoughts in the comments below.


Great Information!!
Thank you for your feedback Maria! We appreciate the comment!
Thanks for sharing these content. This blog is much helpful for Secure Socket Layer related information.