
Contents
Why Choose WordPress Online Store on WooCommerce?
WooCommerce is a free WordPress plugin. It expands the functionality of sites on the most popular CMS in the world. And turns them into full-fledged WordPress online store on Woocommerce. WooCommerce highlights the main advantage of WordPress. You can work with the engine and e-commerce plugin without web development knowledge and experience.
As of mid-summer 2018, the number of active plugin installations exceeds 4+ million. According to the analytical BuiltWith platform WooCommerce is the world’s most popular online trading platform.
Take note of this important detail. The share of WooCommerce exceeds 40% concerning all existing online stores. If you limit to 1 million or 100 thousand of the most popular trading platforms, the reputation of the platform is reduced. And among the 10 thousand of the largest stores, the share of WooCommerce is reduced to 21%.

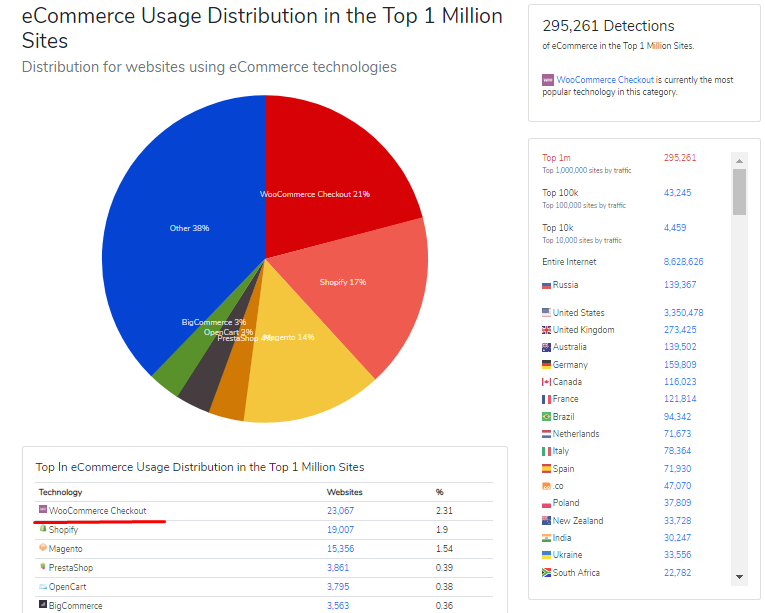
What does statistics say? WooCommerce remains out of the competition when choosing a platform for small and medium-sized stores. Huge online wholesalers also often use this platform.
Why Do You Need WooСommerce?
- By the simplicity of the settings and management the WordPress and WooCommerce bundle has no equal. To create a store, you don’t need developer skills. With Joomla, OpenCart and Drupal work is harder.
- Security and reliability. Sites on WordPress work like a clock. With other engines, sometimes you have to worry about something to work. It takes two days for the micro-markup module integration on Joomla. On WordPress this problem is solved in 5 minutes.
- Free tool regardless of revenue, quantity of goods and other characteristics. One will have to pay for many alternative solutions such as the Ecwid module or Magento Enterprise Edition.
- Developed infrastructure. For WordPress there are 56k+ of free plugins and themes that solve specific practical tasks. When working with other CMS for similar solutions people have to pay or refer to the developers directly and individually. If you experience difficulties on how to select suitable WordPress theme, just read our manual.
- Flexibility. You’ll always be able to find such a plugin that will allow you to solve any problems.
- Self-sufficiency. You receive complete control over your shop and all its data.
- Wide functionality. WooCommerce provides access to the basic features that are required by the online store. The functionality of the platform can be expanded with plugins in order to meet the needs of a particular project.
- High-quality technical support. You can always find forums of support and receive the help from WordPress and WooCommerce developers.
WooCommerce & WordPress
Surely and WooCommerce has its drawbacks. And the main one you have to get under the hood. The same drawback is in all CMS and e-commerce-modules. And its e-commerce shop builders like Shopify are deprived of it. So let experts deal with settings’ technical issues or details when you are not able to.
The shop built by the means of the standard WooCommerce tools is very typical. It is necessary to invest time & financial resources in customization. Many websites which work at commercial CMS or engines with the open code have the same shortcoming. The problem is solved by the self-made engines but it’s a very dangerous choice.
WooCommerce works only with WordPress. It can be a shortcoming for online dealers who prefer other CMS. It is the simplest to estimate advantages and shortcomings in practice. Better get to work if the appearance and functionality of the trading platforms suit you.
First Steps: Hosting, CMS Installation and the Design Choice
Hosting
If you are building an e-commerce shop from scratch, choose the virtual hosting. You won’t need a VDS or the dedicated server since high traffic is not guaranteed right away.
Pay attention to the available disk space. When you display several goods, the question has no critical value. But if the goods go on hundreds or thousands, choose a hosting plan with the large disk space. 10 GB will be more than enough at the first stage. We created for you the detailed guide on how to choose the best WordPress hosting.
It is always better to choose Linux hosting to work with a WordPress and WooCommerce union. MySQL and PHP shall be supported by it. The plan must include access to the server Control Panel and FTP.
Many hosts help with a free SSL certificate when you are registering. Use this offer to provide access to the site through a safe https protocol.
But it is not needed if the hosting control panel includes the cPanel Softaculous Apps Installer. It will help to set WordPress in two clicks.
CMS Installation
Before CMS automated installation pay attention to important details:
- Replace automatically generated database password.
- Instead of standard Admin enter the other name.
- Think of a strongadmin console password.
- Install a Loginizer plugin to protect against WordPress Brute Force Attacks
After changing the settings launch installation.
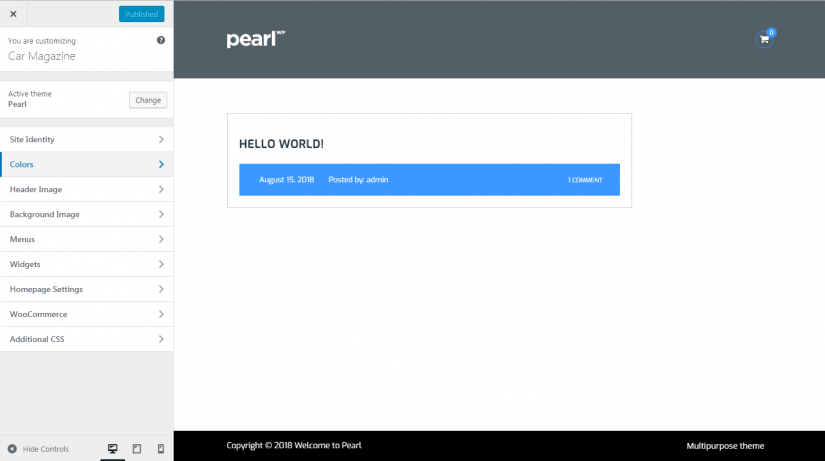
Design
When choosing a theme consider the preferences and features of the project. The design should be compatible with WooCommerce. Theoretically the plugin shall work with all WordPress themes. But in practice some of them work incorrectly with the ecommerce-platform.
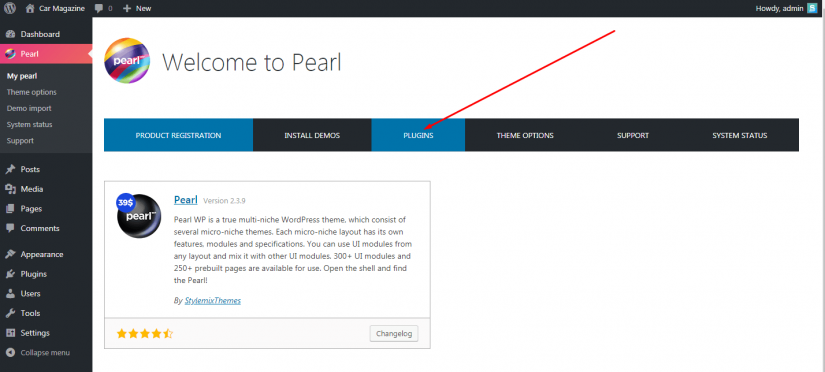
One of the most suitable themes for Ecommerce shop is Pearl. You will find the installation and activation details all included.
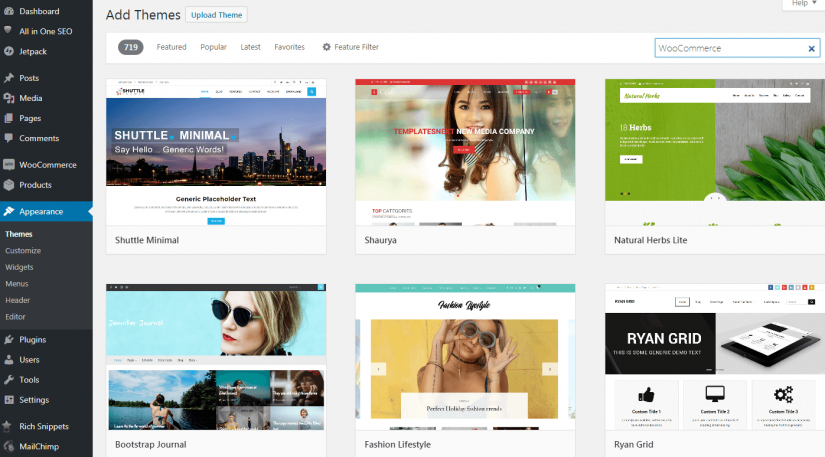
In the WordPress theme catalog there are demos which developers declare compatibility with WooCommerce. The same themes can be found via the admin panel of the website in the “Appearance — Themes” section.

Also suitable demos can be found through developers of commercial themes approved by the WordPress community.
How to Install and Configure WooCommerce on Pearl
Installation
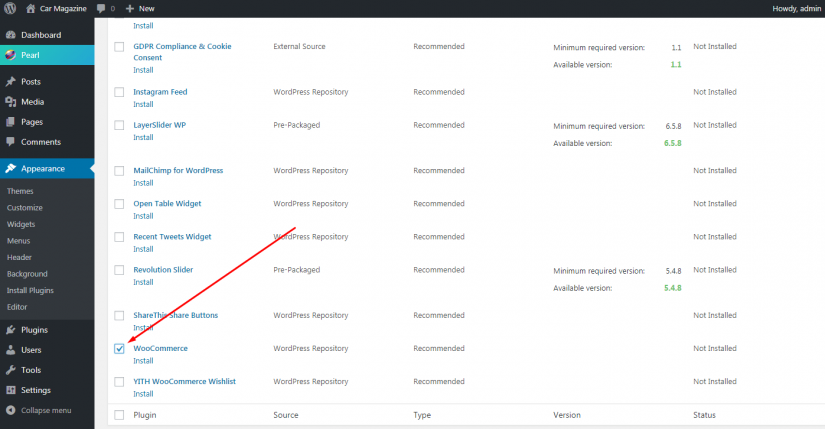
Once you installed and activated the Pearl Theme go to the Plugins section

There you will find available plugins that appeared with purchase of Pearl and among them WooCommerce. Welcome to install it.

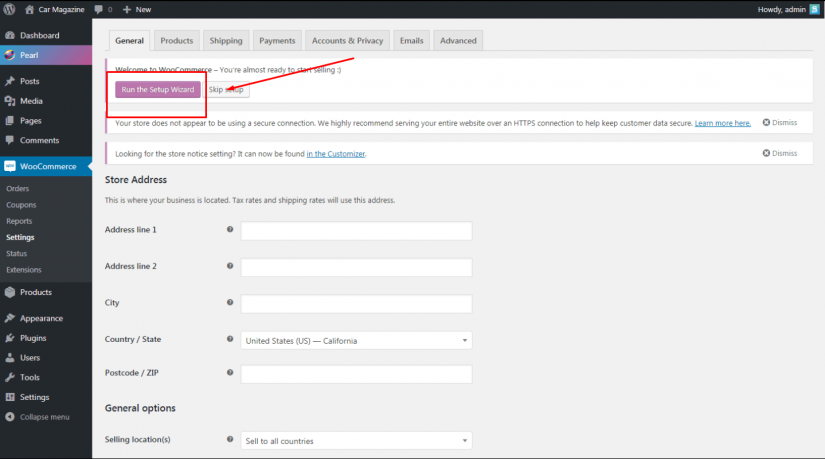
And the WooCommerce icon will appear on the side panel – click on it and press Run The Setup Wizard inside. This will launch the WooCommerce setup wizard where you’ll get started on the nice & easy step by step instructions.
Setup

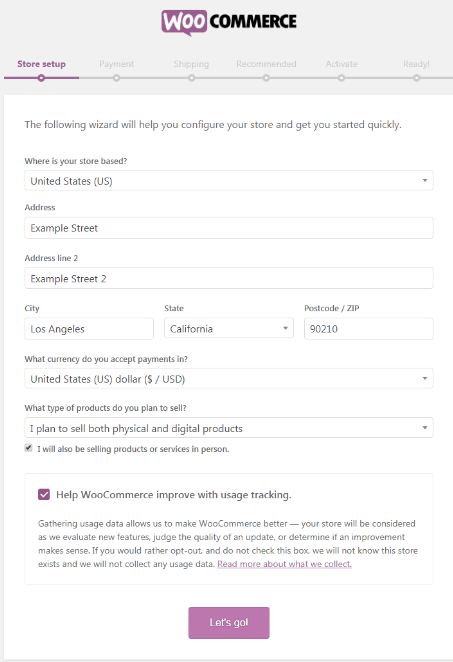
In the Store setup tab of the Setup Wizard you can set some basic information. Such as:
- Address of your internet store
- Acceptable currency
- What type of products do you plan to sell – physical, digital or both?
As soon as you fill out these data, click on Let’s go!

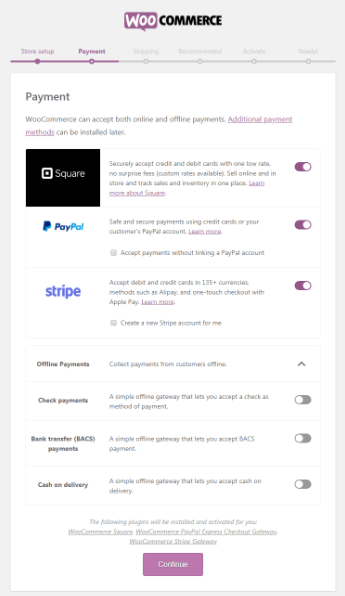
The Payment and Shipping pages are self-explanatory where everything’s hand on a plate as well.
Payment
In the Payment tab you can activate basic payment gateways:
- Stripe – allows you to accept credit and debit cards for payment
- PayPal – allows you to receive payments by the means of any method of PayPal
This is not too important at this stage as:
- You are able to easily replace these settings later
- You can afterwards choose from more than 100 other payment gateways
- You’ll still have to set additional options in order for the payment gateways to start working
Thus, do not even bother right now with these options yet if you will. If you do not know what payment gateway to use, just leave Stripe.

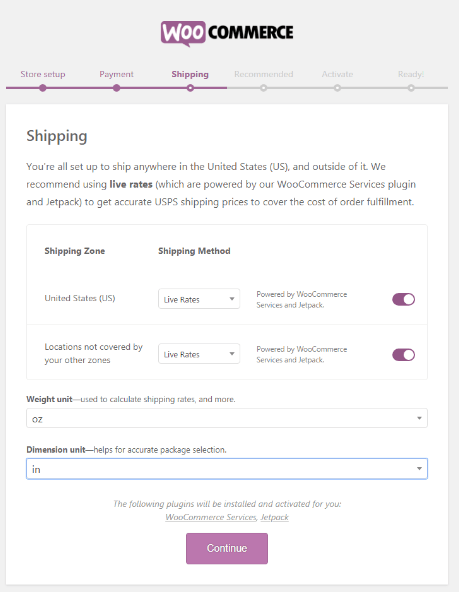
Shipping
In the Shipping tab you have options to set:
- How the shipping cost will be calculated
- What weight and dimensions units to use
Most often these data are left by default. However, if you do not want to calculate rates for shipping in real time – Live – you might as well choose:
- Fixed rate
• Free shipping

Recommended
The Recommended tab allows you to activate automatic calculation of taxes. For this purpose, it is enough to enable the Automated Taxes field.
In case of this WooCommerce automatically will install WooCommerce Services plugin so it could automatically collect the correct tax in the course of client purchase.
You don’t have to necessarily use it, but it is rather useful, and therefore we enabled it:

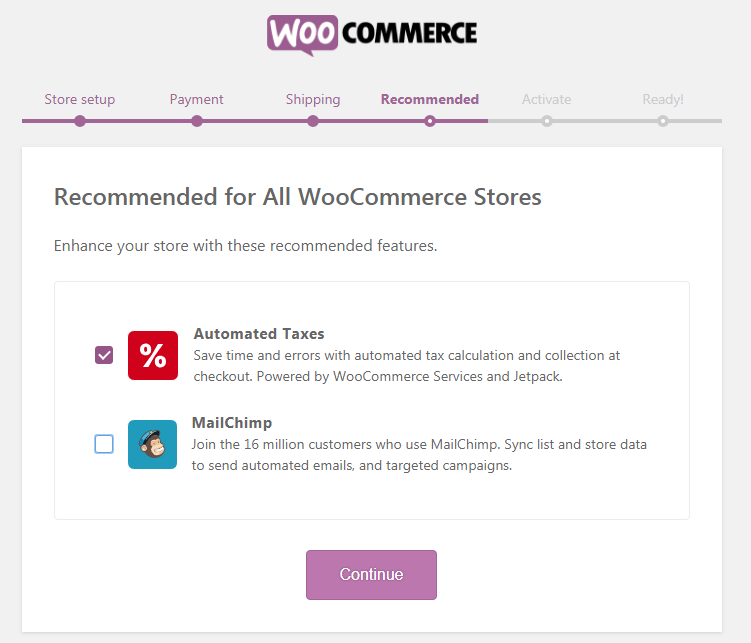
We will assume that you’ve selected items:
- calculate the shipping cost in real time
- automatically calculate tax rates
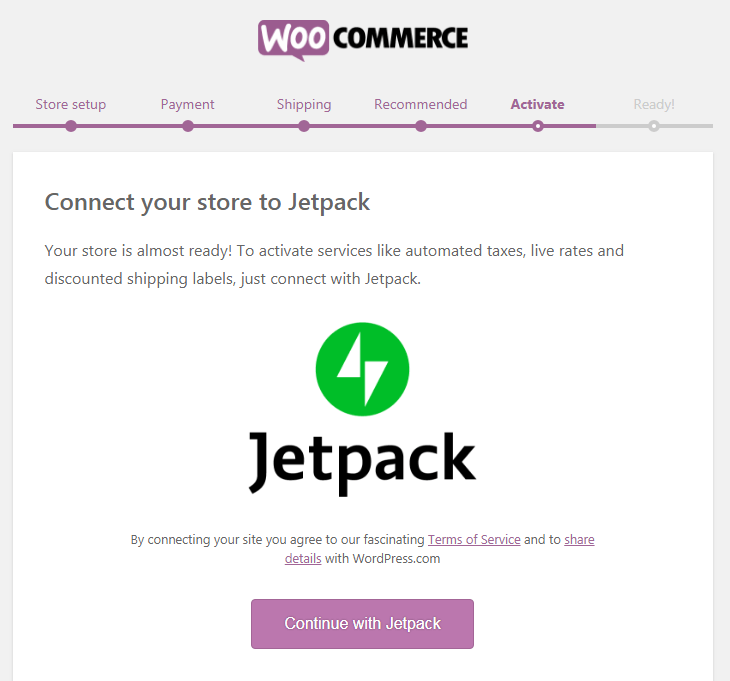
Activate
Further you will need to integrate your website to Jetpack plugin. It is developed by Automattic, the same company which stands up for WooCommerce.
We click on Connect with Jetpack.

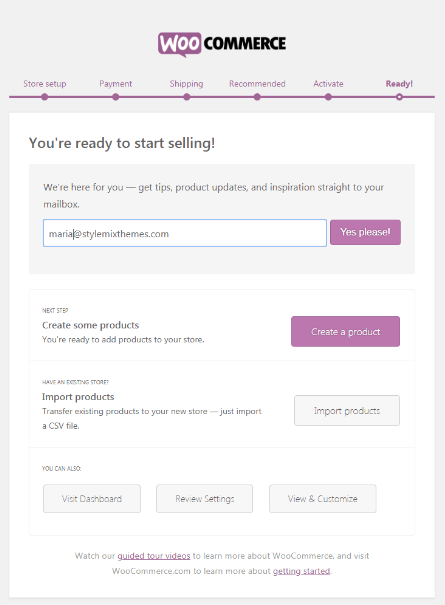
Ready
Great! Now you are ready to start selling. Time to create some products.

How to Add Products to the WordPress Online Store on WooCommerce
It is better to add several products to the store right after general settings. It will provide look-and-feel purpose while tweaking the site. The products on WordPress and WooCommerce platform are sorted by categories. To look at existing or to create new ones is possible through the Products — Categories sidebar menu.
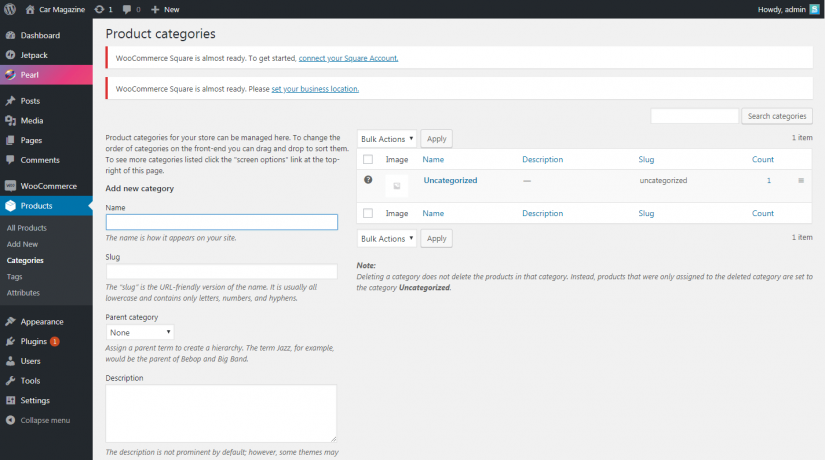

To create new category, specify the name, add the short description and a thumbnail. If necessary, specify slug. And select a parent category by means of a dropdown menu if necessary. Choose the needed option from the “Display type”.
Pay attention, during the WooCommerce installation the system creates test categories. Edit them not to add new.
Add the Products — Add New
Select category, specify the name of a product, add the long description.
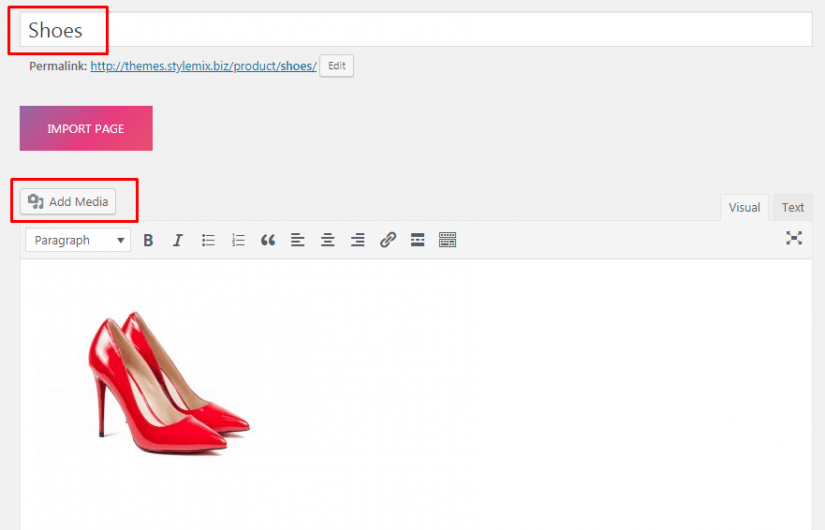

Give the name to the product and upload the image to it or make import
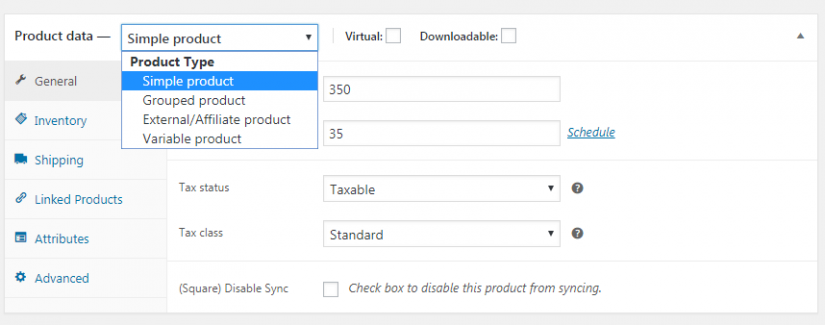

Choose the product data from the offered list in the dropdown menu
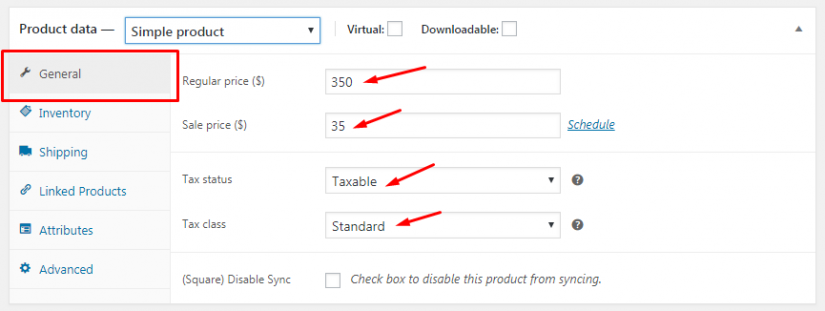

Enter the product price, information on discounts and select tax status & class
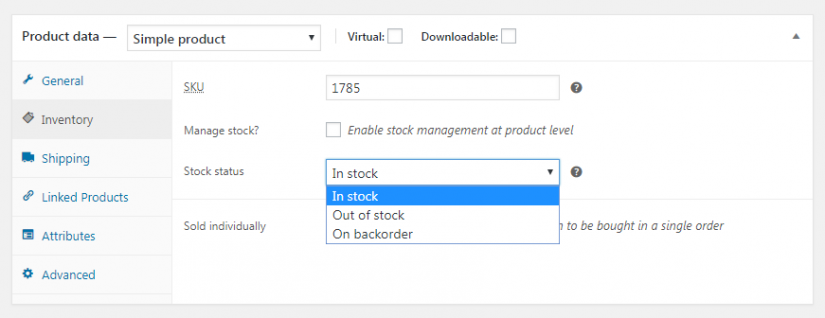

- General – contains prices (regular and discounts), as well as tax information.
- Inventory – specify the SKU (Stock Keeping Unit), enable stock management at product level if necessary. In this case on the website the quantity of available goods will be displayed. You can also enable the box allowing only one of this item to be bought in a single order.
- Shipping – specify weight and overall dimensions of a product, as well as an arbitrary shipping class (for grouped products).
- Linked Products – it is possible to specify upsells and cross-sells products.
- Attributes – specify additionally unique data on goods if necessary
- Advanced – allows you to add custom comments for clients, as well as enable / disable user reviews
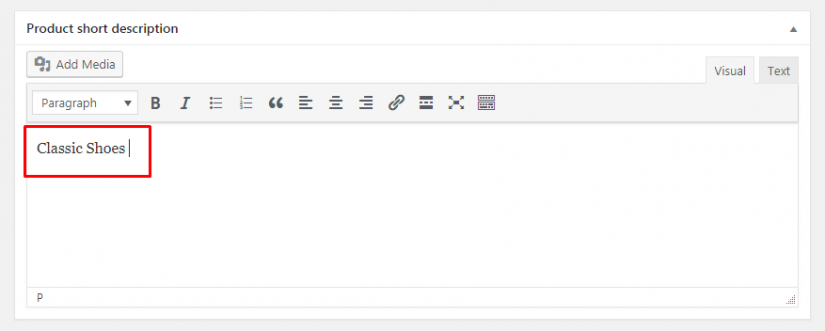
Short Description
Add a product’s short description as well more down further the line.

At the side bar you are able to add:
- Categories and tags
- Main image
- Gallery
Publish
Once you fill out this information, you can publish your product.
If you combine all of this together, you will get something similar in the front-end:

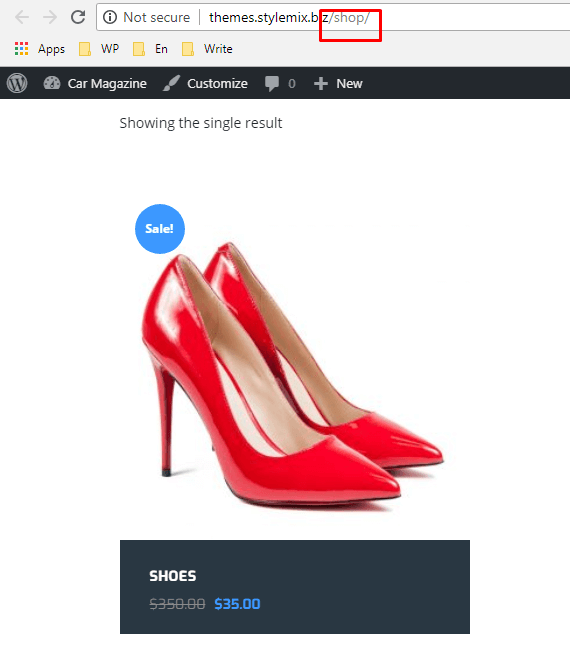
Make sure that the correct data is specified on the product page.
As of now you are able to replicate this process for all of your products
You’ve selected basic settings of an online store.
How to Set up the Homepage and the Menu
Homepage
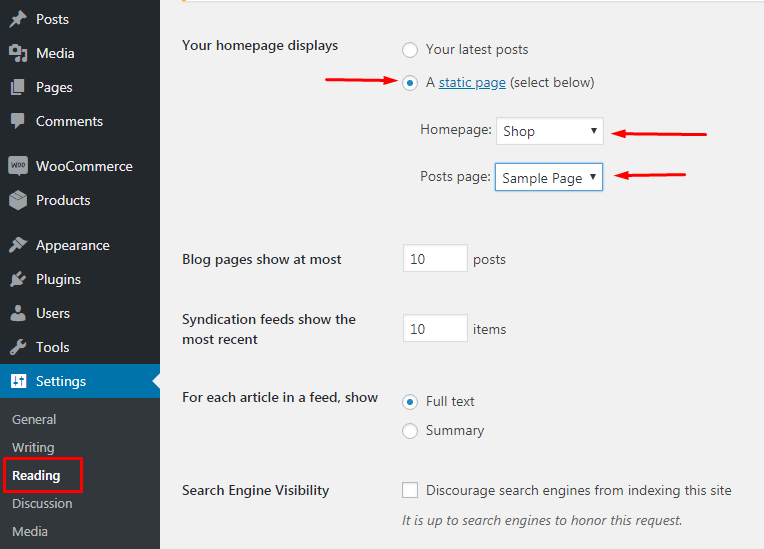
Two options of settings of the homepage are possible. If you create an online store on an existing site, you can place the display on one of the internal pages. In this case the homepage will remain the posts page or the static page.


It is logical to make a showcase the homepage when the website works only as an online store. On the sidebar go to the Settings — Reading admin panel specify that the static page will be displayed as a home one. Select the necessary option from a dropdown menu.
Assign Sample Page created automatically the posts page. Further it can be edited and used as the blog.

Menu
Create or edit the menu is possible through Appearance – Menu.
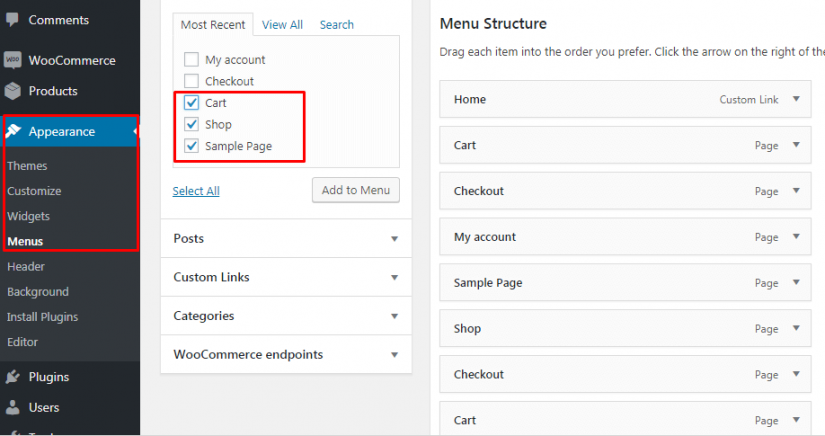


Add links to the mains or the most popular types of products in the menu. For this purpose, copy category URL and specify it in the section “Custom Links”.

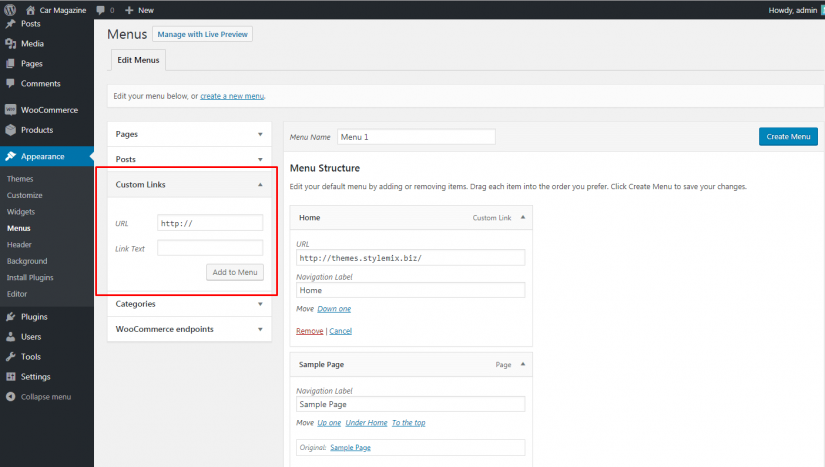
You can also add custom links, posts and WooCommerce endpoints to the menu if necessary.
How to Work with the WooCommerce Expanded Settings (tweaks)
After WooCommerce installation the customization wizard helped you to specify key parameters of the store. Now pay attention to the expanded settings or small tweaks.
How to Configure Taxes in WordPress Online Store on WooCommerce
You must select the form of taxation before configuring the taxes. Consult with experts such as an accountant or tax inspector if necessary.
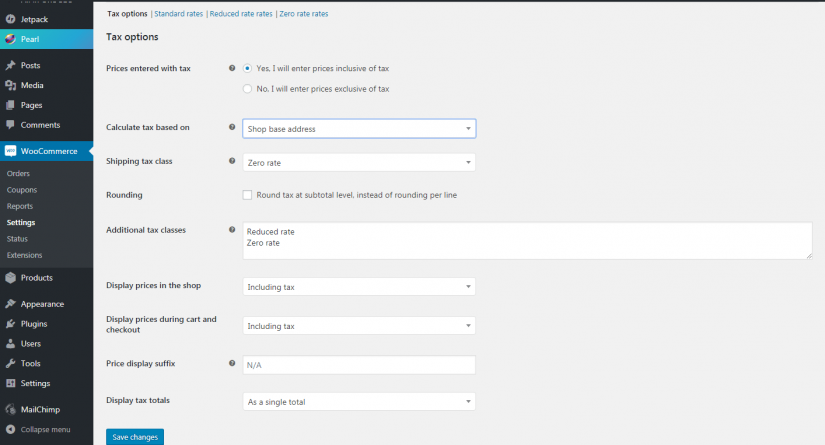

If your shop works at a simplified tax system, you are guided by a domestic market, use the following settings of taxes:
- Put a mark on “Yes, I will enter prices inclusive of tax”.
- For calculation of taxes use Shop base address.
- Specify a Zero rate of a tax on a shipping.
- If you sell products for which the special or zero rate of tax payment works, specify additional tax classes.
- Show the prices in shop including taxes.
- Leave the “Price display suffix” field empty.
- Select “As a single total” from the “Display tax totals field”.
Check the box with the option “Including tax”. In this case, online store visitors will see the products’ final prices. You will return to the tax settings later.
Save changes and check how the product price is displayed.
How to Configure Shipping Settings
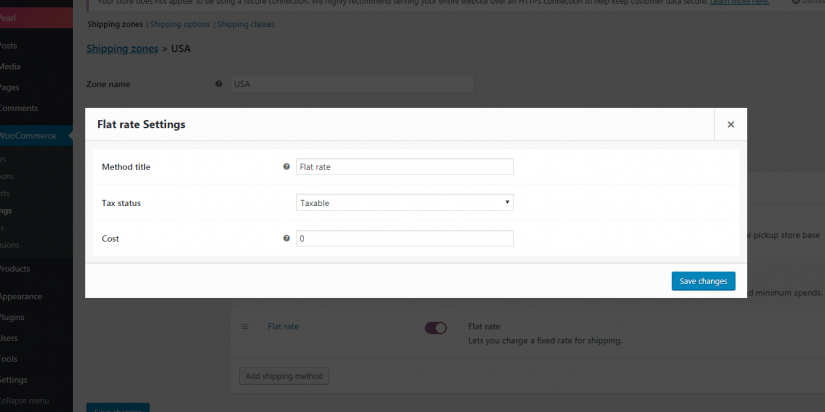
Select the Shipping tab from the WooCommerce-Settings menu. Press the Add shipping zone button.

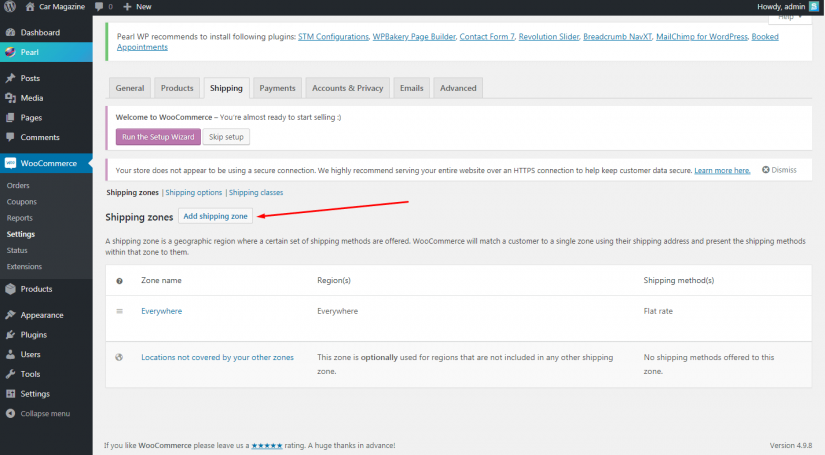
Specify the name of a zone and select the geographical region. Add shipping methods. Available methods are Local Pickup, Free Shipping and Flat Rate. The last method lets you change a fixed rate for shipping.

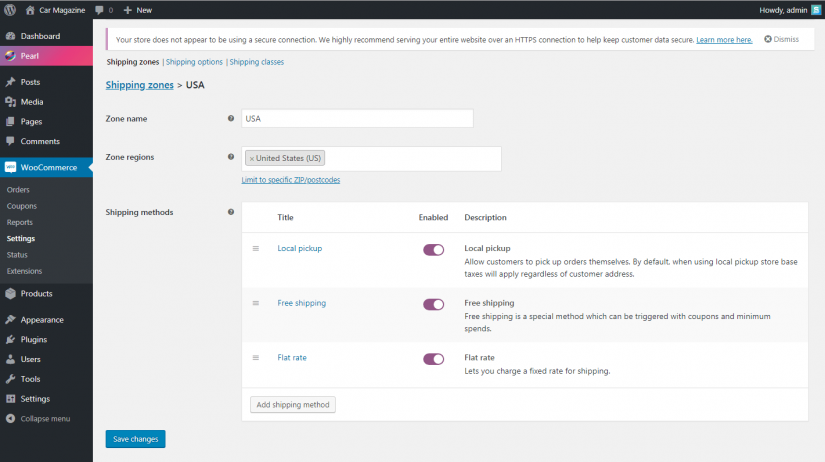
To edit the delivery method, click “Edit” near the appropriate link in the list. In the opened pop-up window, it is possible to change the title of a method, the tax status and cost of service.

Payment Methods for WordPress Online Store on WooCommerce
Ability to accept payments is one of those things you should spend part of your budget on. But there are no reasons you should spend all the money for processing of credit cards online or cash at local buyers.
There are several methods to take payments from your clients, without whittling away a fortune on setup or monthly payment. From built-in processors to additional add-ons there is a suitable solution for each budgetary shop which won’t waste your money and time.
We will consider payment methods with WooCommerce. But first we’ll consider that actually it is worth taking payments by credit cards and why a “cheap” payment gateway can not be as good as it seems.
Cost of Acceptance Payments Online
If you build the first WordPress online store on WooCommerce, you will not understand that to accept credit cards costs much. Fees that the payments can charge you monthly and during purchase, in exchange for you using their service.
It is very easy to wave away from these collections when your store is small or your products are inexpensive. 5% of your general purchases can seem not really wasteful. You can assume that payment of 100 dollars a month is affordable.
One should definitely carefully think about what is better to accept cards or other payment methods before choosing a payment solution. $100 per month is $1200 dollars per year – what to do if you have to spend more, than you expect? Or what if your shop becomes as popular as Amazon and 5% will come out in thousands of dollars?
That is why it is better to look for the solutions allowing to accept credit cards without advance payment or huge monthly payments.
Let’s consider the most available ways you can take payments on WordPress Online Store on WooCommerce regardless of the fact what you sell.
Built-in Options Which Are Free: Stripe & PayPal by Braintree
Stripe & PayPal powered by Braintree as a set with WooCommerce, and you can activate them directly from Setup Wizard. If you set up WooCommerce in the past and didn’t have these options, you can download extensions on WordPress.org at any time free of charge.

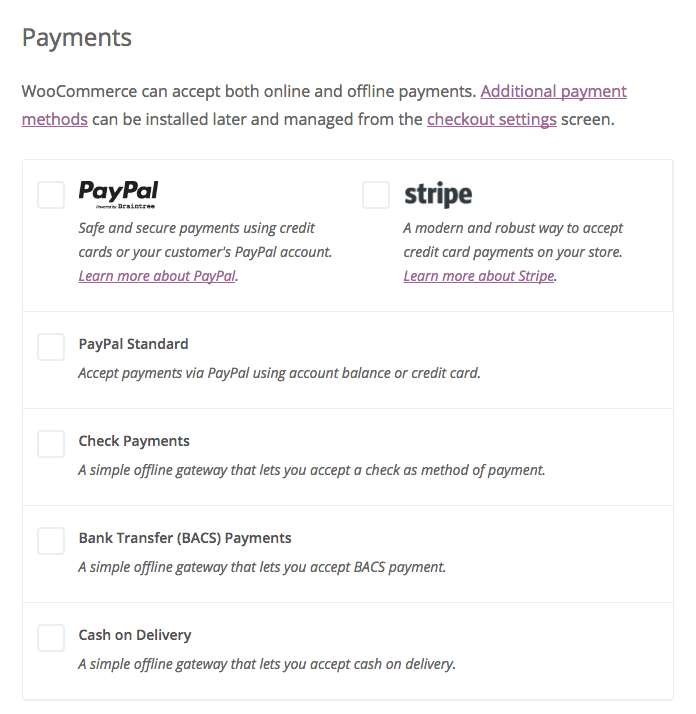
Just mark those boxes to activate PayPal or Stripe payment service providers. You can use any other payment method that you want – then go on to a remaining part of the setup Wizard.
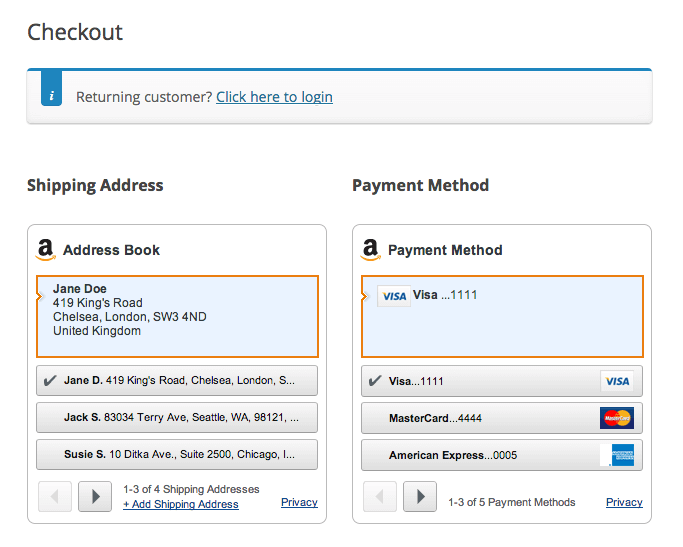
Both of these methods of payments are integrated into your shop, so they will appear into your checkout page but will not send the shoppers out of the platform for purchase completion. For example, here is how Square on the WooCommerce checkout screen:

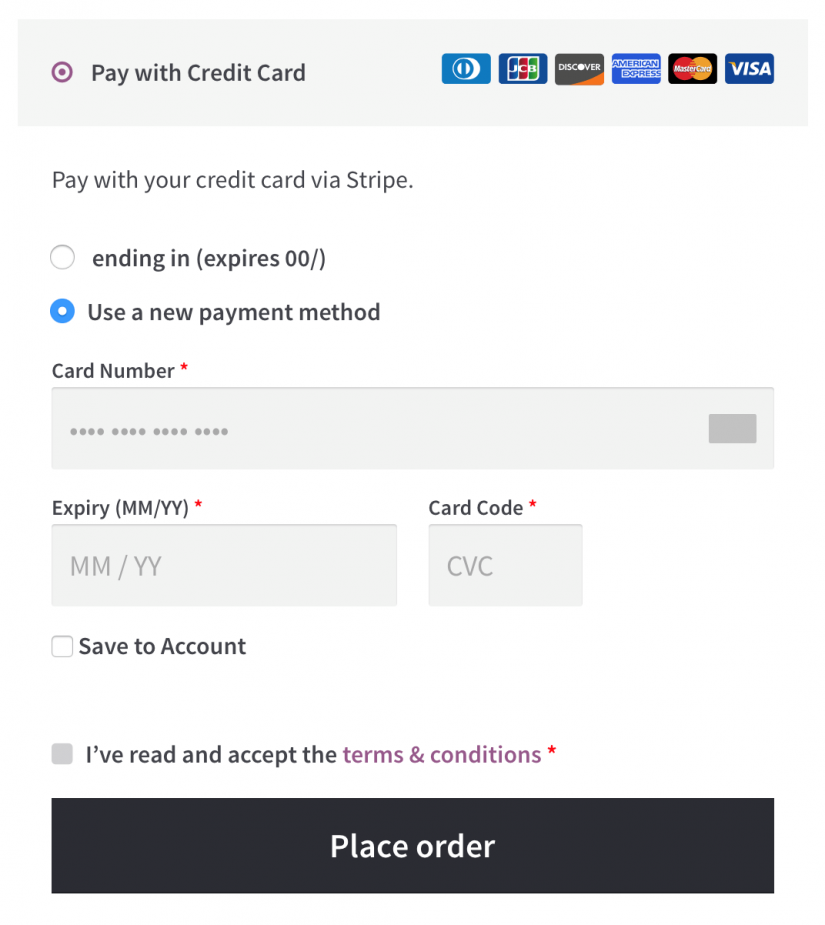
PayPal powered by Braintree and looks similar but adds in “pay with PayPal” option that a client can use the PayPal account for transaction completion if wish.
Pricing for both of these payment methods is simple:
- PayPal by Braintree: the first $50 000 in transactions are free; after that pay 2,9% + 30 cents per successful credit card or digital-wallet operation
- Stripe: you pay 2,9% + 30 cents per successful transaction by the credit card if your annual payments make less than $ 1 million
If you just starting operation on WordPress Online Store on WooCommerce, we recommend to set up both of these payment methods. They are quickly set up, logically look in your shop, and they allow to take credit card payments or PayPal at once.
Paid Gateways With Free Payment, Available as Extensions
You can download extensions at any time for free even if your WordPress Online Store on WooCommerce already functions. We will tell in more detail how to set up it.
If you look for something a little different or you need payment options which are not offered as a part of WooCommerce, there is a set of other available WooCommerce payment gateways.
Here only some of them:
PayPal Express Checkout – allows customers use their PayPal account for completion of transaction off-site
Amazon Pay – adds in a “Amazon Pay” option, clients can finish purchase without leaving your shop
Simplify Commerce – on the Mastercard basis this gateway supports the major credit cards, invoices and recurring payments
Klarna Checkout – for shops in certain countries to accept credit cards, issue invoices, or to pay for the purchases over time

Stripe and PayPal could be installed free, but the transactional fees are paid depending on the number of orders and the quantity of your general earnings.
PayPal Express Checkout has the same coefficient as Braintree (2,9% + 30 cents for successful transaction) which will not be too big expenditure for beginners in online trade and even for large online stores.
The important thing that you must remember: you don’t need a sellers’ account for Stripe and PayPal, for example, the special bank account. With other gateways even free ones you might be required to submit the application through the bank.
Selling Subscription
Let’s consider some options.
So, you plan to offer subscriptions to the products you sell or want to set up membership for your customers, finding a payment method that supports automatic recurring billing is a must.
Since setting up your subscription package is quite expensive you are of course looking for a payment option that will not cost much. You will like these ways:
PayPal powered by Braintree – free, works with WooCommerce and offers subscription support
Amazon Pay – free, offers subscription support and the flexibility of an alternate payment option
Authorize.Net CIM – $ 79 for extension, you get a reliable built-in payment gateway that supports periodic invoicing for 2.9% + 30 cents per transaction
Realex Payments – $ 79 for extension, 29 €/month (for 350 transactions or fewer) – good for small businesses
Options Without a Credit Card
There are 3 WooCommerce options which allow you to take payments for 100% free
- unwilling to pay commission charges for card processing
- local market operation only
- several alternative opportunity options for your clients :
- BACS (bank transfer) – enter the bank account information and the customers can connect you a payment
- Pay by check – ask customers mail you their payment t before you send their order
- Cash on delivery – clients pay with cash when their order is delivered or when they receive it
These payment methods are WooCommerce built-ins and you don’t have to do anything in order to include them. However, if you take orders with these payment options, you will understand that it is more difficult to process them, than the credit cards.
You need to mark orders manually which leads to an extra time spent.
Although when the product disappears while transporting or payment didn’t come through or the client has no cash, issues might occur. Generally, such system of payment is less reliable than online system.
Nevertheless, if you deliver orders for the local market, these are great options that will allow you to save a lot of money on processing fees. Just keep the tax records and everything will be just fine!
How to Setup WooCommerce Payment Gateways
Great, your e-commerce shop already working for 99%. You have products and people can add these products to their carts and make the orders. But they will not be able actually to make purchase as you did not set up payment gateways yet.
For the setup of a payment gateway pass into the WordPress console and select WooCommerce → Settings then go to the Checkout tab. Here you can select a suitable payment gateway.
We will show it on the example of Stripe but you can select any other payment option.

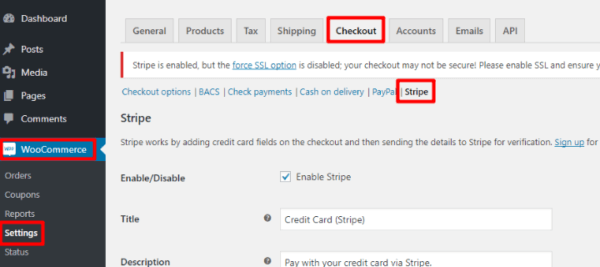
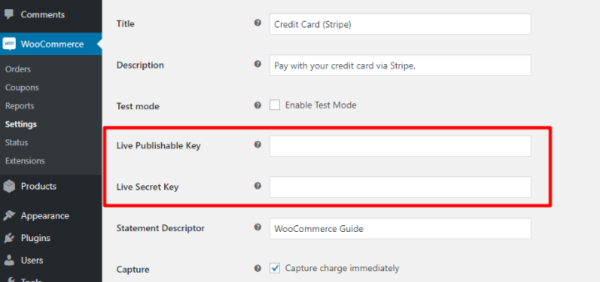
To set up WooCommerce Stripe follow this:
- Create a free Stripe account
- Find Live Secret Key and Live Publishable Key in your Stripe account
- Put them into WordPress
- Customize remaining options

Always click Save Changes right at the bottom of the page and this time to activate your payment gateway.
Specify the Remaining WordPress Online Store on WooCommerce Settings
The shop is now completely functional. But you would definitlely like and, most importantly, need to find out more about the remaining WooCommerce options among which:
- Customer registration (Accounts tab)
- Automatic email (Emails tab)
- Coupons (Checkout tab)
- Etc.
We recommend you to investigate all the Settings area in order to have complete idea of all possible options:

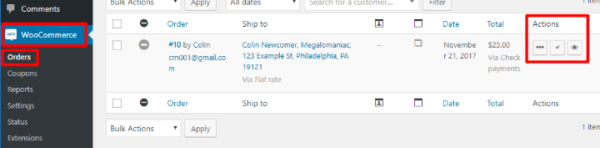
How to Manage WooCommerce Orders
As soon as your shop starts to receive orders, you can manage them on the WooCommerce → Orders page:
You can also use the Actions column to quickly:
- Change order status (using icons with dots and a check mark)
View additional order information (icon with an eye)

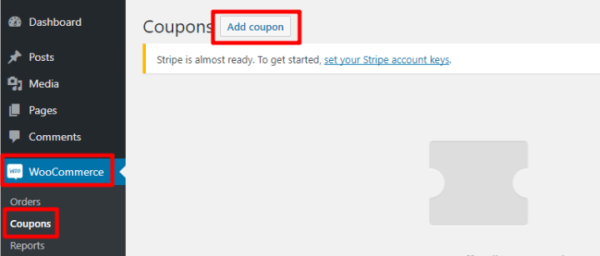
How to Create Coupons on WooCommerce
Let’s go from the fact the coupons come by default. You can create new coupons following WooCommerce → Coupons → Add coupon:
You can:
- Determine the type and amount of discount
- Set the end date of the offer
- Limit the use of coupons
- Set other usage limits

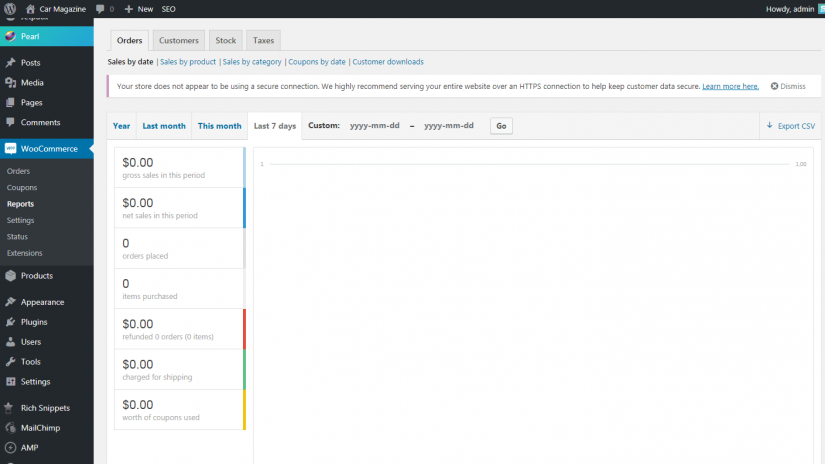
How to View WooCommerce Reports
WooCommerce reports help you understand how your store works. From them you’ll learn:
- Total sales for the period
- Orders ammount
- Number of items sold
- Ammount of used coupons
- Refunds percentage
- And a lot more
You can access to the reports: WooCommerce → Reports.
Let’s just say that the built-in WooCommerce reports are not so great. You can find third-party tools that will offer more information.
How to Improve Technical Features & Expand Functionality of the WordPress Online Store on WooCommerce
At this stage enable the additional SEO module, create ideal URL structure, set up the accelerated mobile pages and a specific e-commerce micro-markup.
How to Optimize the WooCommerce Store
WordPress Online Stores on WooCommerce are SEO-friendly by default. All in One SEO Pack plugin allows to tweak a resource to requirements of search engines.
All in One SEO Pack
Install and activate a basic plugin: WooCommerce All in One SEO Pack. This tool allows to control meta data of product pages. It adds the All in One SEO Pack section to the product editing page.

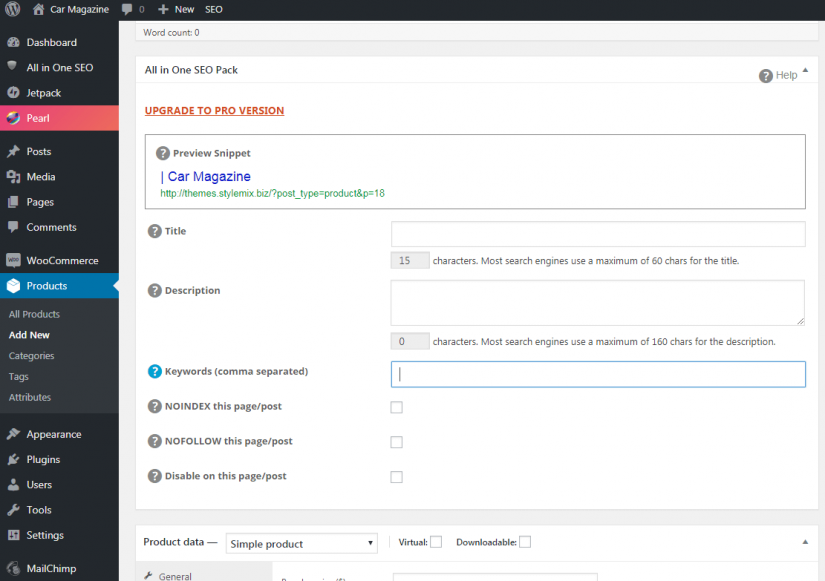
Pay attention, it is better to leave the Keywords field empty. Search engines do not consider its contents when ranging, so do not waste time on useless work.
Pay attention to URL. At a stage of basic site setup you turned on the FURL(= friendly URL). But when using WooCommerce by default, links to products contain product prefix. It is unnecessary information because of which URL is too long.

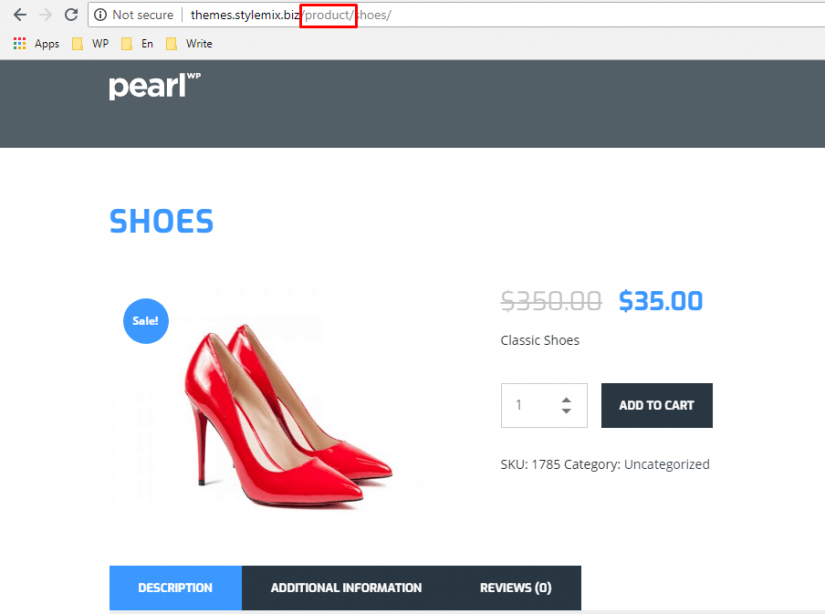
Perfect SEO URL
The problem can be solved with the help of a premium Perfect SEO URL plugin. It makes links to WooCommerce shop products ideal. Examples can be seen on the plugin demo website.
Permalink Manager Lite
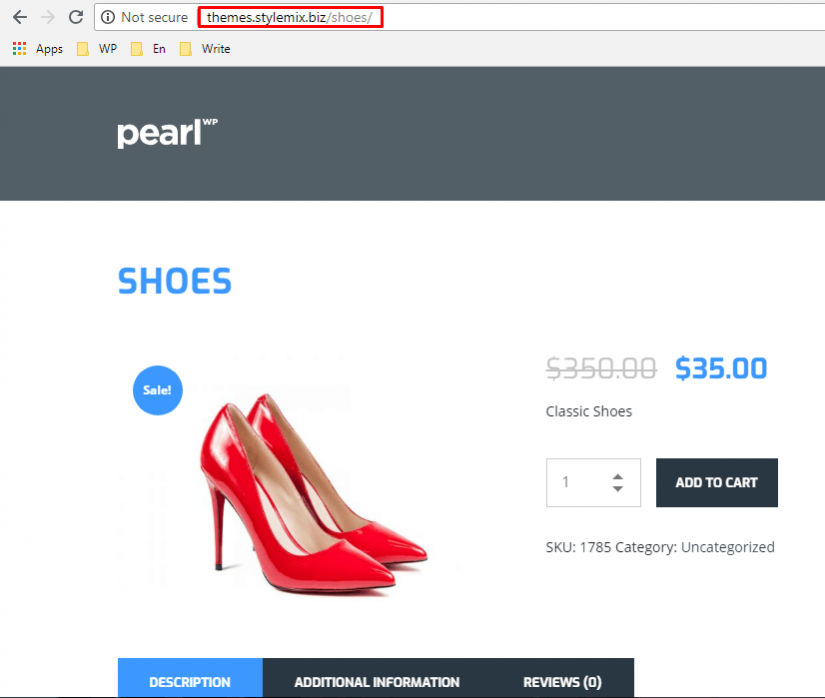
If you do not want to spend $119 for a Perfect SEO URL plugin, download and activate the Permalink Manager Lite. Select the Tools — Permalink Manager from the sidebar. Open the Permastructures tab. In the line “Products” specify desirable structure of the URL. To display only the category name and product name in the link, use the% product_cat% construct.
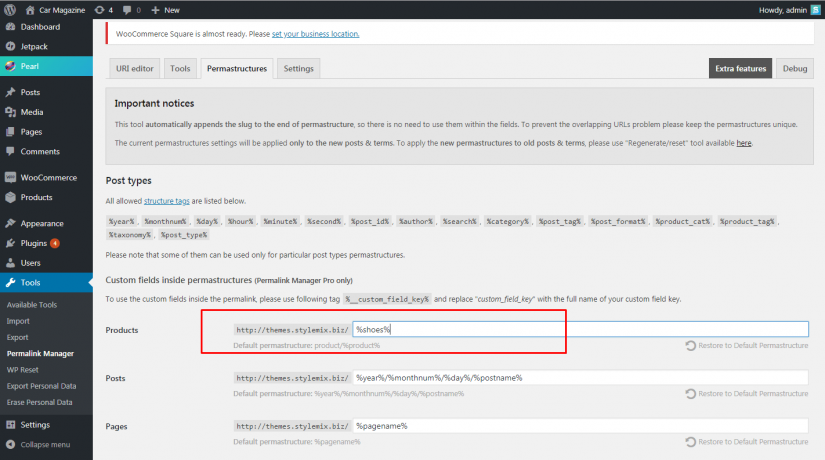
Add a new product to the website. Check how the link is displayed.

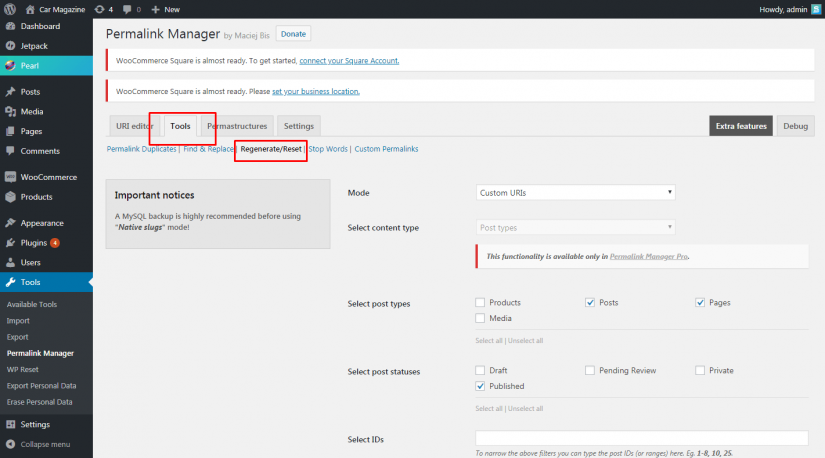
Please note, changes of URL structure are not applied automatically to the products published earlier. Links to them should be edited manually. For this purpose, on the page of settings of a plugin select the URI Editor tab. In the section Products make necessary changes.

How to Configure a Micro-markup & the Open Graph Protocol
Social Meta
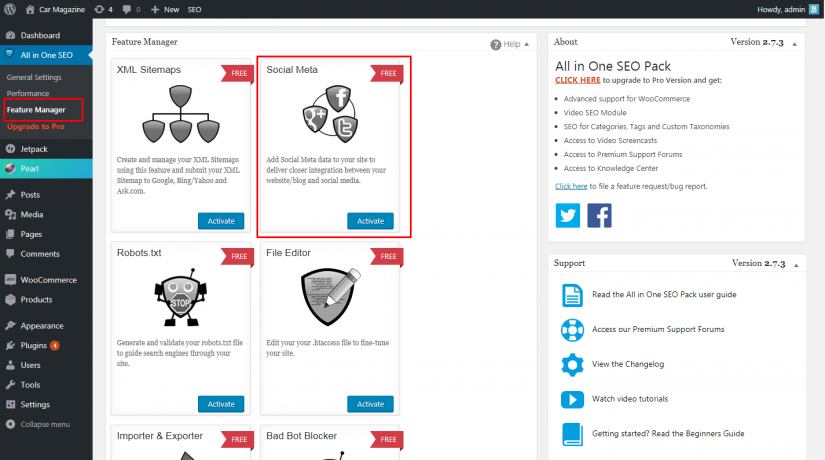
Go to the All in One SEO Pack – Feature Manager and activate Social Meta.
This is enough so that when you publish links to the goods on social networks an attractive snippet would show up.


Open Graph
On the module page change the Open Graph settings for Facebook. Select Facebook Meta for Post Types mark “Products”.
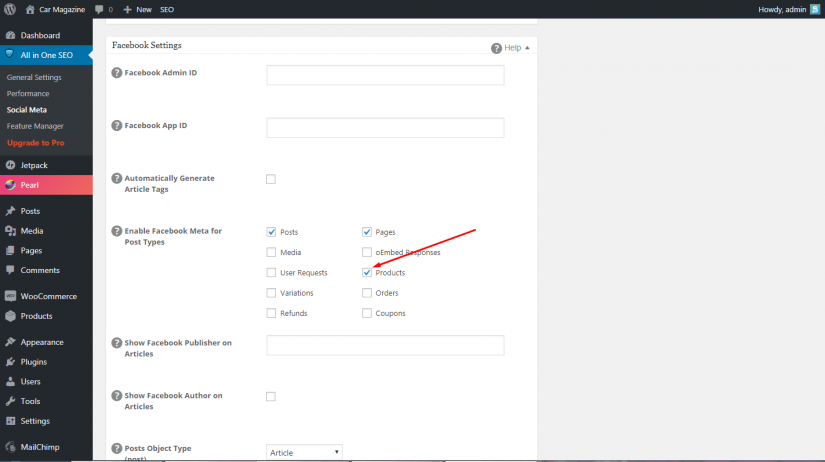
Specify Products Object Type.
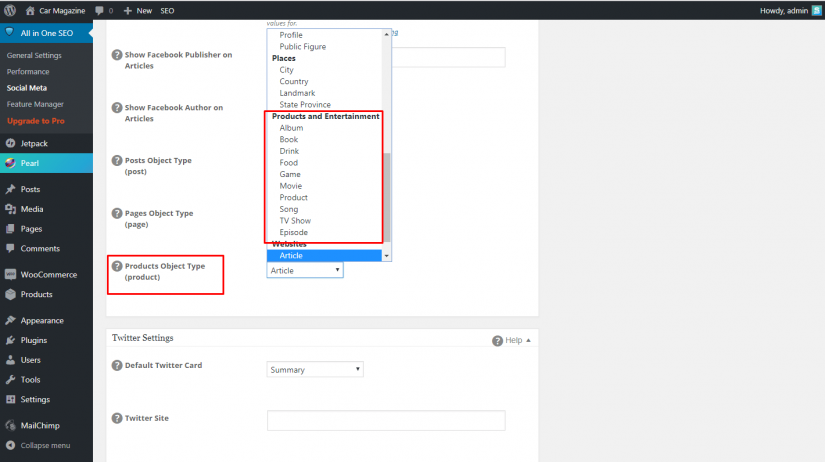
The proposed settings provide a visually appealing snippet for links to product pages.


If necessary, change the Twitter Cards display settings.
If necessary, change the Twitter Cards display settings.
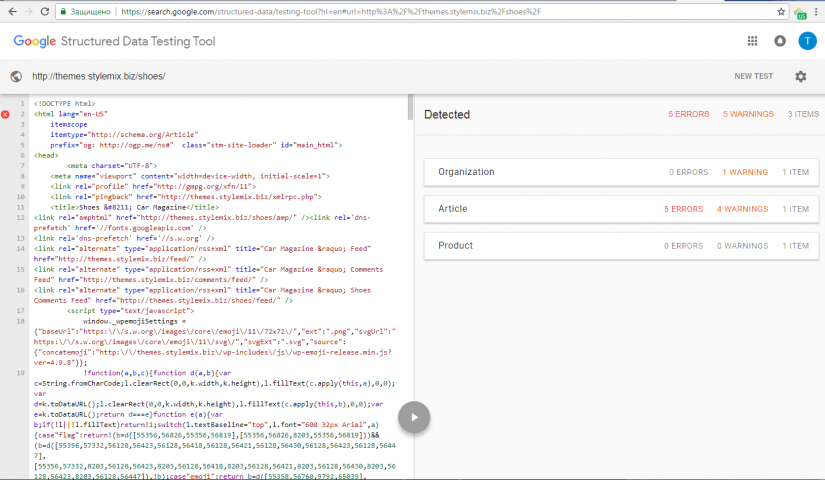
Structured Data Testing Tool
The default template for WordPress Online Store on WooCommerce supports the Micro Score type Product Schema.org for product pages. However, the micro-markup implemented in the subject does not pass validation.

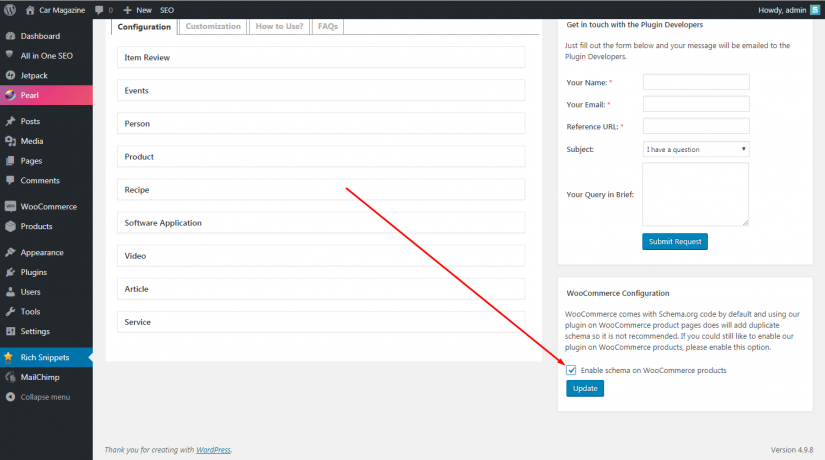
Schema WooCommerce Plugin by Schema App
If you’ll encounter any errors Schema WooCommerce Plugin by Schema App will help correct the situation. It fixes errors and adds missing data to a markup which are necessary to form the rich snippet in the SERP. The cost of a plugin for one website is $47.
All In One Schema.org Rich Snippets
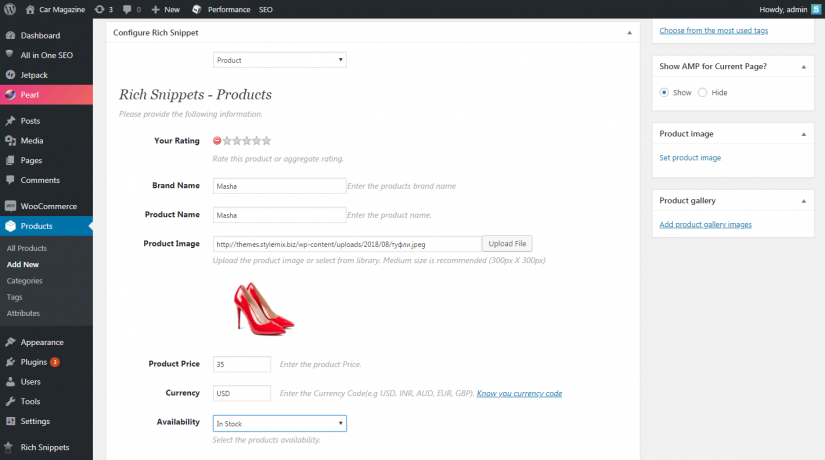
Correct micro-markup can also be added with free tools, for example, All In One Schema.org Rich Snippets. After installation and activation the plugin you must enable markup on the product pages.
An additional field will appear on the product page providing you the opportunity to specify data for rich snippets.
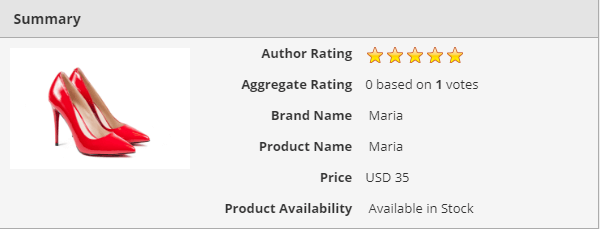
Created with the help of All In One Schema.org Rich Snippets undergoes validation. The problem is that in a code of the page there is also an old markup with errors.
Besides, All In One Schema.org Rich Snippets implements markup not through JSON-LD. Therefore, information is visible not only to search robots, but also people. The unit with semantic data actually duplicates information on the page.

How to Build AMP for the WordPress Online Store on WooCommerce
According to Google, conversion of mobile users directly depends on the page speed load time and a small screen page user-friendliness. Therefore, the largest search engine in a pattern recommends to owners of e-commerce stores use AMP.
To implement the accelerated mobile pages, install and activate a basic AMP plugin and two add-ons: AMP for WP and AMP WooCommerce. The site will have accelerated versions of static pages, posts and products. Our complete AMP Guide will help you if you are having difficulties.
Pay attention to the AMP settings. They are available in the appropriate menu of the admin panel. See the detailed instruction in a manual on the accelerated mobile pages.


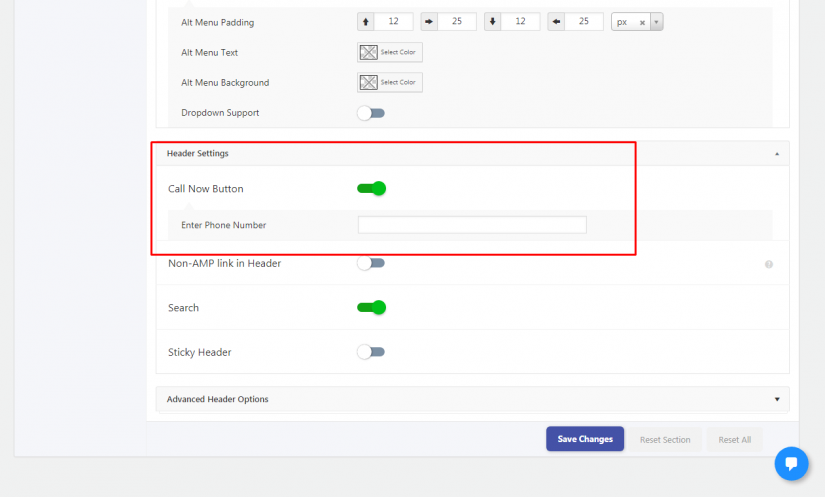
Call Now Button
Turn on the Call Now button at the Design – Header Settings. It will help owners of mobile gadgets immediately contact the sales department. You can specify the phone number and to choose the appearance in the Design section of the AMP settings.

Connect the paid Call to Action feature. This AMP for WP plugin add-on adds call to action buttons. The cost is $30 dollars.
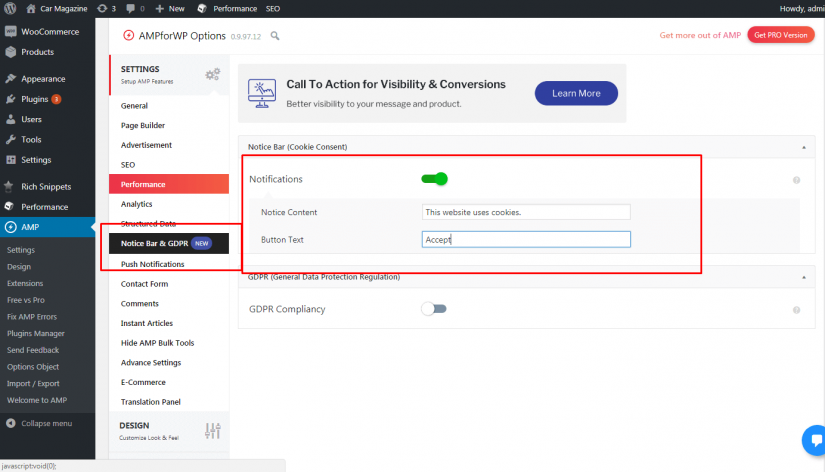
Notifications
In the Notifications section connect notification messages if necessary. They are often used to report to visitors about use of cookies on the website.

Check how the accelerated pages are displayed on mobile screens.
Use WooCommerce Additional Features
Your shop is almost ready to go. Pay attention to additional features of the platform to make the website more user-friendly.
Customizer
Use a customizer to set up appearance of the shop. In the Appearance — Customize menu you can change the title and description of the website, set the background image in the header, change the colors of links, headings and text. You can also choose the appearance of buttons, the sidebar.
Additional Plugins for WordPress Online Store on WooCommerce
One of the reasons for the popularity of WooCommerce is that it is easy to expand the platform with plugins. There are thousands of plugins for WooCommerce. You can find them:
- Official WordPress directory
- org label
- Any plugin markets in the WooCommerce category
Please note useful solutions:
- The Facebook for WooCommerce plugin will help to control advertising campaigns in a popular social network. Also with the help of an add-on it is easy to make the shop on the page of a brand on “Facebook”.
- The WooCommerce Multilingual plugin will help to make the website multilingual.
- If the selected theme has no built-in slider, the WooCommerce Poduct Slider plugin will help. But in our case we use the Pearl theme where all the necessary sliders are already built in.
- If the theme does not support the zoom of the photos on hover, try YITH WooCommerce Zoom Magnifier.
- The YITH WooCommerce Wishlist plugin adds the List of Desires feature on the website.
- By means of Super Socializer it is possible to add a feature for registration through accounts in social networks.
- The premium WooCommerce 360º Image plugin allows to show to customers’ 3D-products picture.
- By means of WooCommerce Recover Abandoned Cart is possible to return on the website of the visitors who added products to a cart, but did not issue the order. Paid plugin.
- The paid solution of WooCommerce Quick Export Plugin will help to instantly migrate the clients’ data and transactions info. It is necessary if you migrate a resource to a new hosting.
Look for other tools for efficiency increase of WooCommerce in the official WordPress plugins directory.
Some other plugins we use especially often:
Jilt is a great tool that allows you to process the left off product carts (situations when the person added an item to the cart but didn’t make an order).
Metorik – a major solution for analytics and WooCommerce reports
Booster for WooCommerce – Adds more than hundred modules.
Beeketing for WooCommerce – focused on conversion. It has established itself as an “All-in-One Marketing Automation platform for WooCommerce websites”.
It is possible to control orders and to trace statistics in the sections “Orders” and “Reports” of the WooCommerce menu. You can create and publish promotional offers for increase in sales in the section “Coupons”.

WordPress Online Store on WooCommerce Has No Match
Thanks to the most popular CMS and e-commerce-platform you can quickly build a full-fledged online store. Web development knowledge is not necessary. At the first stages your expenditures will be minimum as an engine, templates and basic plugins are free.
It is very simple to set up a shop and to manage it. You can independently increase SEO friendliness and adapt it to a mobile traffic. Thanks to the WordPress infrastructure, you’ve got unlimited opportunities of WooCommerce shop functionality customization and enhancement at your feet.
The WordPress Online Store on WooCommerce helps you focus on the product-line expansion and sales increase.
We hope that helped you to build your own WordPress Online Store on WooCommerce. If you still have issues to discuss, please write us in the comments!