If you are looking for a SEO WordPress plugin, then, most likely, you will encounter the All in One SEO package, because it is one of the most popular WordPress developments ever created (over 45 million downloads). In this tutorial for beginners, we’ll show you how to install, configure and use the All in One SEO plugin for your WordPress site.
This beginners guide will drive you through all the necessary steps after installing the plugin. If you have not yet installed the All in One SEO Pack Pro refer to the installation instructions.
All in One SEO is very well configured by default but the steps below will help you identify some important customization settings that every WordPress site owner should follow.
Why SEO plugin for WordPress is needed and what for?
Search Engine Optimization (SEO) helps improve the ranking of your site in search engines such as Google. Of course, WordPress provides SEO-friendly customization but there are still many important little tricks that you can customize to improve your SEO results. For example, add meta tags, create an XML site map, avoid duplication of content, etc.
All in One SEO helps you do all this with an easy-to-use interface that fits into the WordPress panel. By the way, if you are just starting to make your first steps in SEO, then we recommend that you use the Yoast SEO plug-in (here is a link to that article). However, advanced site optimization features will only be available if you use All in One SEO.
Setting up All in One SEO
The basic plugin All In One is available for free. There is an advanced version of the Pro plugin. Additional features are available here such as Video Sitemaps, Search Engine Optimization for online stores, 1 year of professional technical support and several others. The starting price of the professional version is from $ 57 to $ 419 depending on the tariff.
After that, let’s start the installation process.
The first thing you need to do is install and activate the All In One SEO plugin. Install and activate the plugin as usual.
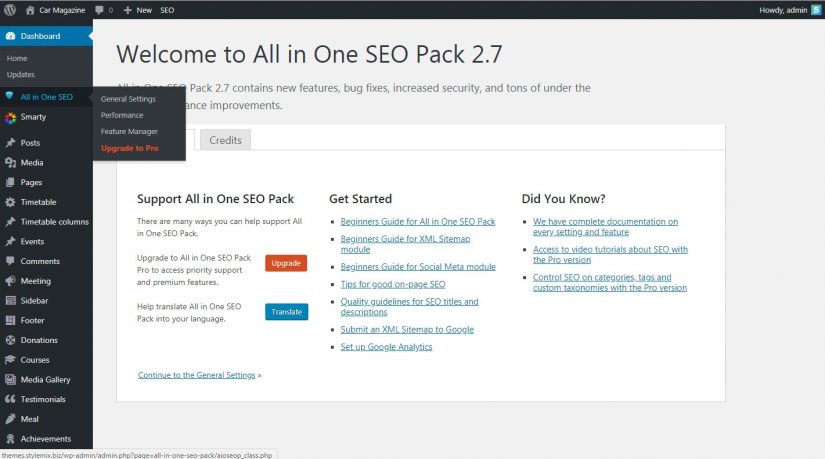
After activation, the plugin will add the menu item All in One SEO in the menu of the WordPress admin panel. To customize the plugin settings, you need to go on to All in One SEO “General Settings”.
On the settings page you will see a lot of options. Opposite to each parameter there is a question mark and clicking on it will show you a help message about this parameter and what it is for.
The first point of the “General Settings” is the installation of URLs. Specifying the canonical URL for each post avoids duplication of content in search engines.
With the usual installation of WordPress, one post is displayed in several places: on the main page, archive page, author page, categories. That’s why we recommend using article summaries or excerpts in the form of announcements instead of full posts on the WordPress archive pages. Posting full-value articles on all pages creates a duplicate content.
Step 1 – Customize the meta tags of the home page
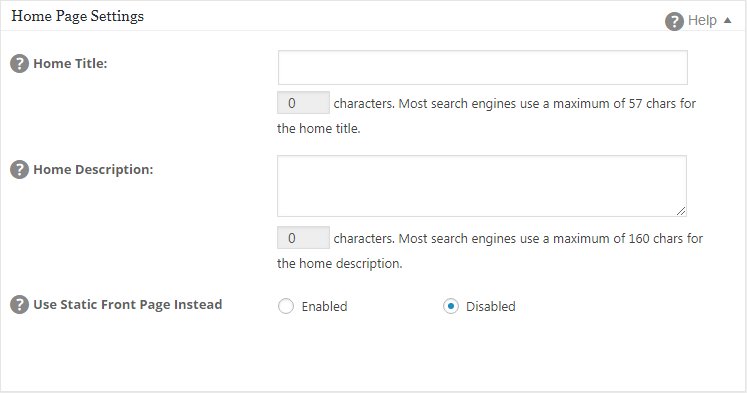
In the settings section of the main page you can specify the title of your home page. This name may differ from the name of your WordPress site. You can make it catchy and use keywords in the description for better search engine optimization.
Remember, if you leave the title field empty, the All in One SEO will use the default WordPress site name. If you use a different title or the same as your site’s, make sure that it contains the main keywords of your site.
In the description field of the home page you need to provide a short description of your website. Use 160 characters to do this and try to include the keywords of your site in it. However, do not go beyond logic and common sense. Make sure that the description is readable and understandable to the audience and most importantly – it carries important information about your site to users. If you leave the description field empty, the All in One SEO will not use the descriptions on your home page. If you want to get the maximum benefit, then you must fill them.
If you are using a static homepage, then you can click “Enable” next to “Use Static Front Page Instead.” Now you can edit your home page and add a title and description in the “All in One SEO” meta-window.
Where to specify the parameters of the title and description of the main page depends on the WordPress settings. First, you need to go to “Settings”> “Reading in WordPress” and check the display settings in the panel. Then, based on this parameter, follow the instructions below:
If the “Home page” is set to “Static page”: go to “All In One SEO”> “General settings”> “Home page settings” and select “Enabled” next to “Use Static Home Page”. Now you can specify the title and description on your home page by going to the pages, edit the home page and scroll down to the “All in One” section.
If the “Home page” is set to “Recent posts”, go to “All in One SEO”> “General settings”> “Home page settings” and specify the title and description in the appropriate fields. Where the “Use static home page” parameter is set to “Disabled”.
Step 2. Custom the title settings of all pages
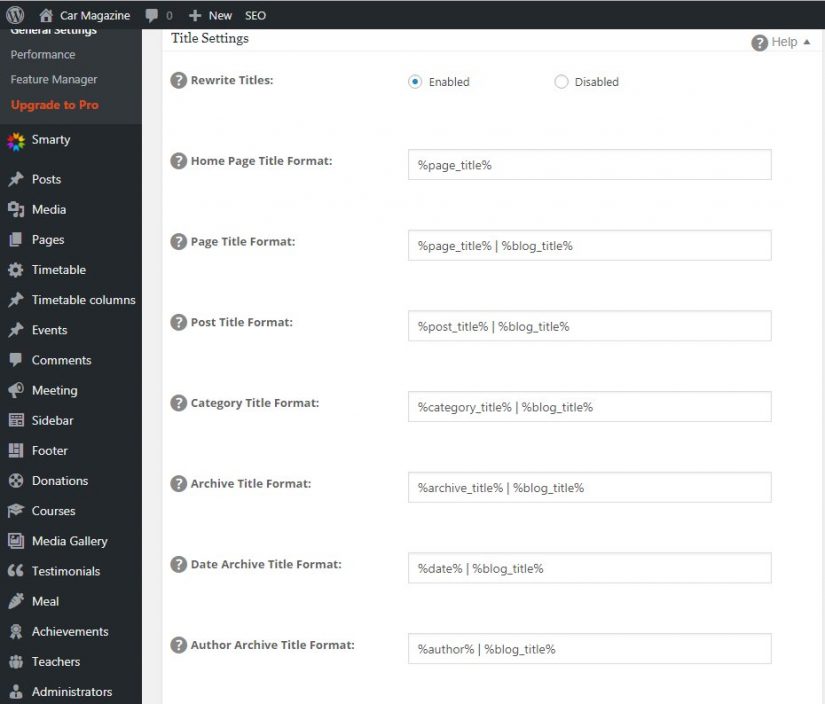
The title settings allow you to set default title templates for each page created by WordPress. This can be an entry, home page, archives, tags or category pages.
Each page created by WordPress has a <title> tag installed in your WordPress theme files. You can use the All in One SEO plugin to rewrite the title for each page. By default, this option is enabled for all, so that you can change any settings. We recommend leaving this parameter as is for optimal results.
If you create many landing pages, then the only thing you need to change is the format of your page. Get rid of | % blog_title% from the Page Title Format, so the name of your site does not match your value and your entire page title is displayed in the search.
Step 3: Custom post types
By default, WordPress has two types of content that most people might use – posts and pages. However, your site may also contain other types of content such as products, frequently asked questions or testimonials. You probably want to use the All in One SEO Pack to manage SEO for all the content on your site. Below are instructions on how to do this:
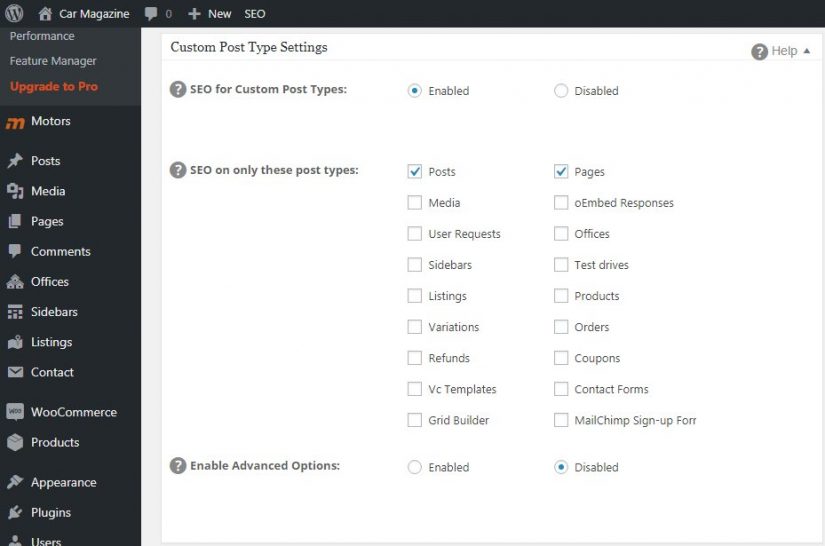
- Log in to All in One SEO> General Settings> Custom Post Type Settings
- Ensure that the custom post types for SEO are set to Enabled.
- In the SEO section, check the boxes next to the types of post that you would like to custom in terms of SEO.
When you use All in One SEO Pack Pro, you can also customize SEO for taxonomies such as categories and tags.
In the Custom Post Type Settings, you can enable the All in One SEO plugin for any custom post types used on your site, as shown in the screenshot below:
For example, if you use WooCommerce, your products are customizable post types and they will be displayed here. You can enable options for SEO-descriptions of posts for products.
Not all post types require advanced SEO settings. For example, if you use the Envira Gallery plugin, your galleries will appear here as a custom post type called “Envira Galleries”. Because galleries are usually added to WordPress posts and pages, you do not need to have an advanced SEO option for them. However, if you use the Envira gallery to create stand-alone galleries, then yes, you must enable SEO settings for this post type.
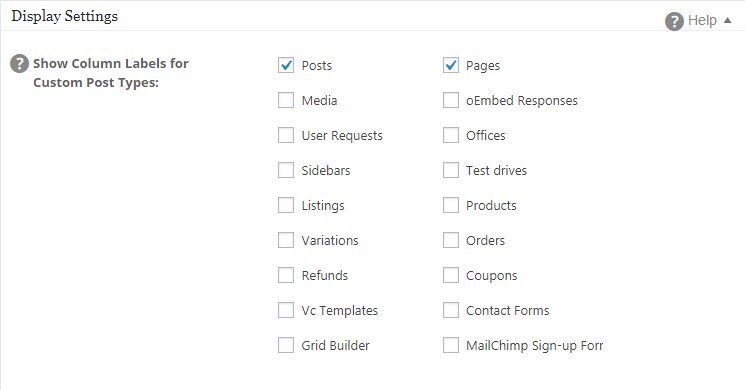
Step 4. Display Settings
The display settings allow you to display title and description on a separate post screen. It is enabled by default and you can leave this parameter unchanged.
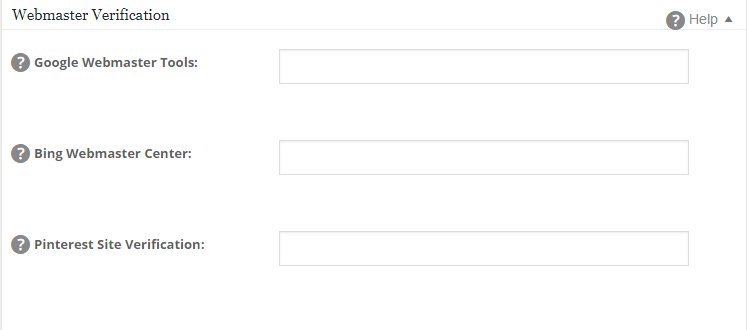
Step 5. Webmaster Verification
Here you will add the webmaster activation code provided by Google, Bing, Pinterest to verify ownership of your site.
We strongly recommend that you sign up for Google Webmaster Tools, because this will help your better index and rank your site. Connecting your site will help these search engines notify you when something goes wrong with your site.
These tools will provide you with useful information about your site and your ranking in the search engines. Then you can use this information to plan your strategy of promoting and improving SEO-rankings.
If you use Pinterest to attract traffic to the WordPress site, then checking your resource with Pinterest will allow you to use Pinterest Analytics. Here you will add the webmaster activation code provided by Google, Bing, Pinterest to verify ownership of your site.
We strongly recommend that you sign up for Google Webmaster Tools, because this will help your better index and rank your site. Connecting your site will help these search engines notify you when something goes wrong with your site.
These tools will provide you with useful information about your site and your ranking in the search engines. Then you can use this information to plan your strategy of promoting and improving SEO-rankings.
If you use Pinterest to attract traffic to the WordPress site, then checking your resource with Pinterest will allow you to use Pinterest Analytics.
Step 6. Google Settings
In the Google Settings section, you can enter your Google Plus profile URL to add Google’s copyright. When you add a link, you must go to your Google+ profile on the page and add your site to the authors section. Despite the fact that Google stopped using authors’ profiles in search results, some webmasters believe that this is useful.
Google Analytics is an excellent free tool for tracking the behavior of your visitors. All in One SEO offers an easy Google Analytics integration way.
- The first thing you need to do is set up your Google Analytics account. In order to do this, follow the instructions on the Google Analytics documentation page.
- After that, you need to get the Google Analytics ID for your site and All in One SEO will automatically add your Google Analytics code to your site. Alternatively, you can log in to your Google Analytics account and click on “Administrator”, select an account from the drop-down list in the “Account” column, then select “Properties”. Your tracking ID will be displayed at the top of this screen.
- Copy your tracking ID and log in to the WordPress site, go to the All in One SEO> General Settings> Google Settings section and paste the tracking ID into the “Google Analytics ID” field.
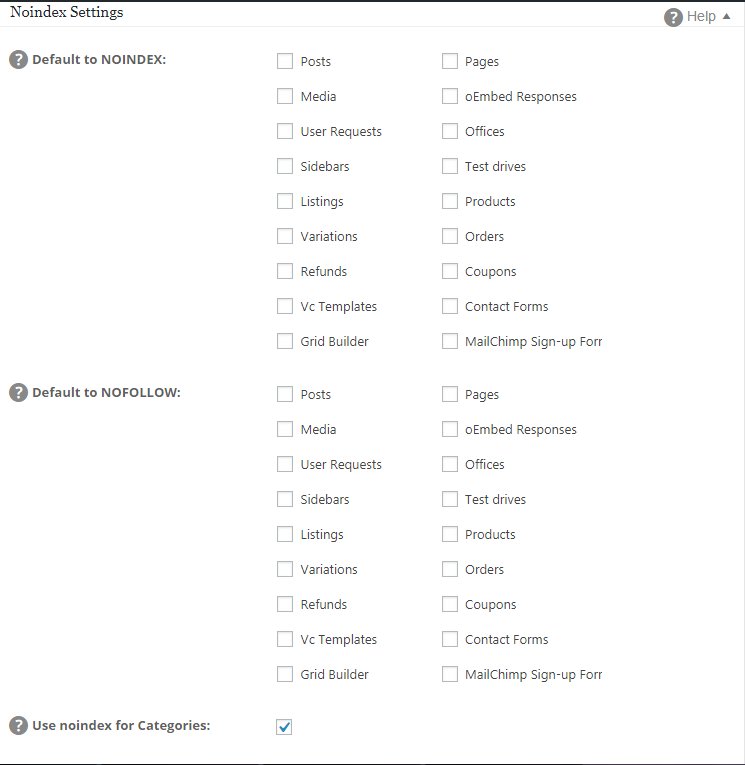
Step 7. Disable the Noindex settings
Sometimes you need to disable the indexing of categories and archive pages on the site. Some SEO experts believe that this is duplicate content and it’s better not to index these pages in order for search engines not know that you have non-unique content.
If you run a blog by one author, we also recommend that you enable noindex for author’s archives. But if you run a site with several authors, you must allow search engines to index authors’ archives.
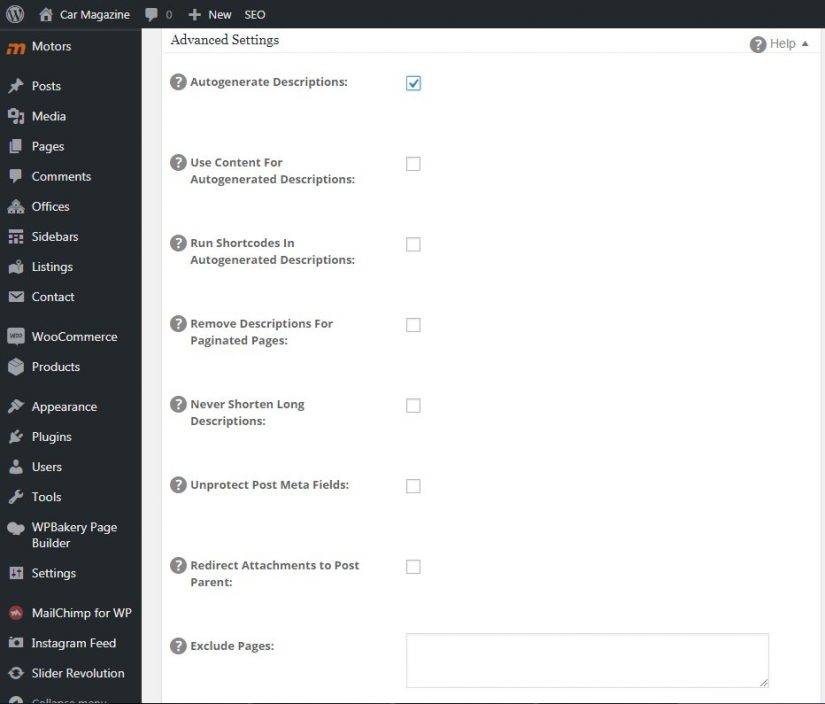
Step 8. Use the Advanced Settings
The advanced settings section allows experienced developers to change some of the hints in optimizing their site. Among them – enabling of pages, adding code to the heading, autogenerating description, etc. If you do not know what to do, we recommend that you leave this unchanged – it is for advanced users.
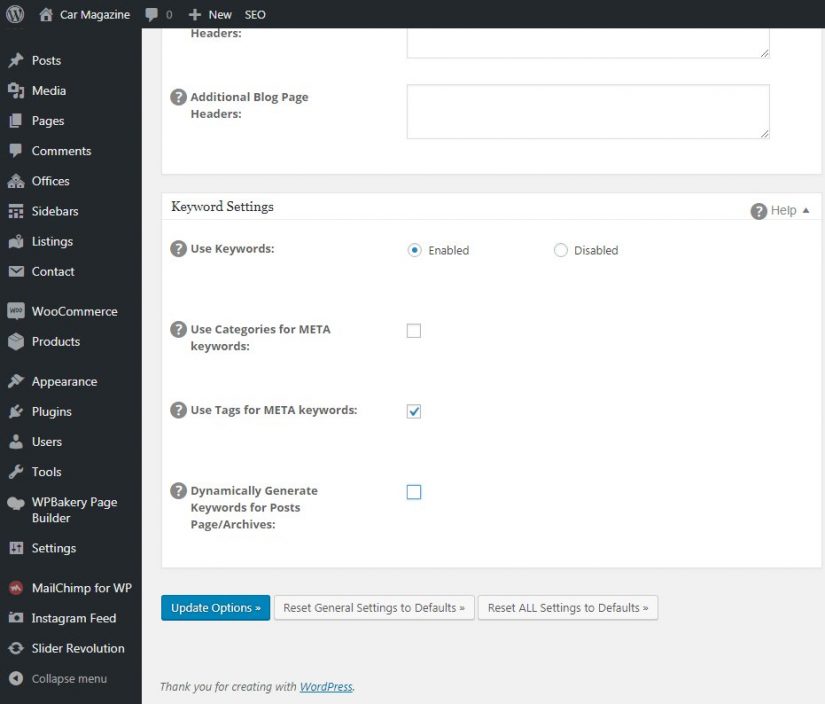
Step 9. Keyword Settings
Many experts in the SEO field believe that there is no benefit from using the keywords tag. On the other hand, other developers believe that they are still useful. The All in One SEO plugin has disabled default keywords. If you want to use them, turn them on here. We use meta-keywords on our website since we believe that even if they are not useful, it will not do any harm. And of course click the Update Options to save all the customizations you’ve made in General Settings!!!
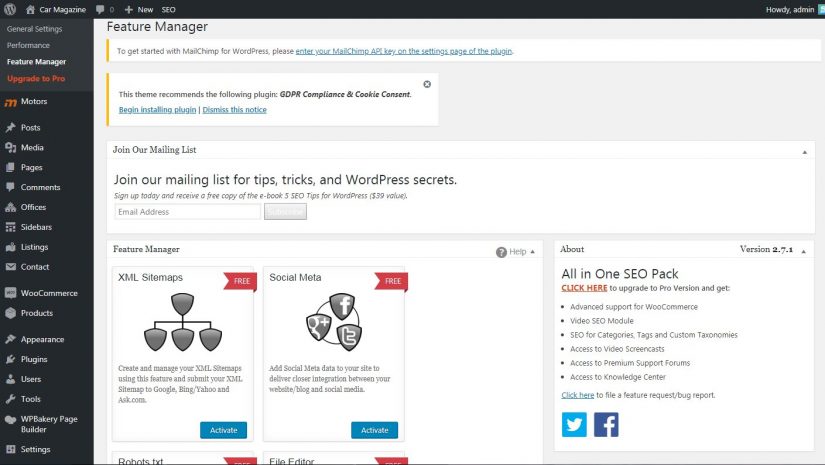
Step 10. Enable the All in One SEO Feature Manager
All in One SEO is a powerful plugin and as you understand, there are a lot of settings for beginners and advanced users. Some of its features are not available to users out of the box. You will need to activate them by visiting the All in One SEO Feature Manager.
The developers of All in One SEO believe that some users can already use other plugins for XML Sitemap files and the Facebook Open Graph meta tag. If you are not already using other plugins for this, you need to activate these two applications to get the maximum SEO benefit.
Step 11. Customize the XML Sitemap
XML sitemap is a special file that search engines use to crawl your site. This file is an integral part of SEO. XML sitemap contains some important information that search engines need when ranking your site and determining its positioning.
Now let’s customize our XML site map.
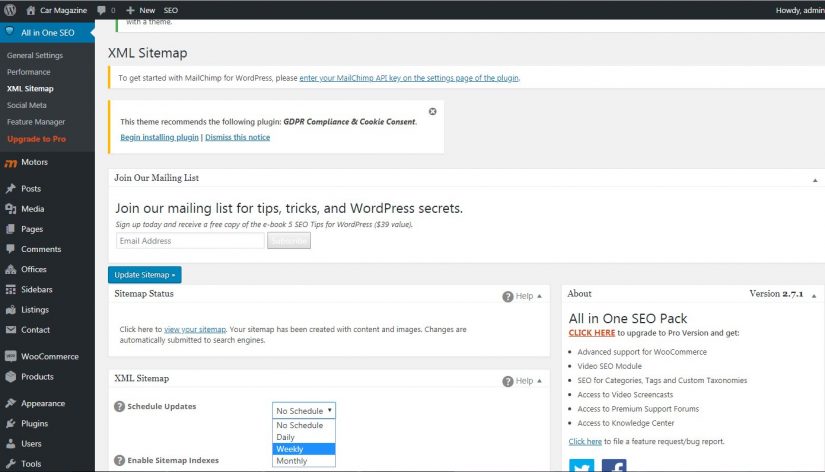
First, from the “Schedule Updates” drop-down list select the one that best matches how often you update the content on your site. If you are not sure what to select, choose “Weekly”.
The next parameter is “Enable Sitemap Indexes”. Do NOT check this box if your XML map does not contain more than 50,000 URLs. We will review this option later in this guide.
The following two options apply to the content on your site – post types and taxonomies. Using the checkboxes here, you can choose which content you want to include in your XML file. Check the boxes next to the post types and taxonomies that you want to enable.
If your site is a news resource with dated archives, check the box “Include Date Archive Pages”.
If you have a site on which you have several authors with your own author’s pages, select the “Include Authors Pages” check box.
Make sure that the “Create Compressed Sitemap” checkbox is selected. This will create a Gzipped site map which will be sent to index by search engines. This file is compressed so the search engines get it faster. This is very useful if your site is hosted on a slow server.
Make sure the Link From Virtual Robots.txt check box is selected. This will add the URL of your XML map to the robots.txt file.
Make sure that the “Dynamically generate Sitemap” checkbox is selected. This option will dynamically generate an XML sitemap every time it is requested by the search engine. This also means that your server will not have an XML Sitemap. This is the best option because this means that the XML site map is updated regularly when it is requested and you do not have a file that can be deleted, corrupted, or unavailable. Some older servers may not support this setting, so if you are having problems, try unchecking this option.
Finally, click the “Update Sitemap” button. Now you have created your own XML file. You can view it by clicking the view your sitemap link and your XML map will open in a new tab. If you see an empty XML file, do not panic, right-click on the screen and select “View Page Source”. Now you should see the XML for the Sitemap.
Step 12. Customize social network interaction
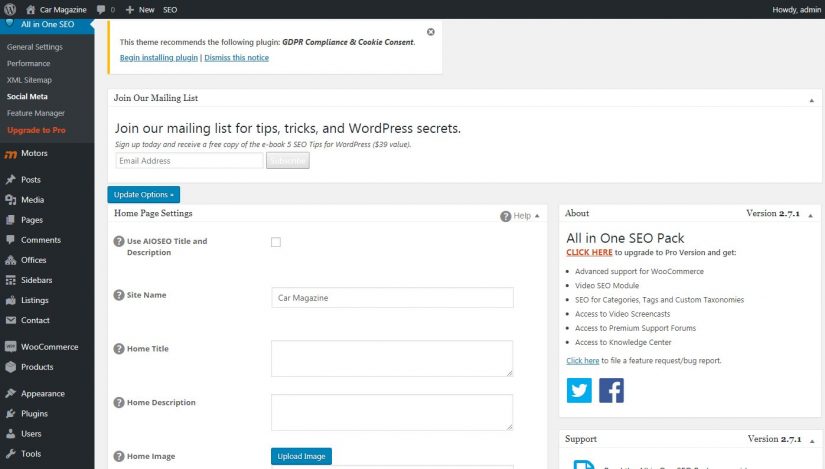
First you need to visit the Social Meta page and go to the “Home Page Settings” section. Here you will specify a title, description and image for the home page of your site.
However, since we have already set the title and description of the home page in the general settings, you can check the box “Use AIOSEO Title and Description”. Then you need to upload the image, it will be used by social networks such as Facebook and Twitter as links.
What is Social Meta?
First, let’s understand what social meta is and what does it do. It is often called Open Graph meta, and it was developed by major social networks – Facebook, Twitter, LinkedIn and Pinterest.
When a page or a post is placed on social networks, the meta-social network controls how this content appears. Each site on social networks will display this information in different ways, and the way it is displayed may change as social networks improve their user interface.
Now that we know what social meta is and how it displays content on social networks, let’s see how it can be configured with the All in One SEO plugin.
First we apply the basic settings that you can find by going to the section All in One SEO> Social Meta
In this section, you can set Open Graph meta for your home page. These settings are used for the main page, regardless of what you set in the All in One SEO section on the home page.
Site Name
The name of the site is the name of your website or business. Different social networks might use or not use this parameter.
Home page: title and description
Use these fields to set the title and description of Open Graph for the home page of your site. If you want to use the title and description according to the SEO principles that you set in the “General settings”> “Home settings” section, select the “Use AIOSEO Title and Description”.
Home Images
Use this box to set the Open Graph image for the home page of your site. If you do not have an image, then the default Open Graph image will be used which is set in the “Image Settings” section.
Home: article tags
This field will only be displayed if you selected an article as the Facebook object type in the Facebook settings. You can use this field to set article tags that Facebook uses. This should be a list of keywords relevant to your home page.
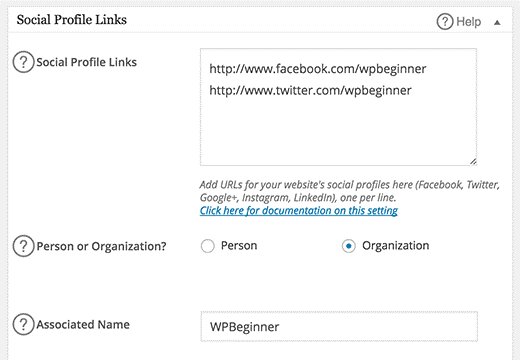
Links to social network profiles need to be added as shown in the screenshot below:
The use of images in social networks is very important. When a link to your content is placed on social networks, the image will usually be displayed as part of the information. These images can be large and miniature depending on the setting.
Using the settings in this section, you can control which image is used by default for your content. You can override these settings on each page by setting the image on the “Social Settings” tab. How to do it:
Select OG:Image Source
You can use this to select which image is used by default as the Open Graph image for the page or post. There are seven options:
- Default Image. It is set in the “Default OG Image” field, shown in this section for each page or post.
- Featured Image. Will use Featured Image, which is set for each page or post.
- First Attached Image.
- First Image In Content.
- Image From Custom Field. The image specified in the custom field on each page or in the column will be used. You specify the name of the custom field “Use Custom Field For Image” in this section.
- Post Author Image – the author’s avatar will be used.
- First Available Image. This option allows you to view all the parameters automatically. It uses the first image it finds.
Facebook Settings
For most people, you should use these default settings. Facebook has strict recommendations for the correct use of the Object Type.
Twitter Settings
Here you can find information about the types of Twitter cards.
Step 13. Optimize posts and pages
The All in One SEO plugin has the ability to edit WordPress posts / pages. To optimize individual messages and pages, you can enter the title, description and SEO keywords for each post that you post on the site.
By default, All in One SEO will use the page title and display it in the output results. For example, if you have a page called Contact Me and you are happy with this title “Contact Me”, you do not need to change anything. However, you can change the SEO title that appears in Google search results for each page or post on your site by following the instructions:
- Log in to your WordPress site and click Pages or Posts on the left.
- Find a page or post where you would like to replace the SEO title and description and edit it.
- Scroll down and enter your title in the Title field.
It’s important to remember that your SEO title should not exceed 60 characters, because search engines only display the first 60. Also make sure that each SEO title on your site is unique. Search engines can punish you for duplicating titles.
To set a SEO description for each page or post on your site, follow these steps:
- Log in to your WordPress site and click Pages or Posts on the left.
- Find a page or post where you would like to replace the SEO description and edit it.
- Scroll down and enter your description in the Description field.
It’s important to remember that your description should be less than 160 characters, because search engines can only display the first 160. Also make sure that each description on your site is unique. Search engines can penalize you for having repetitive SEO descriptions.
Settings in this meta-window will change your basic All in One SEO settings. If you leave them empty, then All in One SEO will use your basic settings to fill these fields automatically. It will use your post as a title, excerpts from the statement as descriptions and tag as keywords. If you want to get maximum SEO results, we recommend that you manually fill in these fields and do not leave them empty.
Important note on titles and descriptions
Some search engines such as Google decide in each case to show or not to show the title and description that you provided. They can decide to display their own title and description which can be obtained from your content or other source. You can not force search engines to display your title and description and influence this process. This does not mean that you need to ignore the titles and descriptions, you still need to fill in these fields, since this indicates to the search engines that you care about your audience and search engine optimization.
Finally
We hope that this All in One SEO user guide will help you customize this complex plugin on your website. You can also see our guide to setting up Yoast. Comparison will help you more accurately understand which plugin is best for you.









Hi, Stylemix
I read your blog and its very helpful for an SEO beginner, SEO is a marketing discipline focused on growing visibility in organic (non-paid) search engine results.
WordPress SEO by Yoast, It is one of the most downloaded WordPress plugins of all times.
Yoast’s WordPress SEO is a comprehensive solution for all your on-site SEO needs.
It allows you to add SEO title, meta description, and meta keywords to each post and page of your site.
You have covered all the topic and you have a great article, Thanks for sharing with us.