


MasterStudy, Updates & Features
Dec 19, 2024
 Consulting
The Perfect Business WordPress Theme
Consulting
The Perfect Business WordPress Theme
 Motors
Car Dealership & Classified Listing Theme
Motors
Car Dealership & Classified Listing Theme
 Masterstudy Templates
Pack of ready-made LMS templates
Masterstudy Templates
Pack of ready-made LMS templates
 Manufacturer
Factory and Industrial WordPress Theme
Manufacturer
Factory and Industrial WordPress Theme
 MasterStudy
LMS WordPress Education Theme
MasterStudy
LMS WordPress Education Theme
 Smarty
WordPress Theme for Educational Institutions
Smarty
WordPress Theme for Educational Institutions
 Pearl
Multi-Purpose Business WordPress Theme
Pearl
Multi-Purpose Business WordPress Theme
 Splash
Sports Club WordPress Theme
Splash
Sports Club WordPress Theme
 HomePress
Real Estate WordPress Theme
HomePress
Real Estate WordPress Theme
 Companion
Corporate Business WordPress Theme
Companion
Corporate Business WordPress Theme
 beTop
Coaching & Speaker WordPress Theme
beTop
Coaching & Speaker WordPress Theme
 Hotello
Hotel Booking WordPress Theme
Hotello
Hotel Booking WordPress Theme
 Crypterio
ICO & Cryptocurrency WordPress Theme
Crypterio
ICO & Cryptocurrency WordPress Theme
 Transcargo
Transportation & Logistics WordPress Theme
Transcargo
Transportation & Logistics WordPress Theme
 HealthCoach
WP Theme for Health & Personal Coach
HealthCoach
WP Theme for Health & Personal Coach
 GlobalStudy
LMS Divi Education Child Theme
GlobalStudy
LMS Divi Education Child Theme
 Sequoia
Elementor Multipurpose WordPress Theme
Sequoia
Elementor Multipurpose WordPress Theme
Learn how to add an email newsletter signup form in WordPress to grow your list, boost engagement, and increase conversions. Includes step-by-step tips and best practices.


Do you want to learn how to add an email newsletter signup form in WordPress to boost engagement and capture more leads?
Building an email list is a very effective strategy for establishing meaningful connections and driving consistent traffic. With an email newsletter signup form, you can invite your visitors to subscribe, keep them informed about your latest updates, and turn casual readers into loyal fans and customers.
But dropping a basic form on your site often isn’t enough. You need opt-in forms that look stunning, appear at just the right moments, and integrate seamlessly with your email marketing service.
In this article, you’ll learn why email newsletter signup forms matter for WordPress sites, how to add an email newsletter signup form in WordPress, and best practices for achieving higher conversions.
Email newsletter signup forms give you a reliable way to grow your audience, build relationships, and increase traffic and sales over time. Unlike social media platforms, where algorithms limit your reach, email gives you direct access to your subscribers’ inboxes.
According to marketing research, email marketing consistently delivers one of the highest returns on investment (ROI) across all digital channels. It’s not only cost-effective but also highly personal and targeted. Whether you run a blog, an eCommerce store, or a service-based business, having a list of engaged email subscribers can make a significant difference in your growth.
Here are a few reasons why adding an email newsletter signup form to your WordPress site is a great move:
Direct Access to Your Audience: Unlike social platforms, which can limit your reach with ever-changing algorithms, your email list provides you with direct, guaranteed access to your subscribers’ inboxes. This makes it easier to share updates, promote products, or deli`ver valuable content without relying on third parties.
Higher Engagement & Conversions: Visitors who sign up for your newsletter are already interested in what you offer. These are warm leads, and they’re more likely to open your emails, click through your links, and convert into paying customers or loyal fans over time.
Build Trust and Authority: By consistently sending helpful, relevant emails to your subscribers, you position yourself as a trusted authority in your niche. This builds loyalty and encourages repeat visits, purchases, or engagement.
Recover Lost Traffic: Not everyone who visits your site will come back. Most won’t unless you give them a reason to. A well-placed signup form enables you to capture those visitors before they leave, allowing you to bring them back later through your email campaigns.
Grow Your Brand and Reach: Whether you’re a blogger, a small business owner, or running an e-commerce site, growing your email list provides a scalable way to stay top of mind with your audience. It becomes a long-term asset that pays dividends in traffic, sales, and community building.
In this guide, we’re going to show you how to add an email newsletter signup form in WordPress using MailOptin.
MailOptin is an excellent lead generation WordPress plugin that makes it easy to create beautiful, high-converting email signup forms.
With MailOptin, you can build pop-ups, slide-ins, notification bars, and embedded forms that seamlessly integrate with popular email marketing services, including Mailchimp, ActiveCampaign, Constant Contact, Salesforce, Zoho, Klaviyo, and many more.
MailOptin also offers powerful features like:
In the next section, we’ll walk you through step by step how to install and set up MailOptin to create your email newsletter signup form in WordPress.
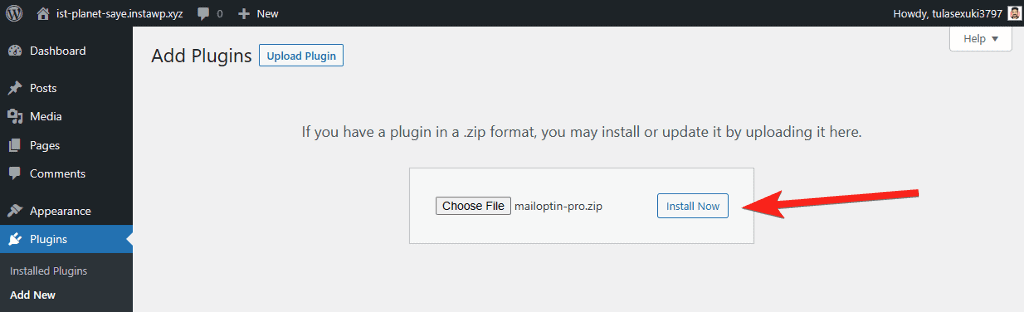
To get started, you’ll first need to purchase a MailOptin license and install the plugin on your WordPress website.
After completing your purchase, log in to your WordPress website, install, and activate the plugin.
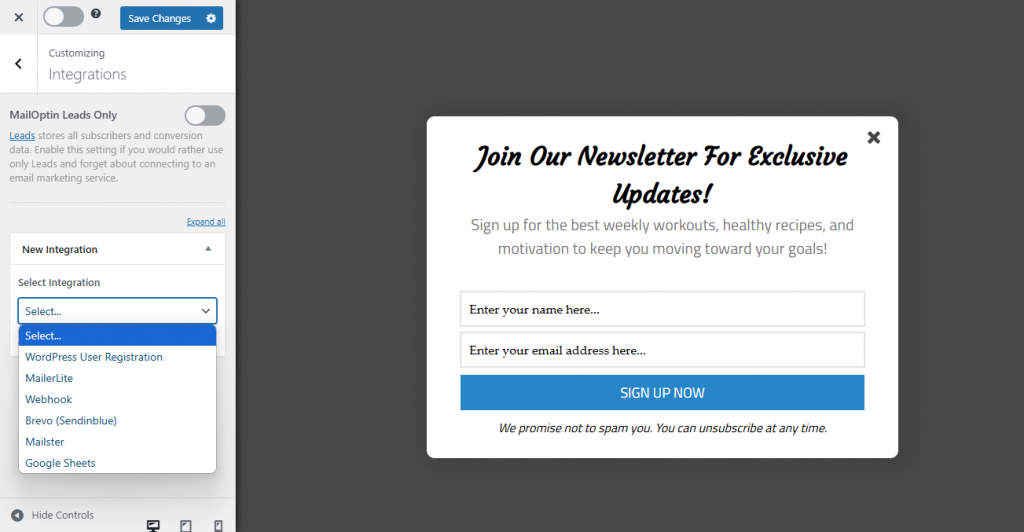
Since we are creating a newsletter signup form, it needs to be integrated with an email marketing software.
To connect your CRM account with MailOptin, log in to your WordPress dashboard and go to MailOptin > Integrations.
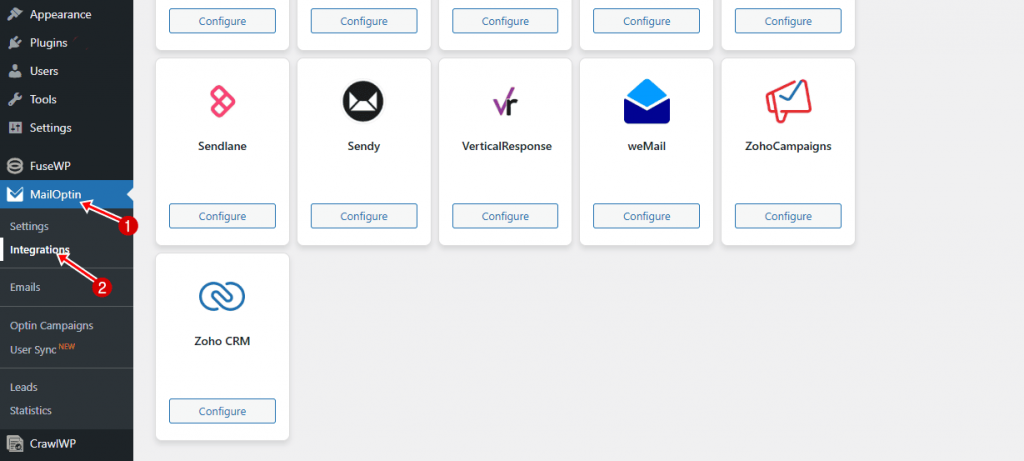
Select your preferred email marketing provider from the list, then enter the API key associated with your account into the designated field.
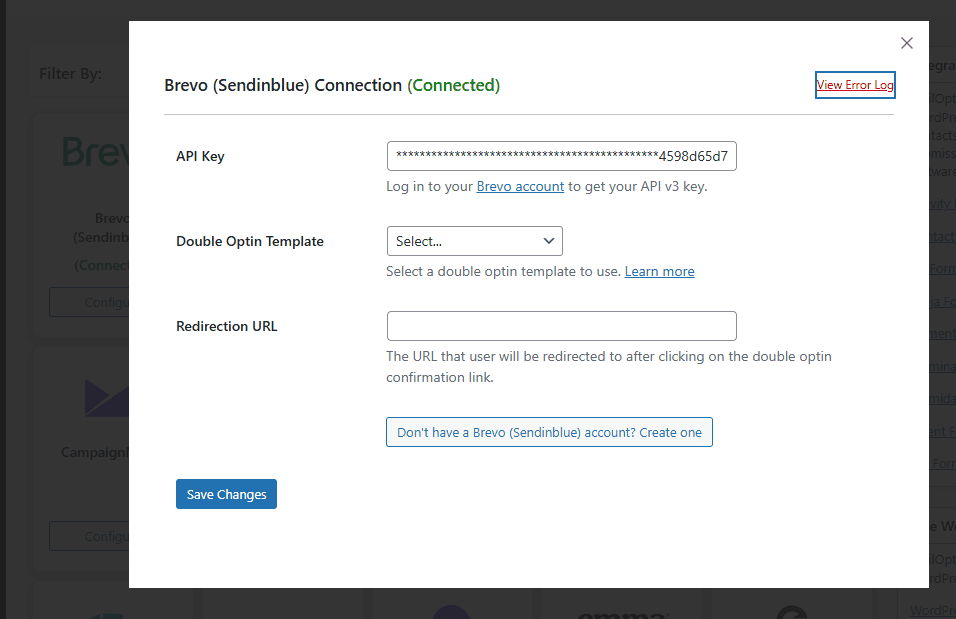
Click Save Changes to complete the integration.
Now that you’ve connected MailOptin to your email marketing platform, it’s time to create your email newsletter signup form.
MailOptin offers various types of opt-in forms to help you capture subscribers, including pop-ups, notification bars, slide-ins, sidebar widgets, and inline forms, which can be displayed before and after post content.
In this section, we’ll show you how to create an engaging email newsletter signup form using MailOptin’s Lightbox popup.
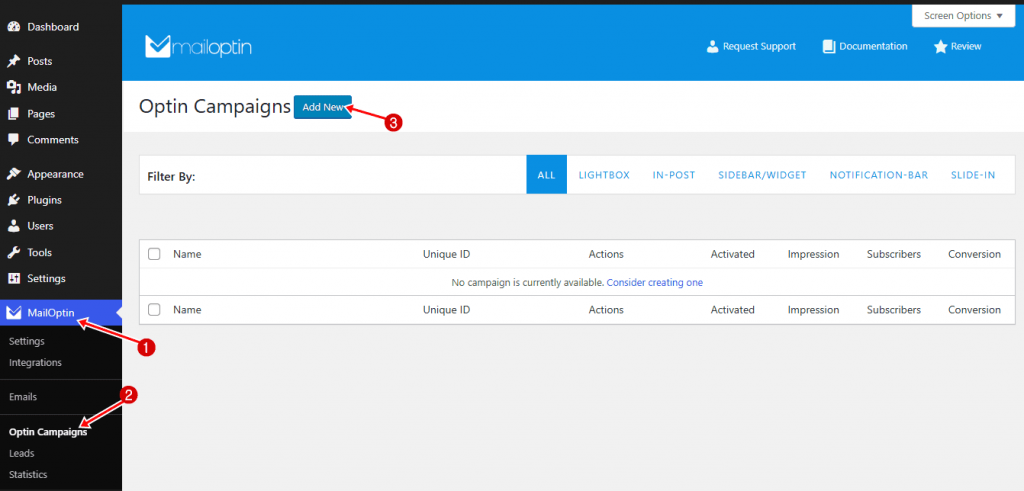
To get started, go to MailOptin > Optin Campaigns in your WordPress dashboard and click the Add New button at the top of the page.
Enter a name for the form and select Lightbox as the optin type.
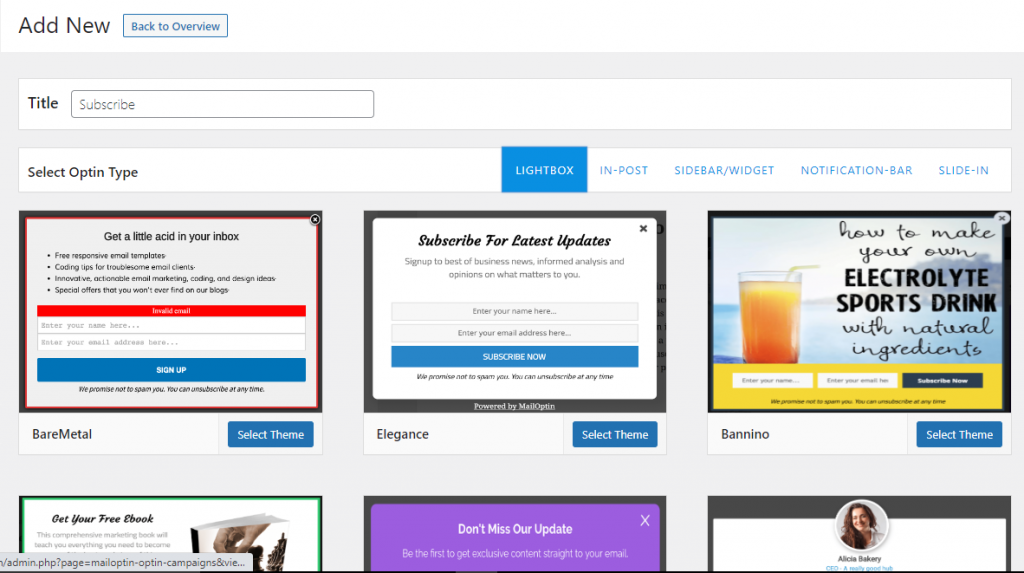
MailOptin offers a range of professionally designed form templates that you can easily select from.
Browse through the available templates and select the Lightbox design that suits your preference. Once you make your choice, MailOptin will redirect you to its built-in form builder, where you can fully customize your form to match your brand and messaging.
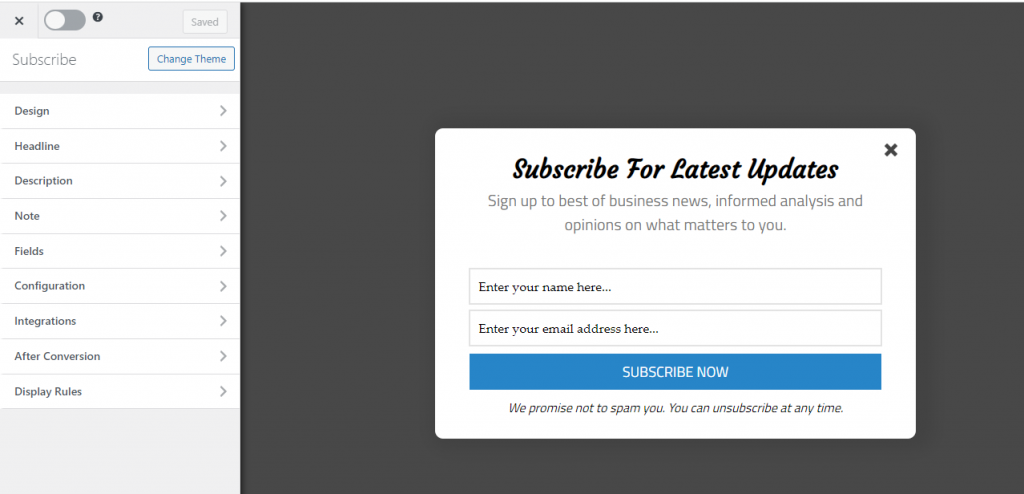
On the left side of the MailOptin form builder, you’ll see several sections packed with options to help you customize your form and ensure it perfectly matches your brand and objectives.
Let’s go through each of these sections.
In the Design section, you have complete control over the appearance and style of your opt-in form. You can adjust the form’s width to fit different layouts, select eye-catching animation effects for how it appears on the screen, and change background and border colors to match your brand.
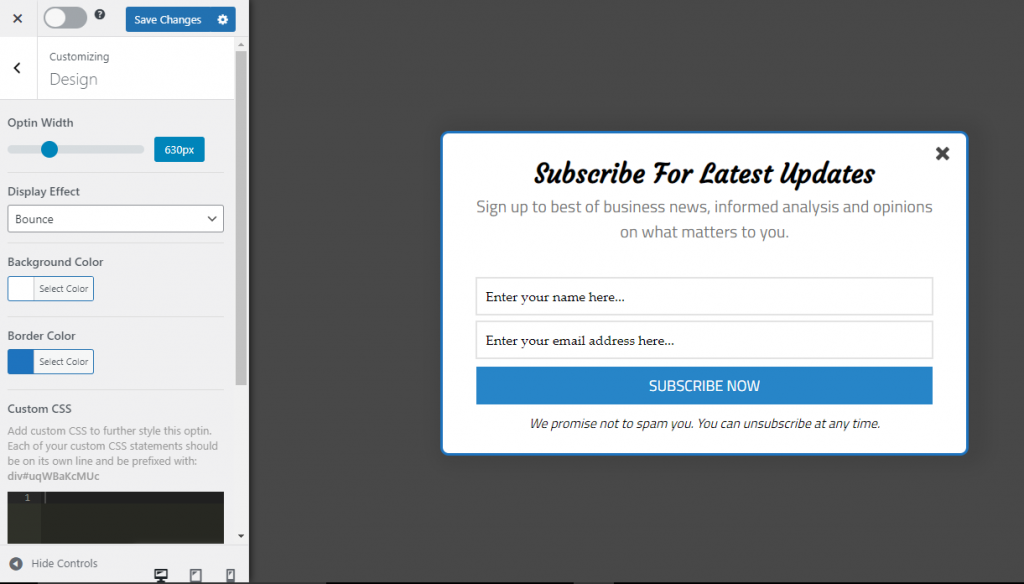
These powerful customization options enable you to create a form that not only looks visually appealing but also integrates seamlessly with your website’s overall design.
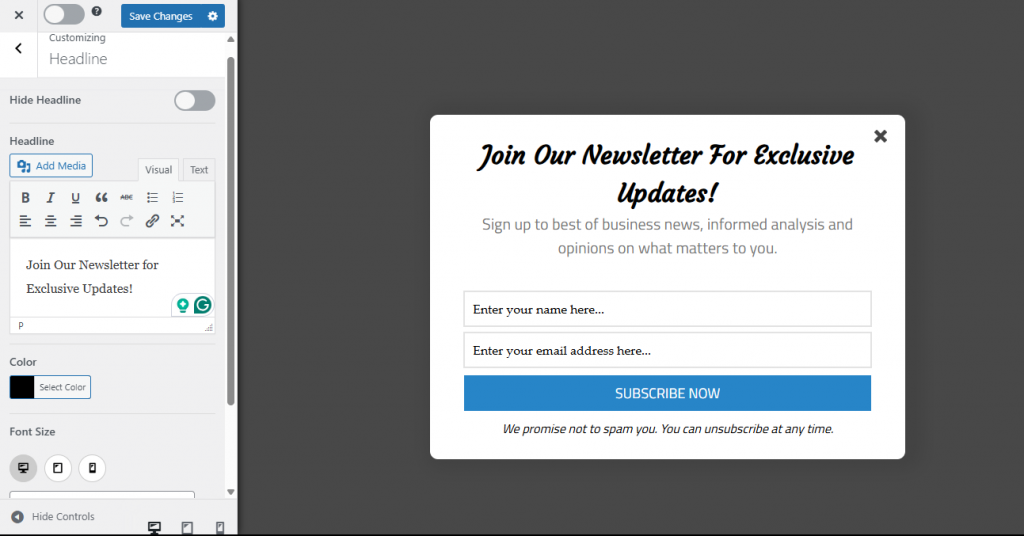
The Headline section is the central message of your popup. You can choose to show or hide the headline, update the text to reflect your offer, adjust the font size and family, change the text color, and even add media, such as images or icons.
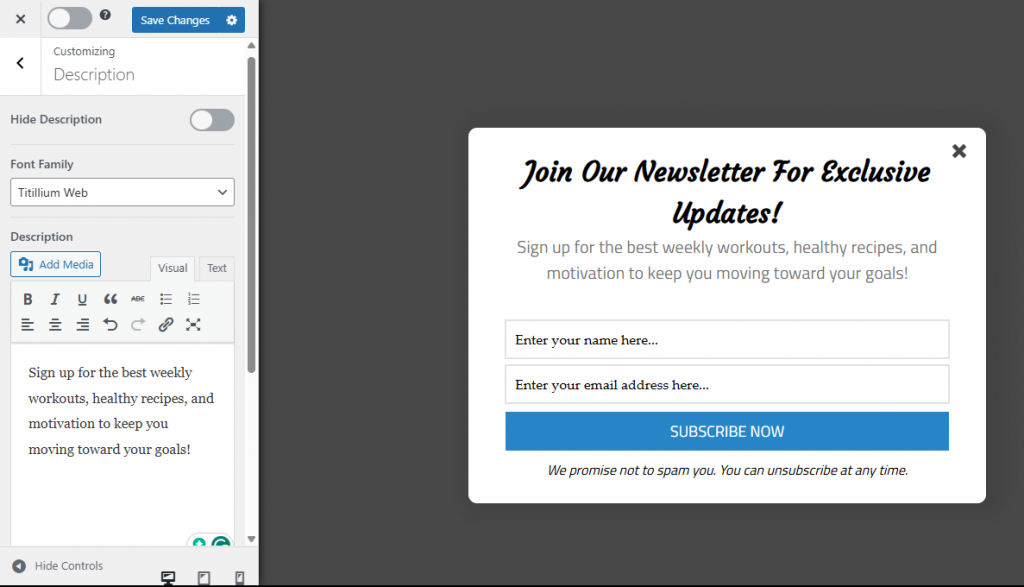
The Description section allows you to customize the supporting text that appears just below your headline.
The Note section offers additional customization options to enhance your email newsletter signup form. You can choose whether to show or hide this section, add media to make it more engaging, and change the text’s color, size, and font style to match your design.
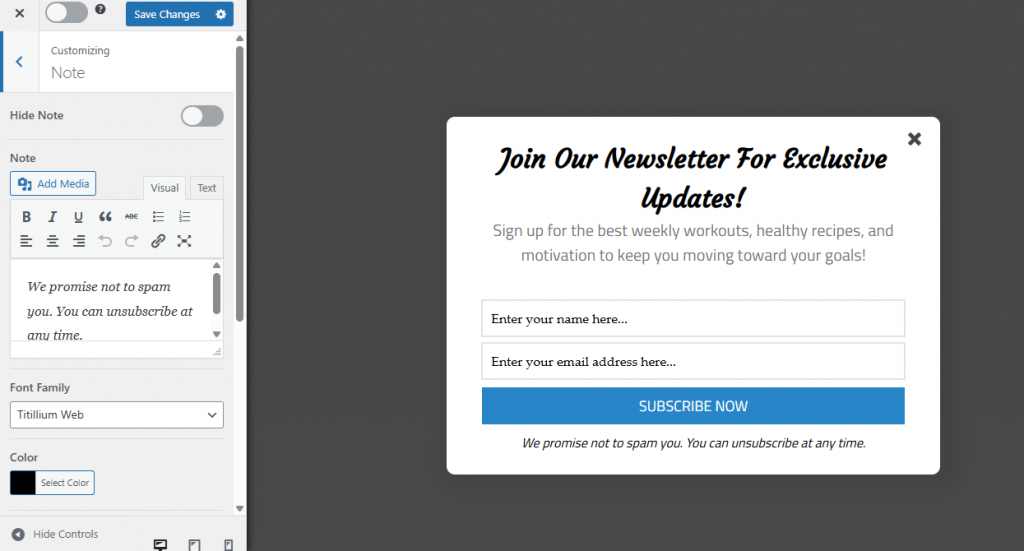
In this section, you can also turn on the “Close Optin on Click” feature, allowing the form to close when someone clicks on the note. Plus, you have the option to add an acceptance checkbox, which is great for collecting user consent or agreement to terms before they subscribe.
The Fields section gives you complete control over the input areas of your form. You can customize the form fields by changing titles, colors, fonts, and background styles to better align with your store’s branding.
MailOptin also provides the flexibility to add custom fields, make specific fields required, replace the form entirely with a call-to-action button, or insert custom HTML for more advanced setups.
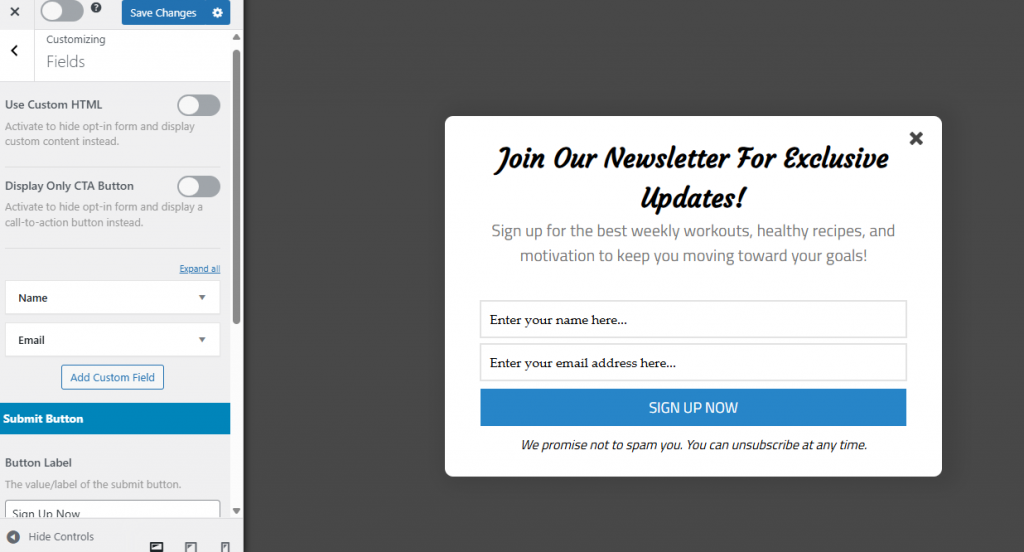
Additionally, you can design the submit button to match your messaging and design.
This section allows you to fine-tune the behavior and appearance of your email newsletter form for visitors.
Here, you can choose to hide the close button for a more focused experience or allow users to close the overlay by clicking outside the form.
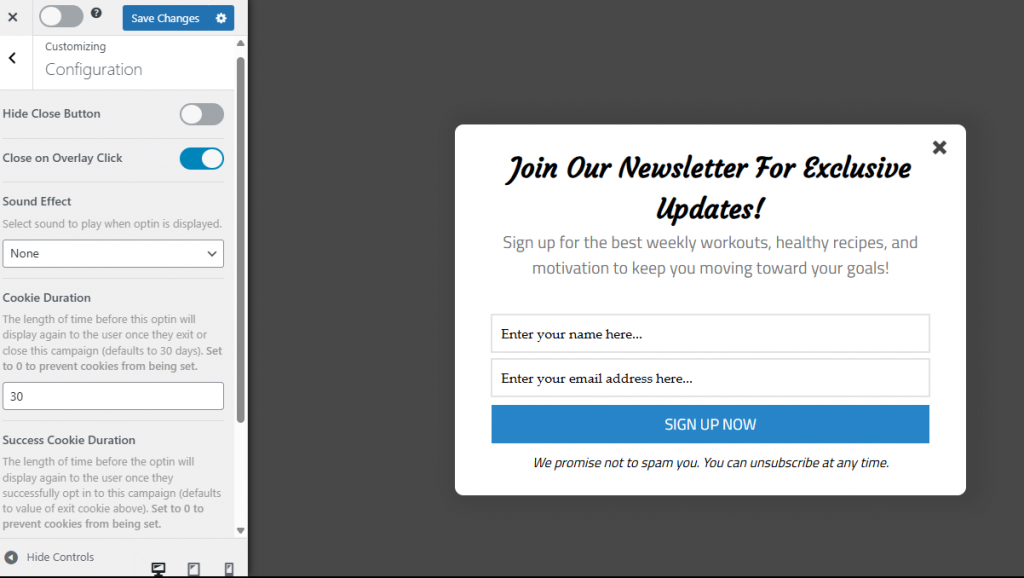
You can also select a sound effect to play when the form appears, set how long cookies should remember visitors who’ve already seen or interacted with the form, and define the duration of the success cookie to prevent repeat displays.
The Integrations section enables you to specify where to store leads collected from your newsletter signup form. You can choose to save them directly in MailOptin Leads or send them to any of the email marketing services and CRM you’ve connected to MailOptin.
The After Conversion section allows you to specify what happens after someone successfully subscribes to your email newsletter. In this section, you can create a custom success message to thank new subscribers. Additionally, you have the option to set up an autoresponder email that automatically welcomes them, helping you establish a relationship right from the start.

Additionally, you can enable email notifications to receive instant alerts whenever a new lead signs up. For more advanced setups, you can use the Success Triggered Script tab to run custom scripts or tracking codes.
Timing plays a critical role in converting visitors into subscribers, and that’s exactly where MailOptin’s Display Rules come in. This section helps you control exactly when, where, and to whom your email newsletter form appears, ensuring it shows up at the right moment, in front of the right audience, for maximum impact.
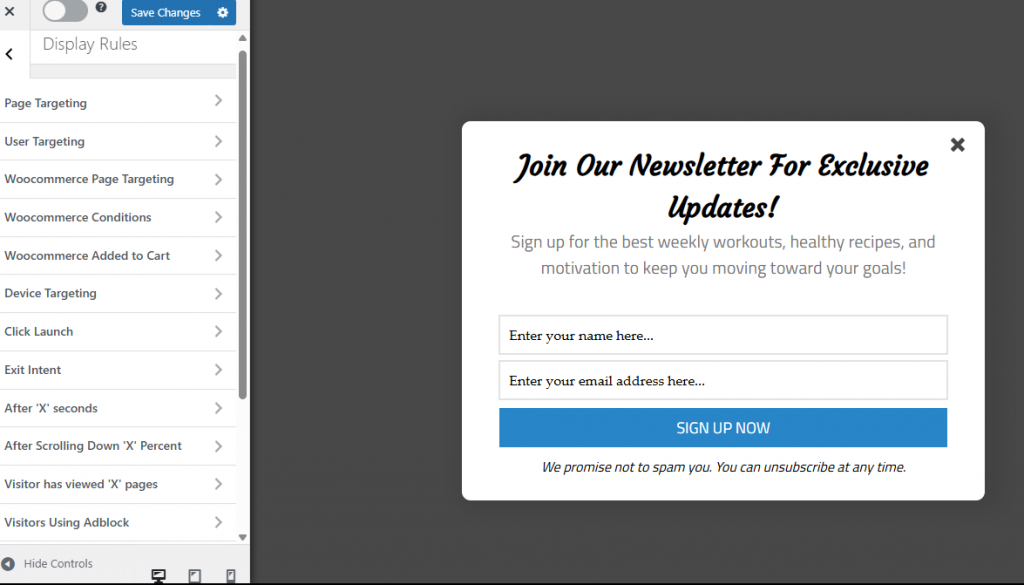
With MailOptin, you can trigger your opt-in forms based on user behavior such as exit intent, scroll depth, time spent on site, number of page views, and more. These targeting options ensure that your form appears when a visitor is most likely to engage, without being intrusive.
Let’s go over the targeting and display options available:
Page-Level Targeting: This option enables you to select where your form appears on your website. You can display the opt-in on specific pages, posts, categories, custom post types, or even sitewide using the “Globally show Optin” setting.
User Targeting: With this option, you can control who sees the form based on whether they’re logged in, logged out, or based on user roles.
WooCommerce Page Targeting: This option allows you to show your forms on specific store pages, such as product, cart, or checkout
WooCommerce Conditions: This feature allows you to target customers based on their shopping behavior.
WooCommerce Added to Cart: This option allows you to display the form immediately after a product is added to the cart, making it ideal for cross-sells or offering discounts.
Device Targeting: This feature allows you to choose whether to display your form on desktop, tablet, or mobile devices. For example, you may want to show a larger form only on desktops and use a less intrusive slide-in for mobile users.
Click Launch: This feature allows you to trigger the form when a visitor clicks on a specific link, button, or image. Note: enabling Click Launch disables other display triggers.
Exit Intent: With this feature, you can show the form just as the visitor is about to leave your site. This proven strategy captures users who abandon their carts.
After X Seconds: This option enables you to set a delay, allowing the form to appear after the visitor has spent a specified number of seconds on the page.
Scroll Trigger: This feature enables you to trigger the form when a visitor scrolls down a specified percentage of the page, indicating strong engagement.
Page View Count: With this feature, you can display the form after a visitor has viewed a certain number of pages, signaling they’re interested in your content.
AdBlock Detection: When activated, this feature detects visitors using ad-blocking software and allows you to choose whether to show the form to visitors with AdBlock enabled or to those without it.
New vs. Returning Visitors: This feature enables you to target your forms to either new visitors or those who have returned to your site.
Referrer Detection: This option enables you to display or hide the form based on the visitor’s referrer. For instance, display a special offer only to users coming from a specific campaign or referral source.
Cookie Targeting: When activated, this feature enables you to determine whether to display or hide the form to users based on whether a specific cookie is set.
Query String Targeting: With this option, you can display or hide the opt-in form based on specific parameters. This is great for targeting visitors from paid ads or campaigns.
Schedule Display: With this feature, you can schedule when your form should start and stop appearing, which is ideal for running time-sensitive promotions or seasonal campaigns.
Together, these display rules give you unmatched control over when and how your email newsletter form appears, helping you maximize conversions without annoying your visitors.
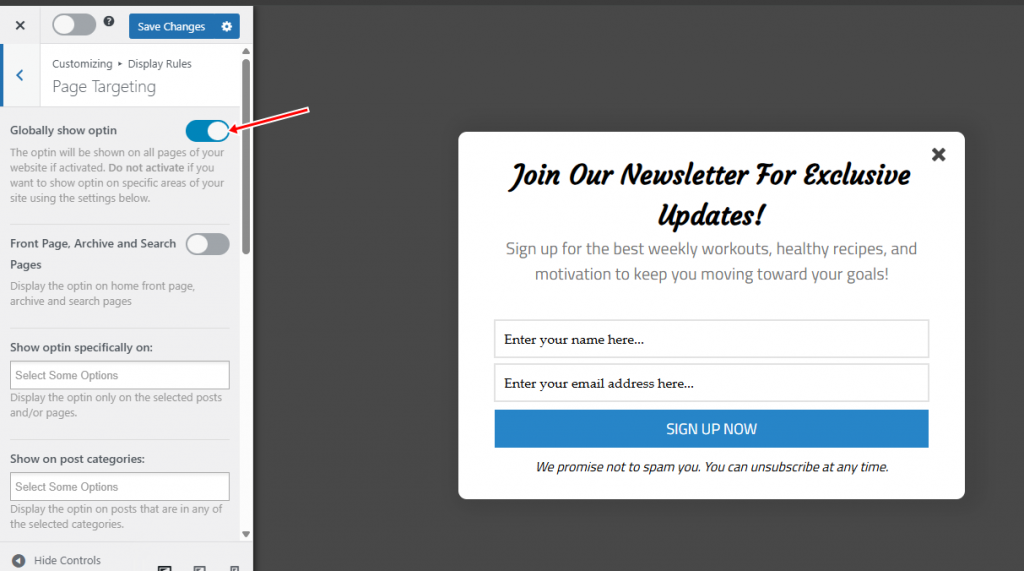
Carefully review the available triggers and configure them to align with your specific goals. For this guide, we’ll set the email newsletter signup form to display on all pages and trigger after the visitor has scrolled 50% down the page.
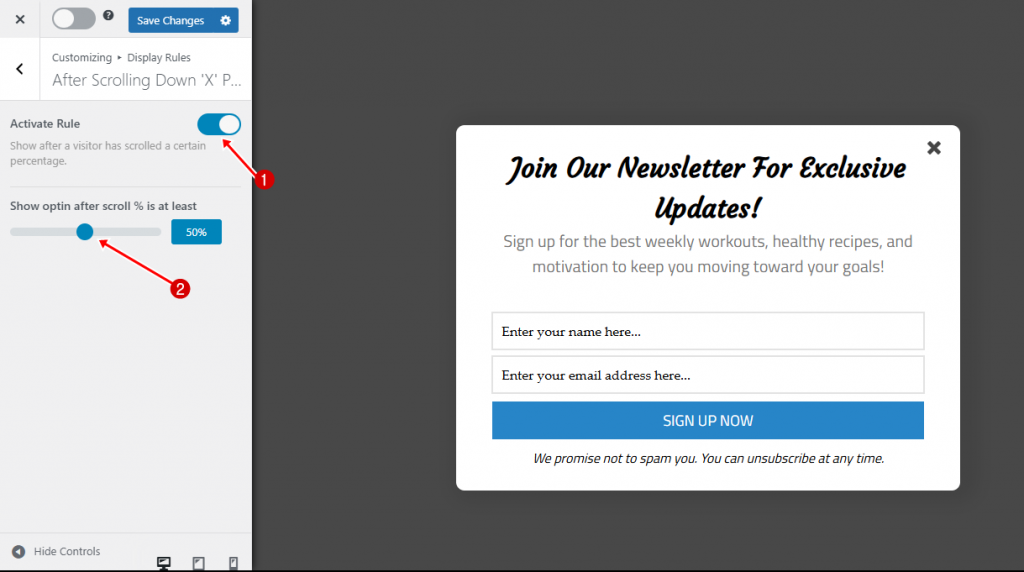
This ensures your form appears only once users are engaged with your content, increasing the chances they’ll subscribe instead of bouncing away. You can adjust this scroll percentage or combine it with other triggers, such as time on site or exit intent, for even more precise targeting.
Once your design and targeting rules are set, click Save Changes, then activate the campaign by toggling the switch at the top of the screen.
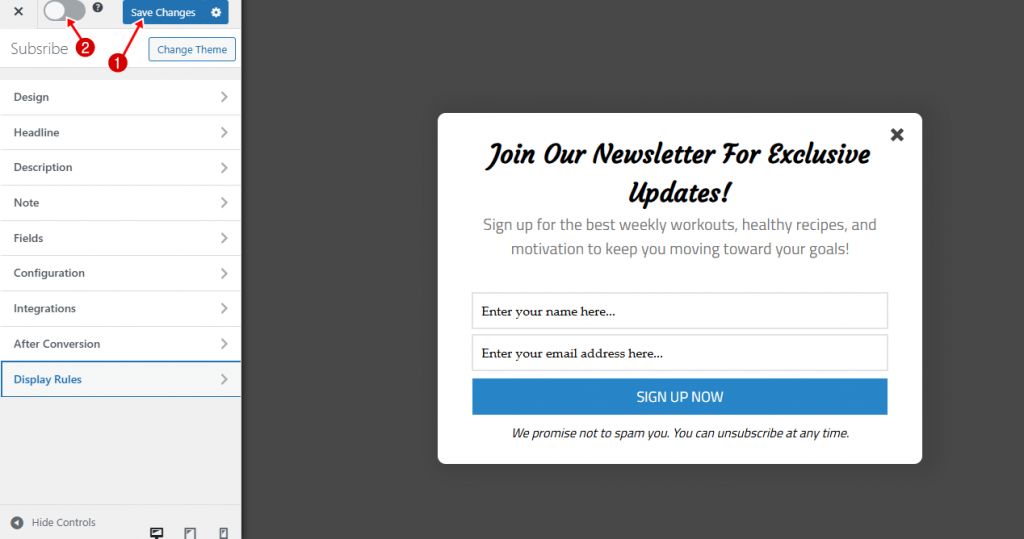
Your email newsletter signup form is now live and will be shown based on the display rules you’ve defined.
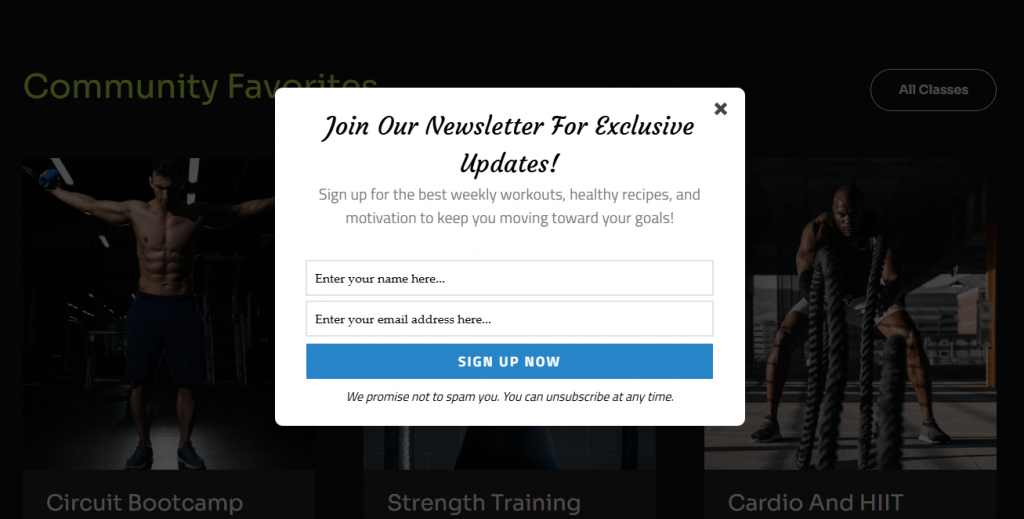
The screenshot above shows the newsletter form on our site, using the Lightbox popup we created with MailOptin. As you can see, it’s eye-catching, professionally designed, and ready to help you grow your email list.
Creating an email newsletter signup form is just the beginning. To truly grow your list and maximize the impact of your email marketing, you need to optimize the appearance, timing, and content of your forms.
Here are some proven best practices to help boost your conversions:
Offer a Clear Value Proposition: Don’t just ask visitors to “subscribe to our newsletter.” Instead, tell them why they should sign up. Highlight the benefits, like exclusive tips, discounts, free resources, or insider news. Make the value obvious and irresistible.
Use Compelling Headlines: Your headline is the first thing people see. Keep it concise, clear, and focused on what the subscriber will gain. Powerful words like “Free,” “Exclusive,” or “Instant Access” often help increase sign-ups.
Keep Forms Simple: Fewer fields usually mean higher conversions. Stick to asking only for essential details, like name and email address. Every extra field can lower your sign-up rate.
Time Your Popups Wisely: Avoid bombarding users the moment they land on your site. Instead, set triggers like exit intent, scroll percentage, or time spent on the page to ensure your form appears when visitors are more engaged.
Add Social Proof: If you have a strong following, share the number of people who have already subscribed. Testimonials, reviews, or mentioning the size of your subscriber base can help build trust and encourage sign-ups.
Test Different Versions: What works for one audience might not work for another. Try A/B testing different headlines, colors, images, or offers to see which version converts best. MailOptin offers built-in A/B testing for this purpose.
Thank New Subscribers: Express gratitude to new subscribers upon their sign-up. Display a warm thank-you message or send a welcome email with useful content or a special gift. This helps nurture the relationship from the very beginning.
Introducing FuseWP, a marketing automation plugin that connects your WordPress site with email marketing platforms and CRMs. It syncs users, customers, and members from eCommerce, forms, and membership plugins, simplifying your email marketing efforts without manual work.
FuseWP provides automatic user syncing, allowing you to add new WordPress users to your email lists based on their roles or activities. It keeps user information up to date in your email marketing service, ensuring your database remains current. The custom field mapping captures valuable subscriber details, and bulk export allows effortless transfer of existing users and historical records to your CRM.
Moreover, FuseWP integrates seamlessly with popular WordPress plugins, such as WooCommerce and Gravity Forms, and supports a wide range of CRM and email marketing platforms, including Mailchimp, ActiveCampaign, and HubSpot.
And there you have it, that’s how to add an email newsletter signup form to your WordPress site using MailOptin. Whether you’re running a blog, an online store, or a business website, building your email list is one of the most effective ways to connect with your audience, drive consistent traffic, and boost sales.
MailOptin makes the entire process straightforward, offering beautiful form designs, flexible display options, and seamless integrations with all major email marketing platforms. By following the steps in this guide, you can create signup forms that capture attention, engage your visitors, and turn casual readers into loyal subscribers.
Now, go ahead and implement your email newsletter signup form today. Your next visitors and customers are just a click away!