

W3 Total Cache – one of the two most popular plugins for caching of the WordPress websites. Today we will tell you in details how to fully configure and set up the W3 Total Cache Plugin!
The W3 Total Cache installation itself is simple but then the plugin literally starts bombarding you with a huge number of options: here is enough to make the angels weep – a browser caching and object caching, along with fragments caching, so if you are not a web developer your head will go around.
And another fact that will really annoy you is that you cannot just take and turn on all the options. If like most people, you have a simple, virtual hosting, then it can significantly slow down your entire site. So, you need to select and set up only types of caching you need.
1. General Settings W3 Total Cache
There are two stages of W3 Total Cache setup. First, you need to configure the General Settings tab, where you enable or disable more than 10 different W3 Total Cache features. Then you will be able to access individual pages with the settings for each module.
After installing W3 Total Cache you first need to go to the General Settings:

1.1 General
The first checkbox is intended to allow you to quickly enable or disable all W3 Total Cache options. It would be wickedly great to simply take and click on this button ., but you must not!
It is always better to configure all the functions separately simply because you won’t need them all.
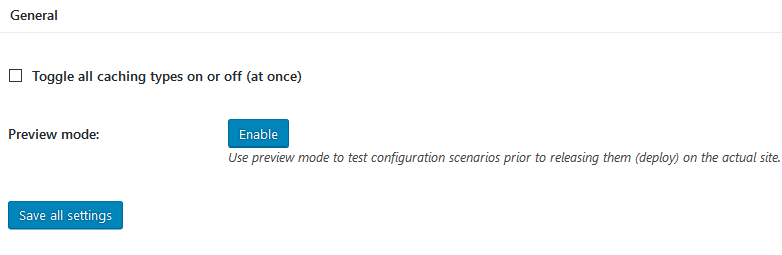

Also here you can turn on the Preview mode. In this mode, all the changes made will not affect the actual, live site until you approve it for sure. If you work on an uploaded live site, then you should use this mode. But if you are setting up W3 Total Cache on a fresh WordPress installation or there is not enough traffic on your site, then just ignore this mode.
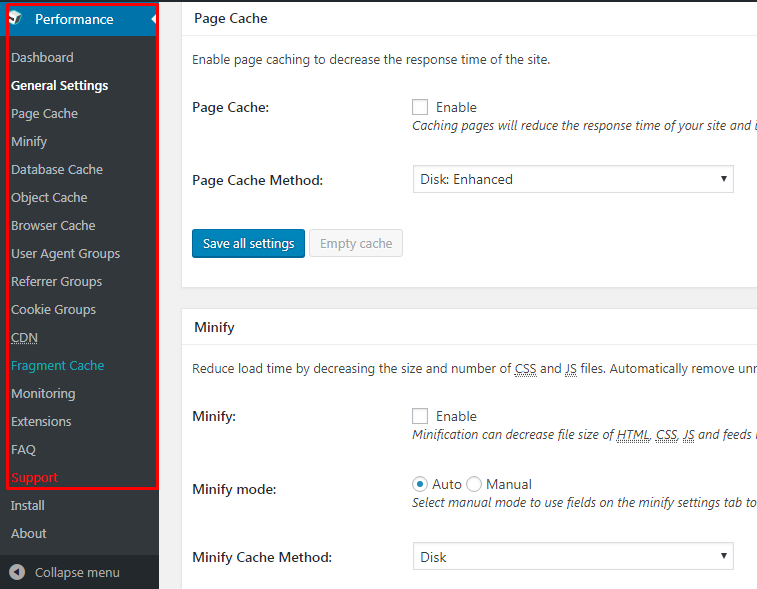
1.2 Page Cache
The next checkbox is the Page Cache. The page cache is what you need. Only the page caching alone can already significantly improve the performance of your site. After enabling this option, you need to select the page caching method (Page cache method).
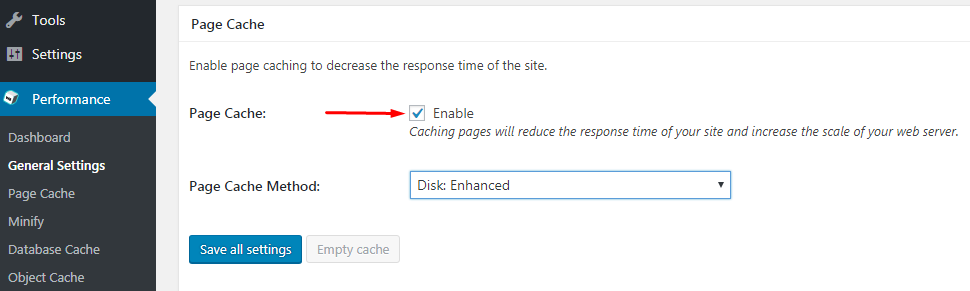

The method depends on your hosting.
- For virtual hosting: select Disk: Enhanced.
- For a dedicated server or VPS: you can use one of the methods of caching Opcode
Page cache method, here you can select a method for caching pages. Basic – standard caching, Enhanced – improved caching, Memcached – caching for multiple servers. For the regular site leave it by default.
If you are not sure what kind of hosting you are using, then, probably, you have a virtual hosting after all. So when you are in doubt, choose the Disk: Enhanced method.
And let’s customize all Page Cache at once since later on the next item down the row in Admin panel detailed about it:
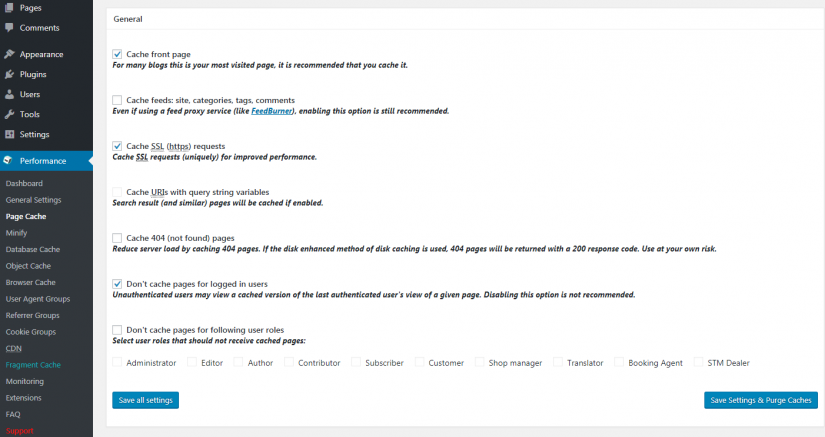
Well, the page is cached. Here, most of the settings are left by default, but there are several important points that need to be adjusted.
First of all, if you are using SSL, you should check Cache SSL (https) requests. Also check the box next to Cache feeds, regardless of whether you use SSL or not:
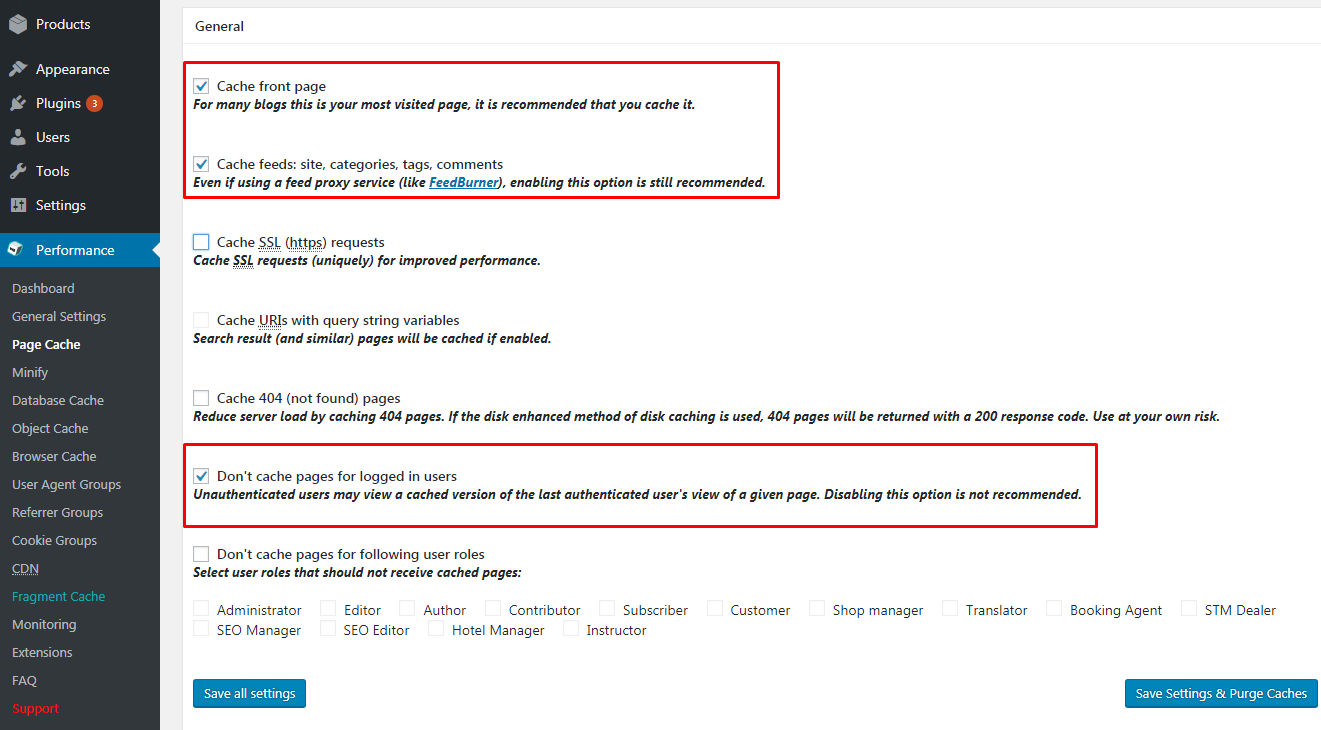

Cache front page – tick to cache WordPress entries.
Cache feeds: site, categories, tags, comments – If you are using RSS feeds on your site, put a check mark to cache it.
Cache SSL (https) requests – tick if you are using SSL security certificate, https.
Cache URIs with query string variables – you can enable caching of the page with search results of your site.
Cache 404 (not found) pages – enable caching of page 404 error, but not mandatory.
Don’t cache pages for logged in users – if there is a checkmark page for authorized users will not be cached. If there is no registration on your site don’t enable.
Don’t cache pages for following user roles – you can choose for which specific user roles not to cache pages. Check the box next to the user role. Save the settings.

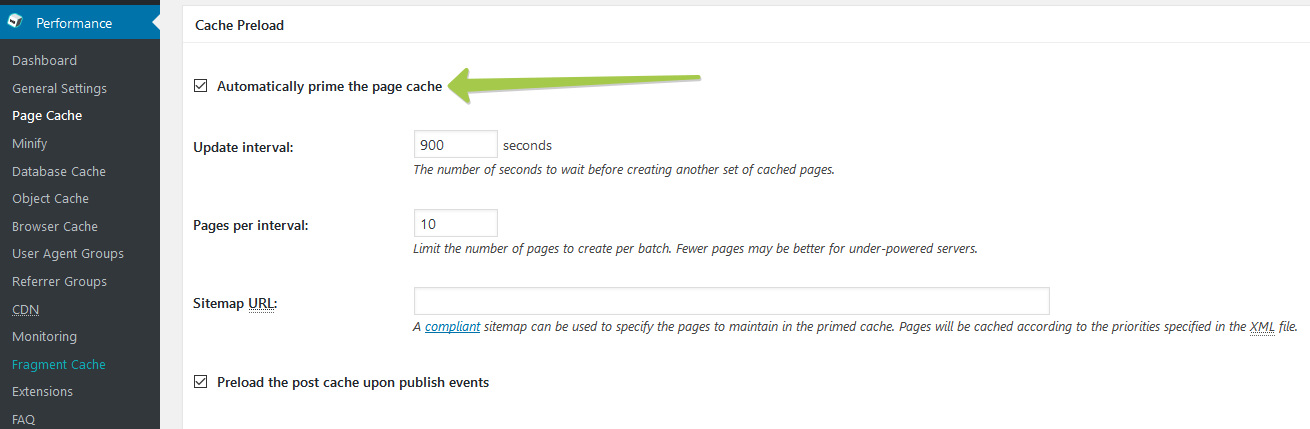
Scroll down a little and enable the Automatically prime the page cache option. And also you need to choose Preload the post cache upon publishing events. Here you can leave the numbers as the default. Make sure that you also added the Sitemap URL:
Update interval, specify here the time interval through which a new page cache will be generated. Please note that the smaller the interval the greater the load on the site. The best option is 84600 approximately every day.
Pages per interval, here you can specify how many pages will be cached during one session. Do not specify many pages, because the more pages, the greater the load on the site again, it is better to leave by default.
Sitemap URL – Enter the URL of your XML card here, if you use it.
Preload the post cache upon publishing events – put a check here to cache the new published entry.

Specify the pages and feeds to purge when posts are created, edited, or comments posted. The defaults are recommended because additional options may reduce server performance. You can mark here the pages and channels that will be updated when creating new posts. For example, if you check “Post comments pages”, then when you add a new comment to the page, the page will be updated. It is not recommended to mark all values as this can create a serious load on your site, mark only the main elements.
Specify the feed types to purge, here you can note the types of feeds for updates that are available on your site.
Purge Limit, pages limit that need to be updated at once, leave it by default.
Additional pages, you can specify additional pages for updates that are not listed above.
Purge sitemaps, here specified the regular expression for the XML map, if you use it, leave it as default.


Late initialization, provides support for WordPress functionality in fragmented caching. Enabling the function can increase the response time of the server, that is, it is better not to enable.
Late caching, overwrites key of page caching via custom filters by postponing entry extraction during the init. action.
Compatibility mode, check the box to enable compatibility mode. Enabling of the function reduces the performance of the site by about 20% in return for the compatibility of the site with the plugin. If you do not experience compatibility issues, do not enable this feature.
Charset, by ticking you disable the UTF-8 encoding. Check only if there are problems with the encoding, instead of the text, scribbles are displayed.
Reject HEAD requests, you can disable caching HTTP HEAD requests, on most sites this function is not active, skip it.
Garbage collection interval, Specify the time period for clearing the expired cache, the recommended value each day is 84600.
Comment cookie lifetime, here’s specified the lifetime of the cookies, the recommended value once a day is 84600.
Accepted query strings, you can specify URLs here, which you should always cache.
Rejected user agents, you can specify here custom agents for which you do not need to cache pages, for example – Google.
Rejected cookies, specify here page cookies that will not be cached.
Never cache the following pages, you can specify the address of directories or sections of the site that will not be cached.
Never cache pages associated with these categories – Will always ignore all pages filed under the specified category slugs.
Never cache pages that use these tags – Always ignore all pages filed under the specified tag slugs.
Never cache pages by these authors – Always ignore all pages filed under the specified author usernames.
Never cache pages that use these custom fields – Always ignore all pages filed under the specified custom fields. Separate name-value pairs with an equals sign (i.e., name=value).
Cache exception list, specify here the addresses of pages that will be cached even if they are in a section that is closed from caching.
Non-trailing slash pages, cache the data of the page even if they do not have slash endings, a slash at the end of the address /.
Specify page headers, you can specify additional page headers for caching.


If you are not sure about your actions anywhere leave everything as it is but make sure you have saved all the changes.
1.3 Minify
Going to the next item: Minify. Minification is a basic compressing and optimization of HTML, CSS and JavaScript files without losing their functionality. The effect is achieved by removing unnecessary information, such as line breaks and long spaces. That’s why the minified code is so hard to read by human.
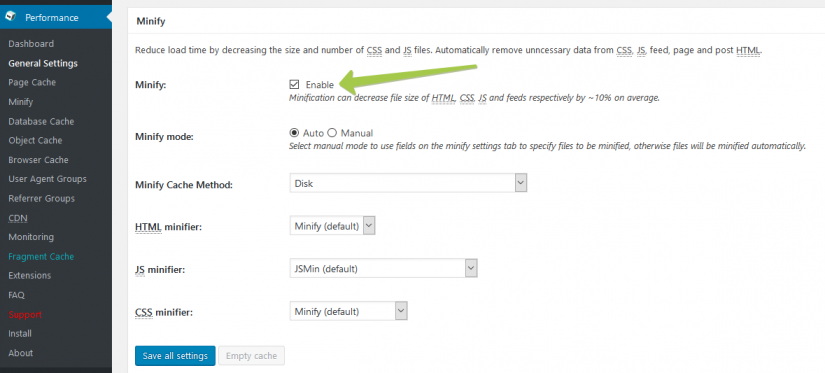

Without going into details, minification is something that Google PageSpeed always recommends, so it cannot be neglected.
When you enable this option, W3 Total Cache displays a warning Hang on! that the site might have problems. And they really can appear that’s why you will need to fine-tune the minification for your website.
Let’s start with putting Minify mode in Auto mode. There is a small chance that you’ll encounter a website malfunction, especially if you use customized JavaScript. If the site stops working normally, then play around with the settings. In such cases, the usual recommendation is to switch to an Autoptimize plugin for minification, or simply turn off this option in W3 Total Cache at all. You can also use CloudFlare CDN services with built-in minification. But, absolutely, don’t be using two plugins at the same time – it is unnecessary. Either one solution for the minification or the other.
Be sure to try the W3 Total Cache minification first, though this method does not guarantee that your site will work as consistently and stable as before.
It is better to select an Auto Minify mode for minimizing files which will automatically compress them. Manual mode will need specification on which files to compress.
Leave the rest of the settings by default and save.
The positive effect of minification is worth your efforts to set it up:
The Minification section may not be so nice & easy to set up. After all, while you do not try something, you do not know how it will affect your site. So we advise starting with the default settings. But if something goes wrong work a little with the settings.
You can try to play with the settings of the W3 Total Cache minification to solve a problem. But you will really have to get deep into the issue since it is not so easy unless you are a developer yourself.
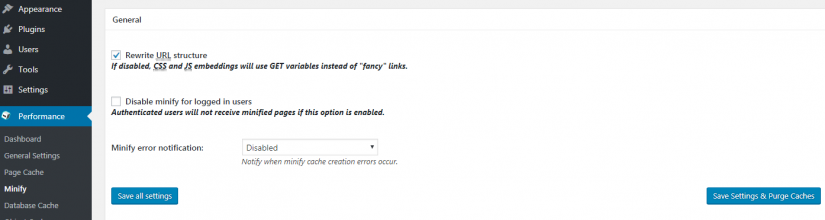

Rewrite URL structure, overwrite the structure of the URL, leave it as default.
Disable minify for logged in users, disable minification for registered users. If you have a large number of registered users, do not turn off minification.
Minify error notification, specify here – Email Notification, to receive notices by Email if there are errors at minification of files.
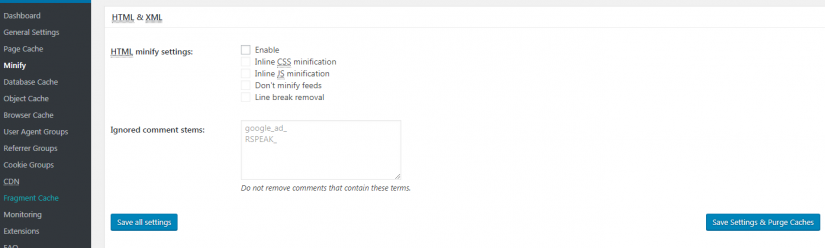

HTML minify settings, Enable – check the box to enable minification, Inline CSS minification – check the box to minify the CSS files, Inline JS minification – put a check mark to minify the JS files, Do not minify feeds – if you check the box, the RSS feed will not minify, Line break removal – check the box to delete empty spaces in files.
Ignored comment stems, comments that contain these terms will not be deleted. google_ad_ google ad.
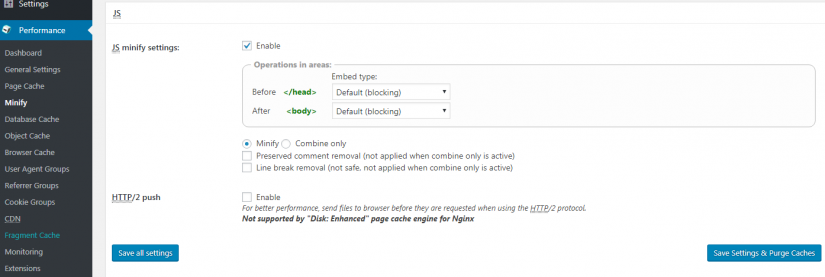

JS minify settings, enable minification of JavaScript files, recommended default value.
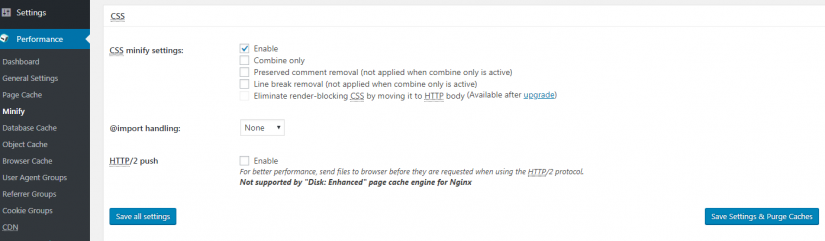

CSS minify settings, enable minification of CSS files, recommended default value.
Disable minify automatic file name length test, disable automatic minification of the length of the test file name, leave it by default.
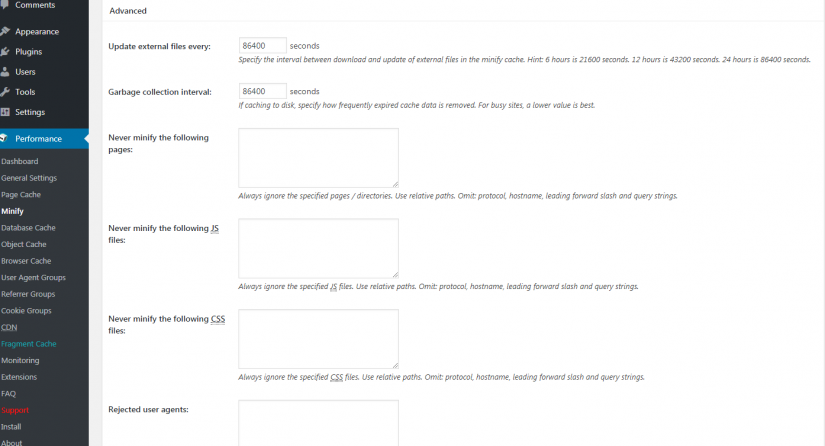
Update external files every, interval between downloading and updating external files. Leave by default 86400 – once a day.
Garbage collection interval, removing expired cache data. Leave by default 86400 – once a day.
Never minify the following pages, specify here pages or sections of the site that you do not need to minify.
Never minify the following JS files, specify here JS files that you do not need to minify.
Never minify the following CSS files, specify here the CSS files that you do not need to minify.
Rejected user agents, specify here the custom agents that will not receive minified content, for example – Google, Bing, etc.
Include external files/libaries, specify here the external files / libraries that need to be combined. Save settings.

It is much easier to switch to Autoptimize if the W3 Total Cache Minification settings by default cause problems. If you are using CloudFlare you can also take advantage of the built-in CloudFlare minification.
So if you do switch to Autoptimize or CloudFlare make sure that you have disabled the minification in the General Settings tab.
1.4 Opcode Cache
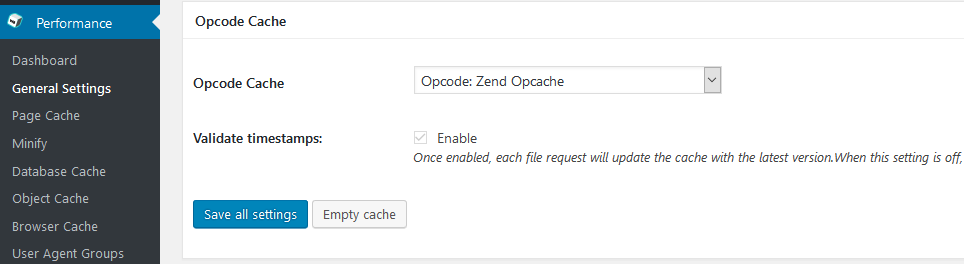

Latest versions of W3 Total Cache include Opcode caching. Opcode cache is only available with the pro version of W3 Total Cache. If you have the pro version, then enable both the settings and test performance. Opcode cache is used to cache PHP. Parts of WordPress are written in PHP which is regularly executed. Opcode cache can cache these code blocks for a performance boost.
But if you have a virtual hosting, you probably will not even be able to enable this option. For most users, this option is not available, in this case, do not pay attention to it.
1.5 Database Cache
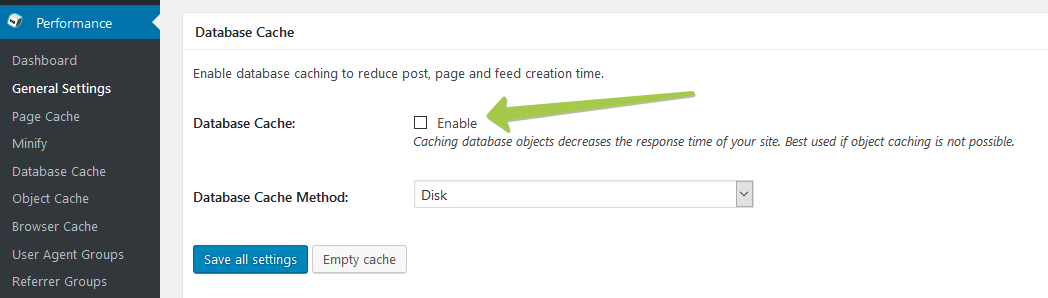

According to the developers of W3 Total Cache, W3TC – is a Swiss knife, which you should try. In general, caching object cache and database cache to disk are things that are not recommended.
Database caching can potentially boost your site by moving the execution of processes from the database to the processor/memory. But there is a problem – for most virtual hostings, the database works better with the load than the processor or memory. So database caching can slow down your site by overloading other aspects of your server.
Database Cache Method – the caching method for regular sites leave by default. Memcached – if you have multiple servers.
Anyways, if you have a virtual hosting, it is better to leave the database caching disabled.
But we’ll also guide you through this one down the row:
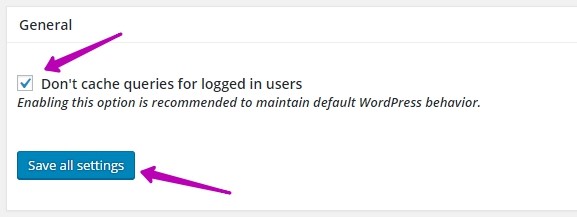
Don’t cache queries for logged in users, do not cache requests for registered users, should be enabled to maintain WordPress behavior by default.

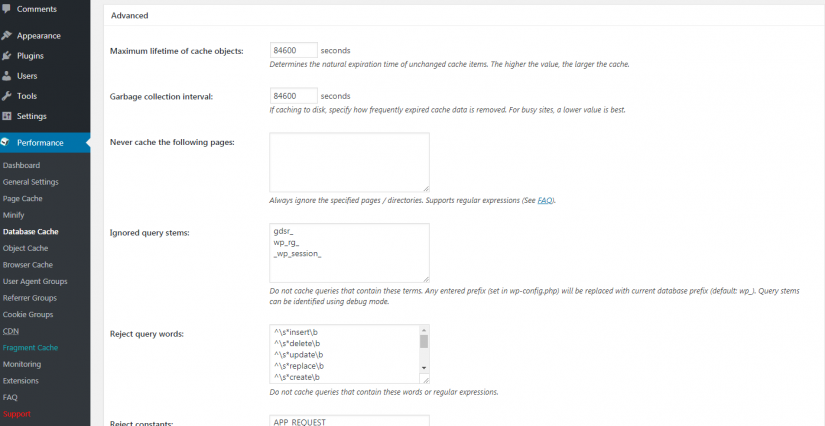
Maximum lifetime of cache objects, here you can specify the maximum lifetime of the object cache. The lower the value, the greater the load on the server. Recommend setting for all such values the time period once a day – 84 600.
Garbage collection interval, Specify here the interval of garbage collection, stale files. Recommended – 84 600 once a day.
Never cache the following pages, specify here pages or sections that never should be cached.
Ignored query stems, do not cache requests containing this data.
Reject query words, do not cache requests containing these words or regular expressions.
Reject constants – Disable caching once specified constants defined.

1.6 Object Cache


Object caching can either boost your WordPress site … or it can significantly slow down the work of the WordPress admin area.
If you are trying to understand why the WordPress admin is slow, then, first of all, you should disable object caching. That’s why it is recommended to disable object caching. Of course, you can test all this, but if you have a virtual hosting, then this kind of cache is unlikely to be useful, and most likely, will slow down the work of the admin.
But there is one exception here: if you have an extremely dynamic project (for example, BuddyPress, bbPress, etc.), you can consider object caching.
And leave the Object Cache Method by default!
Here’s details by admin panel:
You can set the lifetime of cache objects and the garbage collection interval. Leave the time as is, by default. The settings below relate to multisite, so they also do not need to be touched by most users.
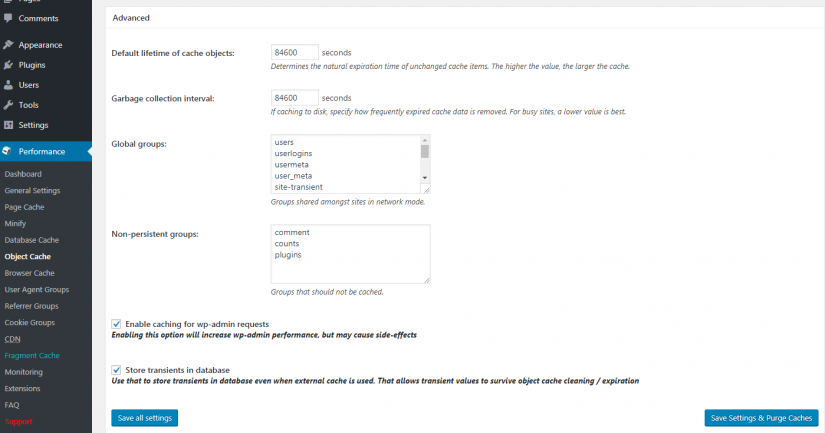

Default lifetime of cache objects, the default lifetime of the object cache. Recommended to specify 84 600 – once a day.
Garbage collection interval, garbage collection interval. Recommended to specify 84 600 – once a day.
Global groups, specify the global groups for caching in the network mode, leave the default.
Non-persistent groups, specify here the groups that should not be cached.
Enable caching for wp-admin requests, enabling this option will increase wp-admin performance, but may cause side-effects
Store transients in the database, use that to store transients in the database even when the external cache is used. That allows transient values to survive object cache cleaning/expiration.
1.7 Browser Cache


If you ever ran your site through Google PageSpeed Insights, then you probably know that leverage browser caching is the favorite message of this tool. And here you can apply this reinforcement.
Browser caching is a simple method of improving website performance by caching data on a visitor’s browser. Since everything depends on the local storage of data on the computers of your guests then do not be afraid that it would slow your site down.
No matter what hosting you are using, anyhow, you should definitely enable this kind of caching!
Now you need to configure the browser cache thoroughly.
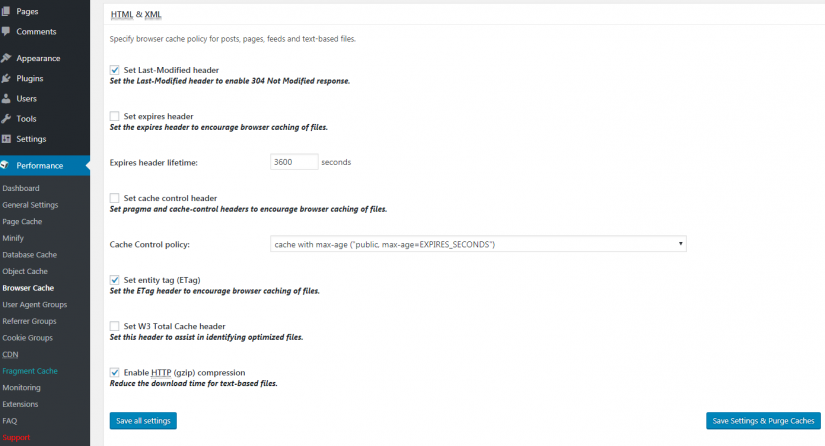
For browser caching you must enable the first 6 below:
- Set Last-Modified header
- Set expires header
- Set cache control header
- Set entity tag (eTag)
- Set W3 Total Cache header
- Enable HTTP (gzip) compression
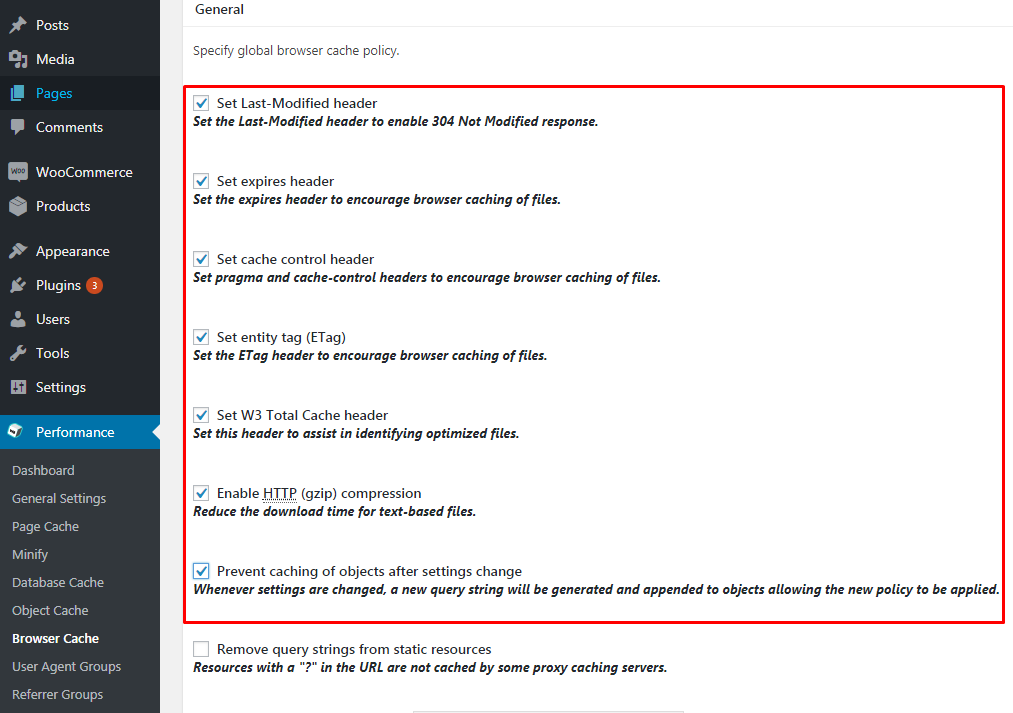

Scroll down and tick the Do not process 404 errors for static objects with WordPress. All the rest is advised to leave as it is.
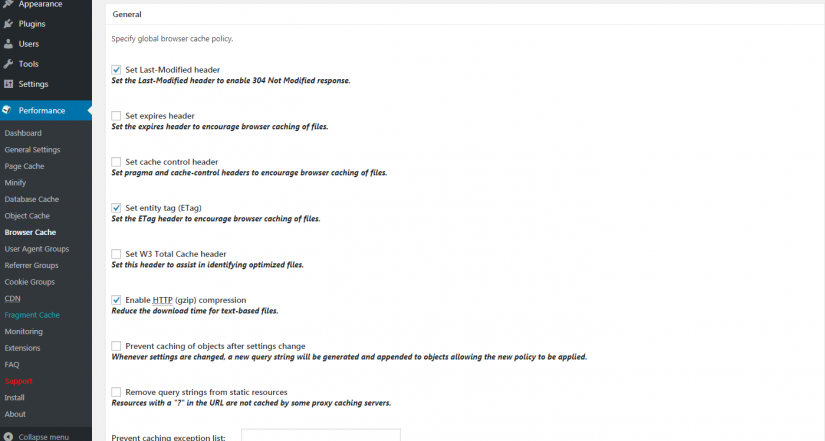
Set Last-Modified header, here there should be a tick so that the browser had access to the set of the last changed heading on your site.
Set expires header, you can set the expires header to stimulate the browser for more frequent file caching but not necessary. It is not recommended to enable as it will increase the number of requests to your site.
Set cache control header, you can enable the header control cache function, which will be added to the htaccess file, not necessary.
Set entity tag (eTag), dding eTag tags to the headlines, to stimulate browsers, not necessary.
Set W3 Total Cache header, set a common header cache, not necessary.
Enable HTTP (gzip) compression, enable GZIP compression, check maybe you have already enabled gzip compression, then disable this option.
Prevent caching of objects after settings change, prevent caching of objects after changes, it is not necessary to enable.
Remove query strings from static resources, resources with a “?” in the URL are not cached by some proxy caching servers.
Prevent caching exception list, list of exceptions to prohibit caching.
Don’t set cookies for static files, do not install cookies for static files, not necessary to enable.
Do not process 404 errors for static objects with WordPress, do not process 404 errors for static objects with WordPress, not necessary to enable.
404 error exception list, list of exceptions for 404 errors.
Rewrite URL structure of objects, generate unique URI for each file protected from caching by the browser.

Set Last-Modified header, set of the last header change for CSS and JS files, should be enabled.
Set expires header, tick the box to specify the expiration time for expires header in CSS and JS files, not necessary.
Set cache control header, the enabling of cache control for CSS and JS files, not necessary.
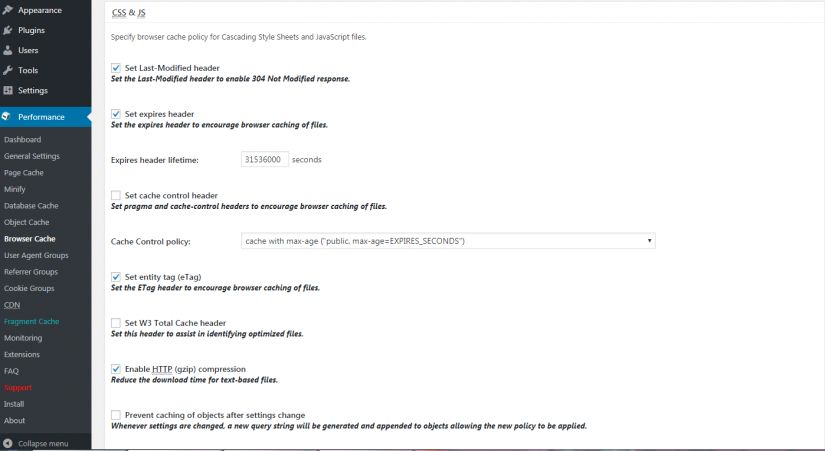

Cache Control policy, leave by default.
Set entity tag (ETag), the adding of ETag tags to the CSS and JS file headers, not necessary.
Set W3 Total Cache header, common cache for CSS and JS file headers, not necessary.
Enable HTTP (gzip) compression, you don’t need to enable it if your site already uses gzip compression, the link above.
Prevent caching of objects after settings change, prohibiting caching of objects after changes for CSS and JS files, it is not necessary to include.
Remove query strings from static resources, resources with a “?” in the URL are not cached by some proxy caching servers.
Disable cookies for static files, do not create cookies for static CSS and JS files, not necessary.
Set Last-Modified heade, set of the last header change for HTML and XML files, should be enabled.
Set expires header, tick the box to indicate the lifetime of the expires header. Recommended time 84,600 seconds.
Set cache control header, you can set the control’s header cache, cache control for HTML and XML files, not necessary.
Cache Control policy, cache management policy, leave by default.
Set entity tag (ETag), you can add an ETag tag to the title, to encourage browsers.
Set W3 Total Cache header, set W3 Total Cache for the header, not necessary.
Enable HTTP (gzip) compression, enable gzip compression only if you do not use it at the moment on your site
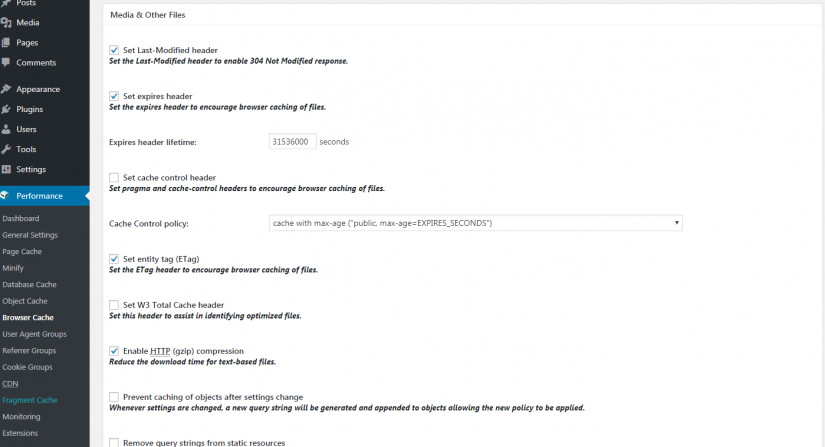

Media Other Files, here you can enable the function – Set expires header, to specify the lifetime of the media file cache, leave the default lifetime. If GZIP compression is already enabled on your site, disable the function – Enable HTTP (gzip) compression. Leave the rest of the settings by default. Save your changes.
1.8 CDN
If you are using a CDN, you can connect to the W3 Total Cache using this option. You can try to find your CDN server in the drop-down menu or select Generic Mirror if there is no option in the list.
If you are using CloudFlare you do not need to integrate here. Instead, you will need to add the CloudFlare extension. You can do this from the Extensions tab.
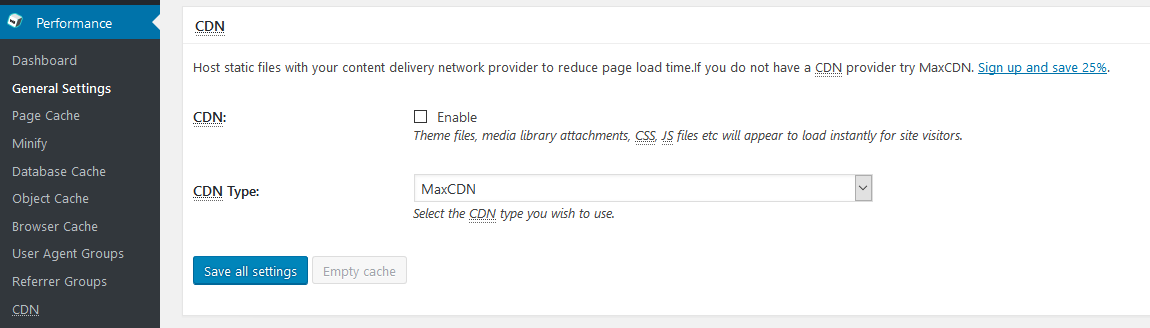

If you do not use the CDN, do not put a check in this box. Enable this option only if you already have a CDN provider.
CDN Type, here you need to select the name of the service where you enabled the CDN function.
Unfortunately, we cannot give you precise instructions on this one since the settings depend on which CDN you are using and whether you are using it at all. But luckily for you, because W3 Total Cache is a very popular solution, most CDN providers offer detailed instructions for the configuration process.
With this in mind, if you use CloudFlare as a WordPress CDN, you need to add the CloudFlare extension at the Extensions tab.
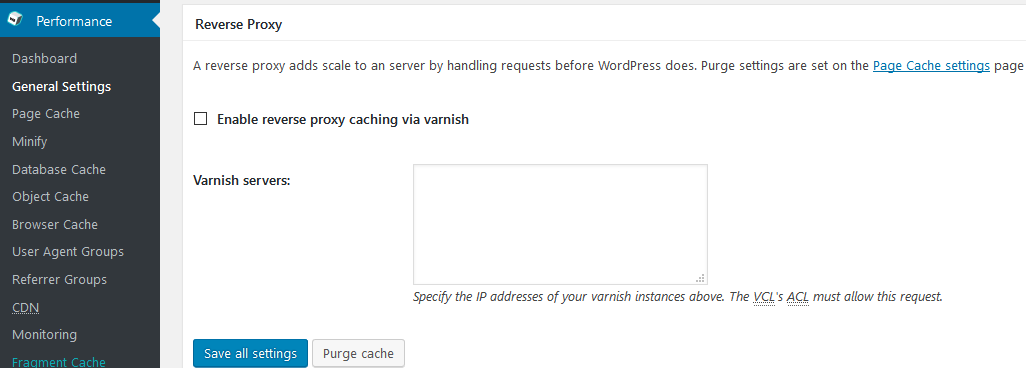
1.9 Reverse Proxy
Most WordPress sites should ignore this option. A reverse proxy is such a thing that if you are so advanced and sharp that you can use it then you probably do not need to read this guide!
But in case:
Enable reverse proxy caching via varnish – you can enable varnish caching if you are using it on your site. Varnish is designed for very large sites with very large traffic, such as Facebook
Varnish servers – here you will need to specify the IP address of your server for varnish.

1.10 Monitoring, Fragment Cache, Misc, and Licensing
New Relic, you can connect the server monitoring function, user monitoring, mobile monitoring. The function will allow you to monitor server processes and user behavior, etc. It is not necessary to enable this function. Monitoring is a paid feature.


License, License, if you purchased the Pro version of the plugin then you need to enter the license key here and save the settings. For a free version just skip this field.


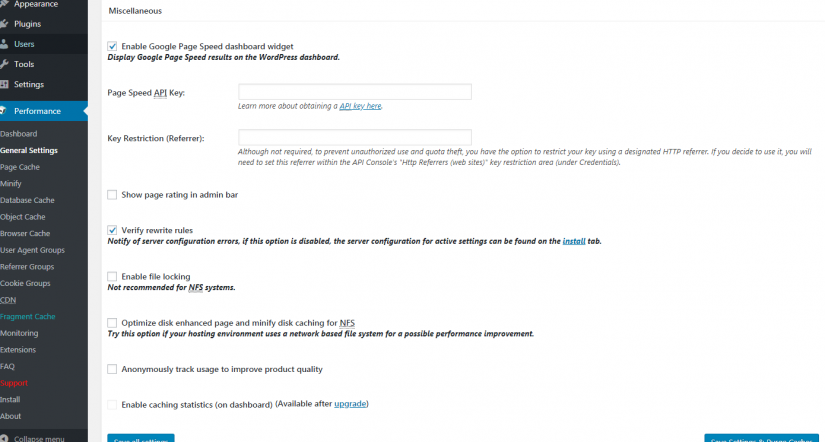
Enable Google Page Speed dashboard widget, you can enable Google Page Speed support so that you have a widget with the results of the service displayed on the main page of the admin panel. To enable the function, you need to enter the API key – click the tab – API key here.
Verify rewrite rules, tick this one, pleaseю
Enable file locking, the enabling of file locking is not recommended for the NFS system. Leave it unchanged.
Optimize disk enhanced page and minify disk caching for NFS, you can enable this option if your hosting uses an NFS network file system. To improve performance.
Enable Edge mode, DO NOT click on this tab, checking the experimental plugin function, can cause an error. Save settings.

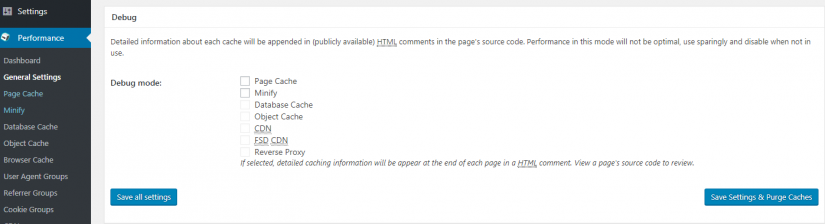
1.11 Debug Monitoring, Fragment Cache, Misc, and Licensing
If you have problems with W3 Total Cache, then you can enable the debug options but only temporarily. For normal use disable all these boxes. Since if they are not used to solve issues they produce a redundant code.

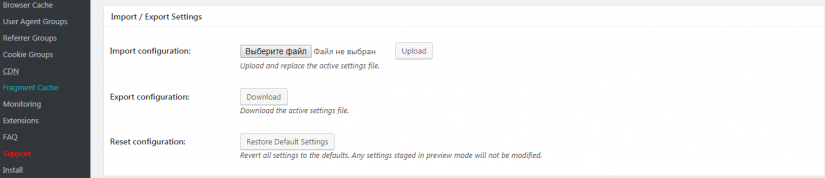
Import/Export, you can export or import plugin settings to another site or from another site. To export from another site, click the button – Choose a file. To import to another site, click on the button – Download.

ALWAYS do not forget to save the changes.
2. W3 Total Cache Extensions
The CloudFlare extension was already mentioned but W3 Total Cache also includes extensions for a lot of other tools.
For example, there are extensions for:
- Google AMP pages
- CloudFlare
- FeedBurner
- Genesis Framework (Be sure to install if you use Genesis)
- Yoast SEO
- WPML (Be sure to install if you use WPML for translation).
Each extension requires some configuration. For example, if you enable CloudFlare, you will need to enter the API activation key. Then you can work with CloudFlare functions directly from W3 Total Cache.
3. Other Settings
User Agent Groups, here you can create a group of user agents for creating cache specifically for each selected device or group of devices. You can specify a subject or domain to which the redirect will be performed when a specified device is detected.
Referrer Groups, the same as above, only for search engines, browsers.
Monitoring, configure the monitoring function. This function is not crucial.
FAQ, questions and answers on working with this plugin.
Support, here you can write a letter to the plugin support. You can also select the subject of the question.
Install, data on the performance of the plugin. Here’s what changes were made to your site after installing this plugin.
About, additional plugin features which you might use.
4. Too Complicated? Just Choose Another Caching Plugin
W3 Total Cache – the plugin is certainly powerful and will be an excellent solution for experienced users but for beginners using more user-friendly caching plugin is the recommendation! For instance, Cache Enabler, WP Super Cache or an awesome WP-Rocket. You’ll spend an hour setting up the W3 Total Cache whereas in the case with Cache Enabler just a minute!
No question, Cache Enabler as it is in-itself does not have configuration options for the database cache, object cache and so on. But ordinary WordPress users do not need this functionality. Thank You and good luck with your optimization!
We hope that helped you set up the W3 Total Cache plugin on your WordPress website. Share your experience with this plugin in the comments below.