

Companies running an online business have an added advantage due to technology’s growth changing the world. Every day, innovations help your business improve using tools and readily available features.
One such tool is a calculator that you can avail to your customers. One may wonder, but what power does a simple calculator hold in my business? Truth is, this simple estimation calculator can bring you outstanding business when utilized the right way.
If you are running a business with a WordPress website, adding a calculator is the best thing you can do to revamp your business. This magical calculator will help your customers know their spending amount without leaving the page. How liberating is that!
Let’s learn how to make business better using this custom calculator.
So how you can add a nice custom calculator on your WordPress website?
- Why add a custom calculator to a WordPress Website?
- The Cost Calculator
- Installing the cost calculator
- Creating calculators
Why Add a Custom Calculator to a WordPress Website?
A custom calculator is one of the essential tools to have on your website.
This innovative and simple tool allows you to create price estimations for your products or services. It also helps you generate more leads by asking your customers to share their email addresses to get the results from the online calculator.
Adding the WordPress online calculator to your website helps users easily calculate anything they need without leaving the site. This creates more focus on the website as the user has everything they need to sign up or subscribe.
Depending on your type of business, you can add a calculator that benefits your customers, for example:
- If you are in eCommerce, a custom calculator that converts metric units to imperial will help your customers check if the product is the right weight or size;
- If you have a fitness blog, you could add a BMI calculator that helps customers calculate their BMI and proceed to choose a product or service to buy.
The cost calculator is the best tool to help you figure out all the cost problems on your website. It has a free version and a PRO version with enhanced features.
The Cost Calculator
The Cost Calculator allows you to create cost estimation forms on your website to direct your customers. Any type of business can use this cost calculator and create a well-organized payment process within your website.
Moreover, you can create multiple pricing forms on one website and insert them on a page or post. One huge advantage is if you already have an existing calculator outside your website, you can import or export them.
This plugin is easy to use and suitable for a variety of services and products. Whatever you need to make a price calculator for, this tool will work for you. Whether it’s loans, orders, sold items, etc. Allow this tool to help you in your business journey while increasing conversions to your website.
There are major advantages that come with getting a cost calculator, they include:
- It makes your website look pro. Not many websites have learned the secret of using the cost calculator. Using it gives your customers a feeling of being professional, thus trusting you more.
- It makes pricing transparent. It gives your customers precise estimations without any hidden costs. It also completes calculation tasks, thus providing the necessary cost information to the client.
- Generates leads. It helps convert potential customers into actual sales.
You can use a cost calculator as an extension to incorporate into various websites, including:
- Car rentals;
- Booking websites;
- Venue rentals;
- Delivery service;
- Graphic design
That said, let’s learn how to install this calculator.
Installing the Cost Calculator
Here is a step-by-step guide to assist you.
To install the cost calculator use the WordPress Admin panel. Start by logging in to your wp-admin console using your login name and password. You can also purchase the PRO Version, which comes with more features than the free one.
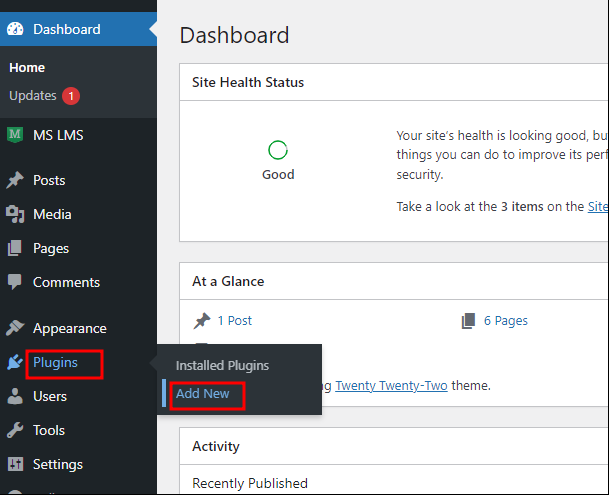
Navigate to Plugins >Add New.

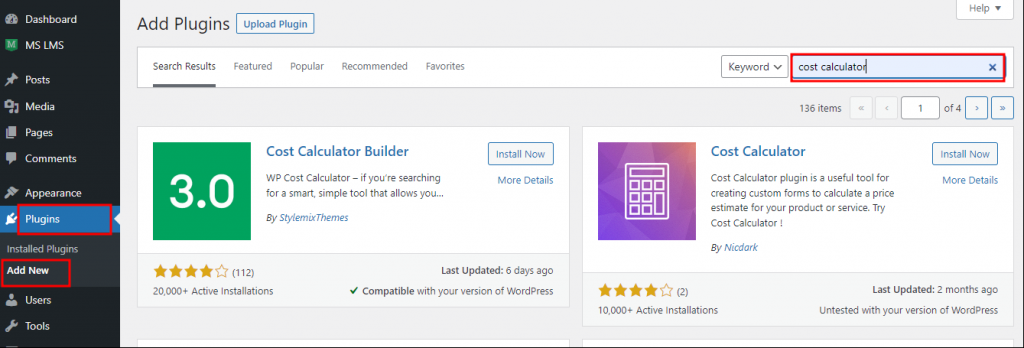
On the search box, type cost calculator, and the plugin will appear on the search items as shown below.

Choose the Cost Calculator Builder and click on Install Now.

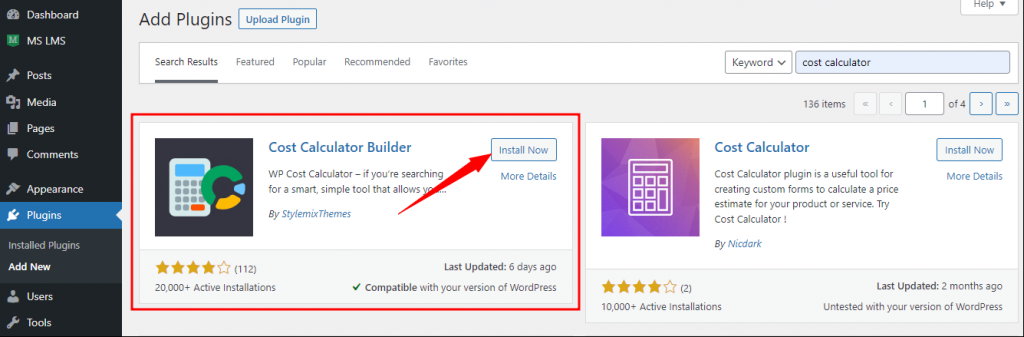
Once installed, Activate it.
Creating, Editing, and Customizing Calculators
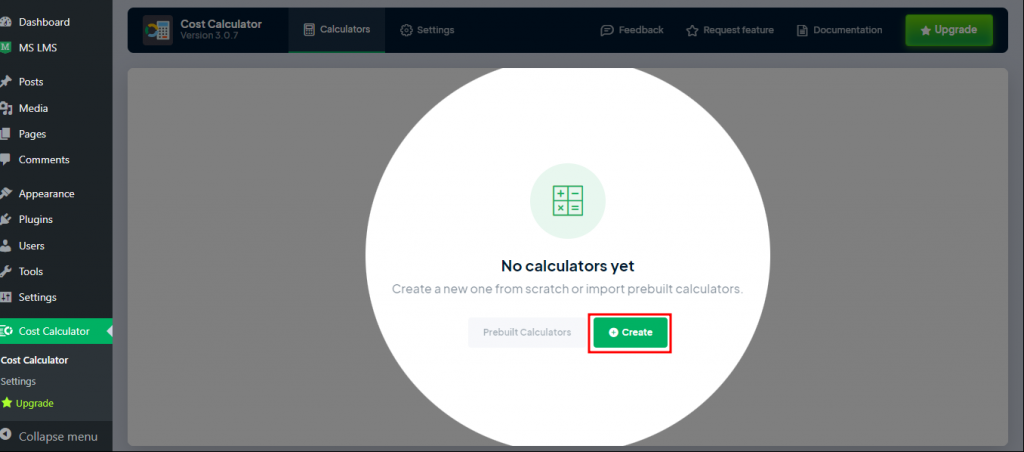
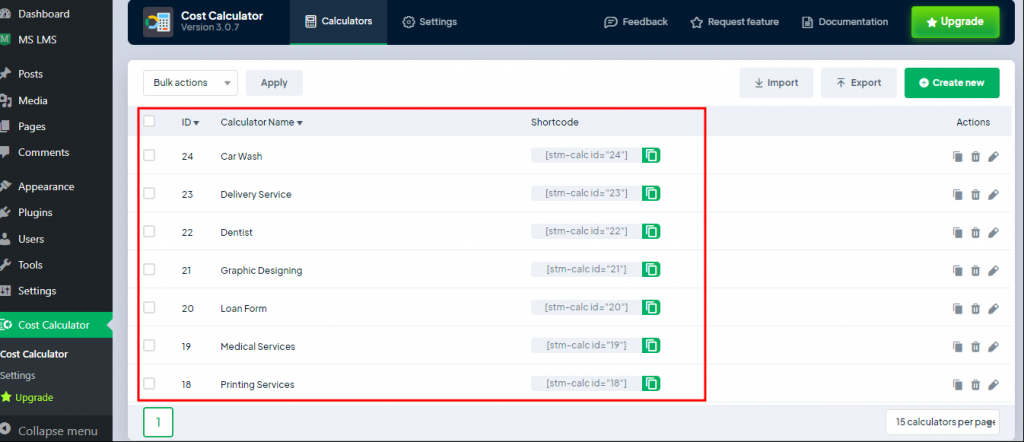
Once you activate your plugin, the cost calculator icon will now appear on the dashboard menu. Go to Dashboard >Cost Calculator menu.


To start with, there are no forms on the list yet. You will need to create your own. Click on Create.

You can also import prebuilt calculators. You can also choose any demo calculator from the prebuilt calculators and edit to fit your needs. For this guide, we will use prebuilt calculators.

For example, Let’s choose the Graphic Design calculator and see what it looks like before we edit. Click on Graphic Designing>Preview.

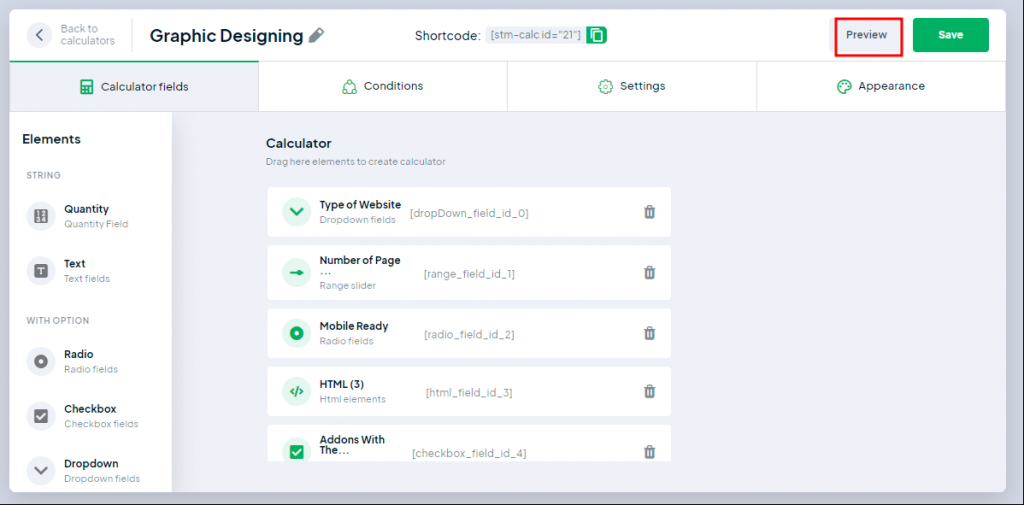
You will get to see how the calculator looks like before you can edit anything.

Let’s see how you can edit this calculator.
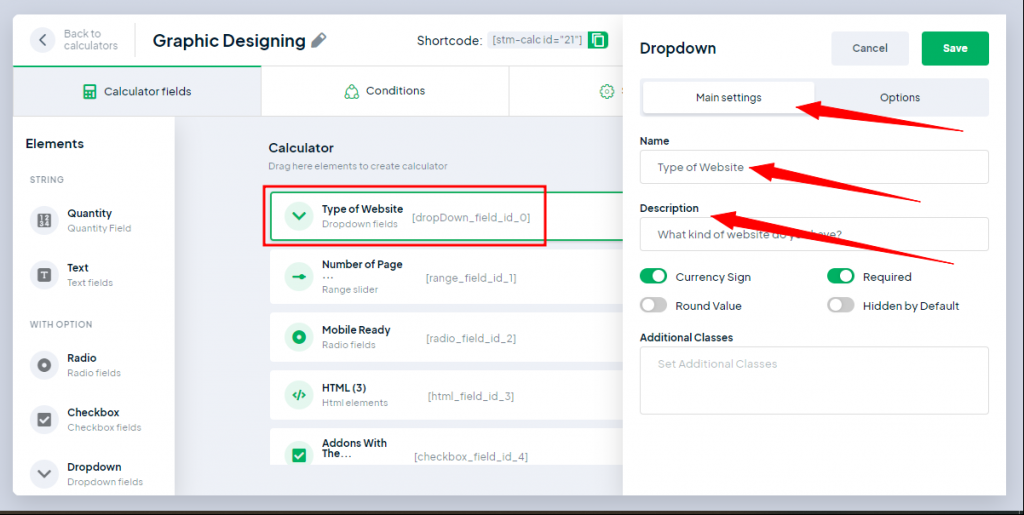
You will find the elements that need to change depending on the type of website you have and the services you offer. The first element, Type of Website is a drop-down menu whereby it needs the name and description of your website on the main settings page.

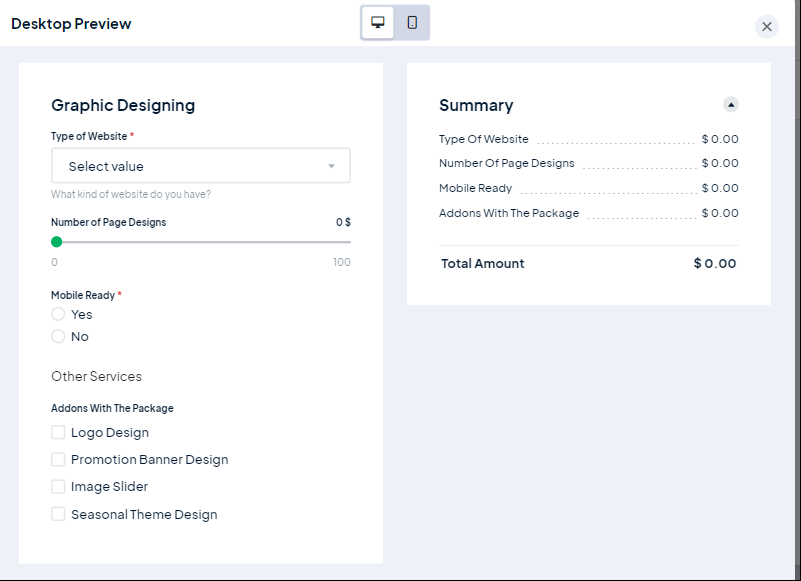
On the options page, you get to choose the cost for each service.

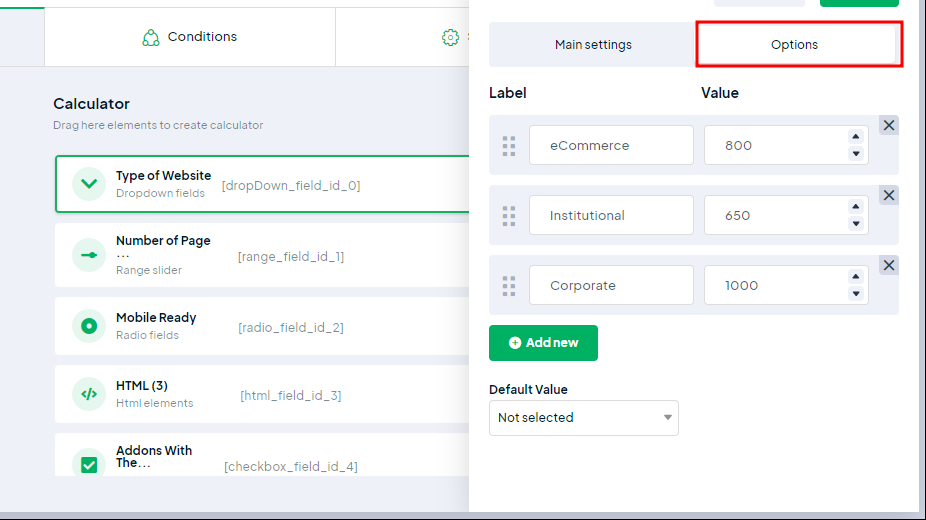
The calculator totals the cost of graphic design because you will include everything including the pricing form.
The number of pages is the next element that you should edit. This helps define the pages that the calculator works on. The rest of the fields are quite straightforward and easy to fill as per your business service.
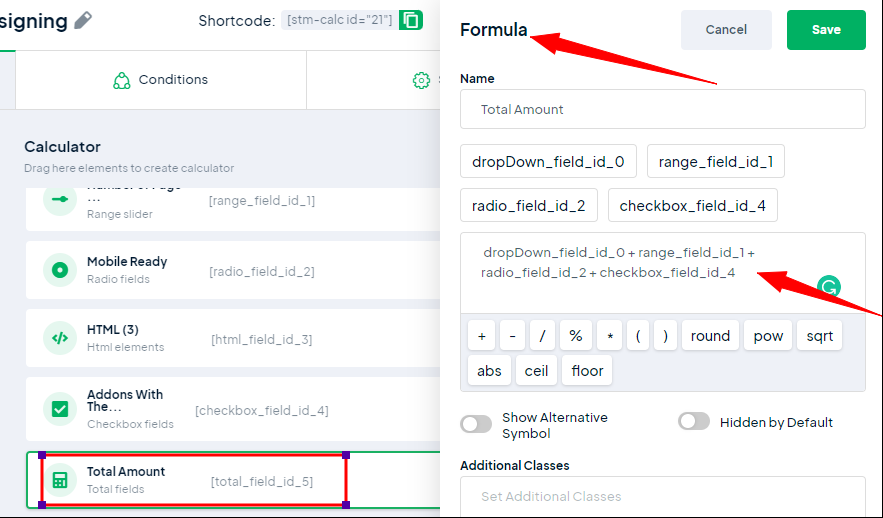
The Total element is the point where all the calculations will happen. In the formula field, you will see a code that may look complicated but it’s possible to recreate yours. Under the available fields, there are four fields you can use in the formula. Click the first field and add an operator. Click on the asterisk to signify that you want to add the four field values. Click on the other field option to add it and your formula is complete.

Let’s see how you set up the conditions, settings and appearance.
Conditions
You will use this feature if you are on PRO Version. Though its not a must to use it for every form, it is an excellent feature to have.
Settings
The settings feature is ideal in helping you adjust the currency and payment integrations you would like to use.

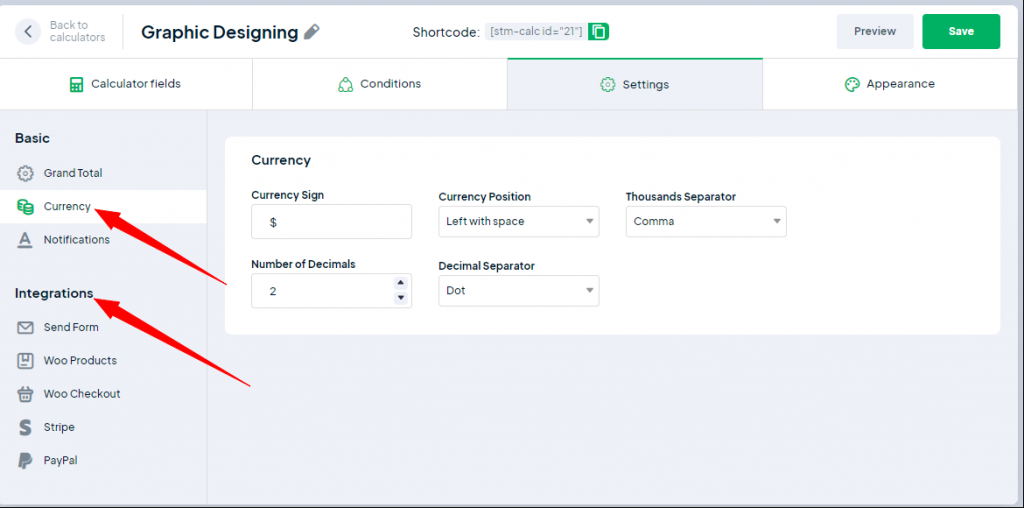
These features on the settings page are ideal for most businesses as they make them work easily. Let’s look at these features closely –
If your business has woo commerce, the Cost Calculator automatically integrates with it. For example, you can set up your store in a way that when users click the submit button, they land on the woo checkout page. Adding an Add to cart button helps complete transactions fast.
Send form Allows integration with your customers’ contacts whereby they will have an option to receive the results via email. This goes a long way in producing leads for your business.
Choose either one of the payment options – PayPal or Stripe for your calculator.
Finally, its time to customize the appearance of your calculator. You can change any design aspect including the box style, background color, typography, borders, spacing, etc.

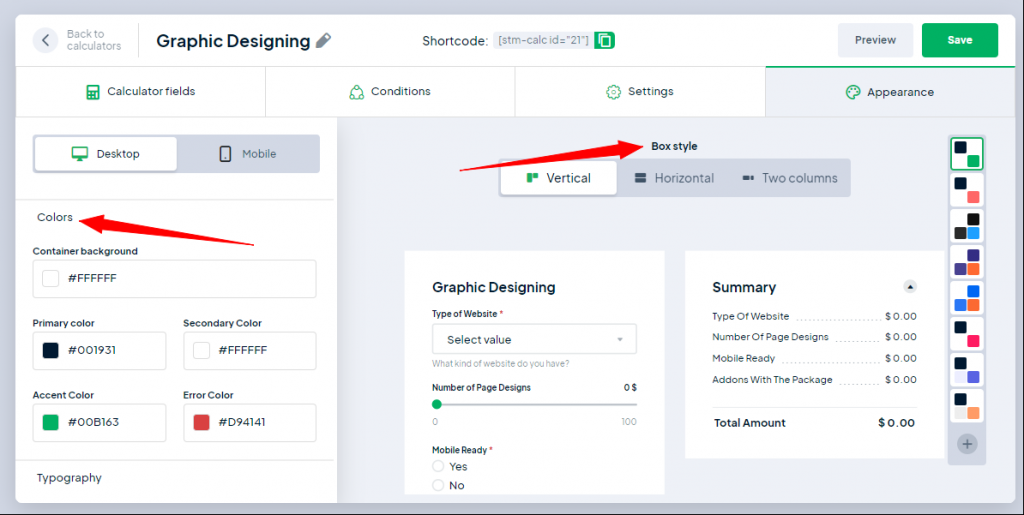
This customization is the icing of the cake so ensure you give it your best. You can match the colors of your calculator with the website colors to form a certain theme.
Conclusion
If you have surfed the internet long enough, you may have noticed that many websites are not interactive enough. This is common for businesses that sell a service or product. Most of them do not provide the users with an easy-to-use platform thus discouraging them from the end goal, which is to buy.
If your website has been one of these, it’s time for a change. Websites that sell a service or a product must equip their platforms with estimation forms that help the customer get an estimation of how much they will spend.
One of the ways you can enhance your website and make it more friendly is by adding a Cost Calculator plugin. From the above, guide you can tell it’s something easy to do that doesn’t need you to hire any developer or coder. You can do it as long as you have a WordPress site.
If you do require any assistance or wish to speed up the plugin customization process, you can always get professional WordPress development services.
The Cost Calculator is free to use, however, you can also get a PRO Version that comes with advanced features like Woo Commerce checkout, payment gateways, date picker, et.c.
This plugin will create a relatively interactive site that enables your customers to use the pricing calculator to complete transactions easily without having to leave the page.
What are you waiting for? Good things come to those who act immediately without wasting time. Get the Cost Calculator today and watch your business change for the better. Share with us your experiences of using this plugin and let us know if it’s working magic for you!