

Accepting payments on your website is essential if you sell products or services online. It makes things easier for both you and your customers.
Without it, you might be stuck manually sending invoices, waiting for bank transfers, or losing potential sales because customers don’t have an easy way to pay.
The good news is that you don’t need a full online store to start accepting payments. With tools like Cost Calculator, you can let customers calculate prices and pay instantly in one place.
In this guide, we’ll show different ways to accept payments on WordPress and how you can do it with Cost Calculator.
Why Accept Payments on Your WordPress Site?
There are many reasons to add a secure payment option to your WordPress site. It presents your company as reliable and you can get more leads with a smooth checkout process.
Let’s look at the advantages of setting up payments on your website:
- Convenience for customers. They can estimate the costs of products or services you offer which they are interested in. It will allow them to pay in the same place.
- Faster transactions. There is no need for additional emails or invoices. You can accept payments in just a few clicks.
- Automated process. Payments are processed instantly which lets you reduce admin work. If you configure payments on your WordPress site it will save you time and money.
- Increased sales. With a secure and efficient checkout process, you can get higher conversions.
You might think that it depends on your company size whether you need to accept payments on your site or not. It is a common misconception that only large businesses require a tool for payment processing.
But, even if you run a small business adding a payment gateway will increase customer satisfaction and sales. Almost any industry that sells products or services online can benefit from accepting payments, including:
- eCommerce stores
- Digital product sellers
- Service providers
- Agencies
- Booking businesses
- Membership sites
- Freelancers
- Nonprofits accepting donations
Beyond convenience, integrating a payment gateway can also improve security by encrypting transactions and protecting customer data. Various payment solutions include fraud detection, automated invoicing, and multi-currency support.
All of them simplify the process of managing global transactions. It is not dependent on whether you’re selling services or physical products. Because a reliable payment system helps build trust and streamlines your business operations.
How to Accept Payments in WordPress
WordPress tools don’t offer you built-in payment features, but you can add them to your business website using plugins. There are several ways to accept payments in WordPress:
1. Using E-Commerce Plugins
Let’s say you sell digital or physical products like handmade candles, an e-commerce plugin like WooCommerce is the best choice for you. WooCommerce lets you create a full online store with product listings, shopping carts, checkout pages, and automated tax calculations. It also supports multiple payment gateways like PayPal, Stripe, and Square so customers pay securely.
2. Adding Payment Gateways to Forms
If you don’t need a completely functional online store but still want to accept payments, a form builder plugin is the perfect solution. You can integrate a payment gateway with tools like Cost Calculator, WPForms, Gravity Forms, and Ninja Forms.
They integrate with PayPal and Stripe, letting users make payments directly through your website. This is great for one-time payments, subscriptions, or donations. For example, a yoga instructor can create a simple registration form with Stripe as the payment option. Students can pay instantly while signing up.
3. Using Calculator Plugins for Custom Pricing
Do you own a business with services and variable pricing? Cost Calculator plugin has the best features for creating interactive calculators. Your users enter specific details when requesting your service or product, and see real-time pricing before making a payment. You can integrate payment gateways like PayPal and Stripe to let customers complete transactions immediately.
A web design agency can use Cost Calculator to let potential clients choose the number of website pages, extra services like SEO, and hosting plans. The total price updates dynamically, and clients can pay instantly without needing to request a custom quote.
For businesses that don’t need a full eCommerce setup, Cost Calculator is one of the easiest solutions. Let’s see how it works.
Accepting Payments with Cost Calculator
Cost Calculator is designed for businesses that want to provide instant price calculations and smoothly accept payments. It’s especially useful for services where pricing depends on different factors, such as:
- Cleaning services: Calculate based on the number of rooms
- Construction projects: Estimate costs based on materials and labor
- Event planning: Prices based on the number of guests and extra services
- Health-related services: Calculate consultation and treatment expenses

How to Set Up Payments in Cost Calculator
Let’s go through a simple guide with 6 steps to start accepting payments in WordPress:
- Install Cost Calculator on your WordPress website. In your WordPress dashboard, go to Plugins > Add New, and search for Cost Calculator. Click on Install and after the installation, activate the plugin.
- Get the Pro version and activate your license key. Payment processing features are available in the Pro version of the plugin, so make sure you have upgraded to Cost Calculator Pro and entered the license key before proceeding.
- Allow Payments in Global Settings. In your admin dashboard, go to Payments in global settings and turn on the ‘Apply for all calculators’ option. If you want different payment methods for different forms, you can set up them individually in each calculator’s settings.
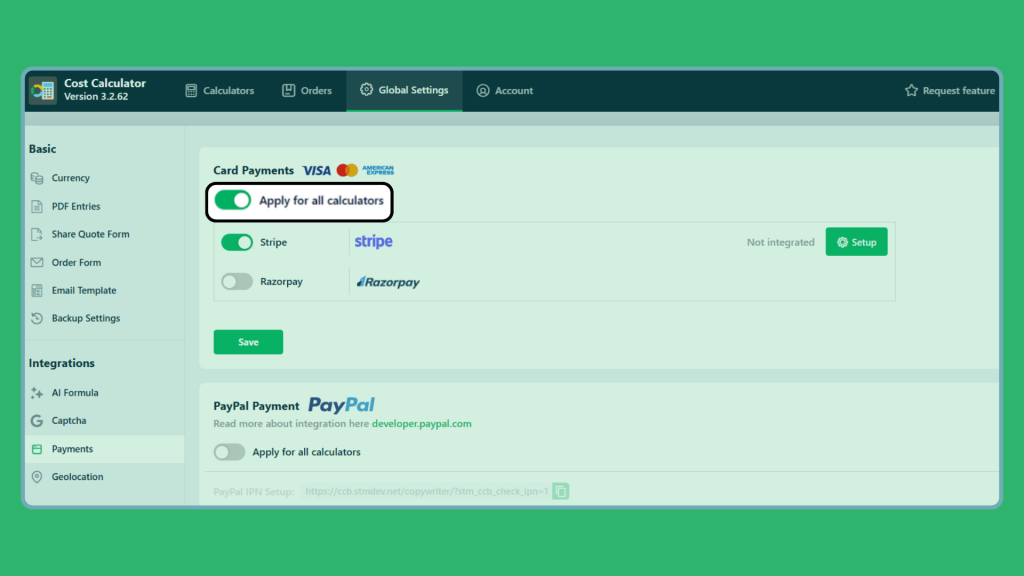

- Connect a payment gateway. Cost Calculator supports the most popular payment methods: PayPal, Stripe, and Razorpay. Select your preferred option and enter the required API keys to connect your account.

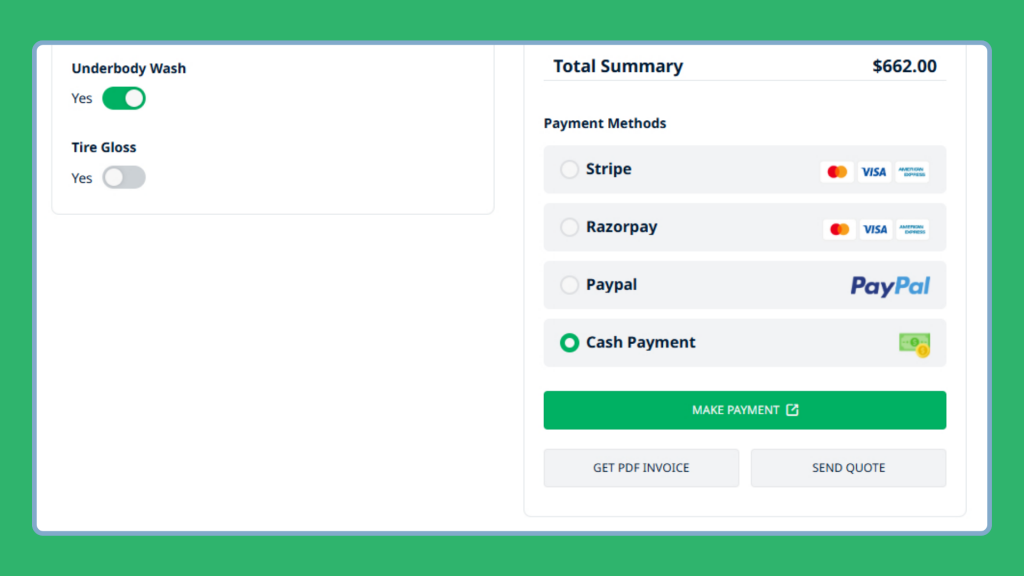
- Create a calculator with a payment form. Design a calculator by adding fields like quantity selectors, checkboxes, or dropdowns and choose a form for payments. Then, include the “Make Payment” button so users can pay after seeing the calculated total.
- Add the calculator to your website. Once the form is ready, embed it on any page as a widget using a shortcode or the block editor. Customers can now calculate their costs and pay instantly.
You can try out the demo of Cost Calculator and explore its top features.
Benefits of Using Cost Calculator for Payments
Unlike other payment solutions in WordPress, Cost Calculator is designed specifically for businesses that provide custom pricing. Why is it the best tool for accepting payments? Here’s why:
- No need for a full eCommerce store. You can accept payments without setting up WooCommerce.
- Instant price calculations. Customers see exactly how much they need to pay before checkout.
- Smooth user experience. Everything happens within a single calculator and a payment form so it’s fast and easy.
Final Thoughts
Accepting payments on your WordPress site is not complicated if you have the right tools. Whether you’re a small business owner, agency, freelancer, or service provider, adding a simple payment option can improve your workflow and boost customer satisfaction.
With Cost Calculator, you can set up custom pricing, real-time calculations, and secure payments. Everything you need for successful payment processing is included in one tool.
Try it now and make online payments easier for your business!